3.3 iDisk Public Folders
| < Day Day Up > |
| One of the great things about having an iDisk is its Public folder. The Public folder is a place where you can store files that you want to share with other people or that other people want to share with you. This section shows you how to configure the settings for your Public folder, and also how to connect to other .Mac members ' Public folders. You'll also learn a bit more about how to tell whether someone has added password-protection to their Public folder. 3.3.1 Configuring Your iDisk's Public FolderAs mentioned earlier, all iDisk Public folders can have their permissions set to one of two options:
If you want to change your Public folder's permissions to read-write so other people can save files there, go to System Preferences Figure 3-8. To allow others to upload files to your iDisk's Public folder, simply click on the radio button next to Read & Write.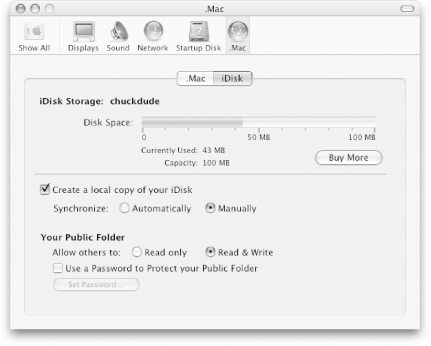 You can also assign a password to control access to your Public folder by clicking on the Set Password button near the bottom of this window. When you do, a sheet slides out at the top of the window, in which you can assign a password (as shown in Figure 3-9). The password you choose must be between 6-8 alphanumeric characters . Figure 3-9. Assigning a password to your iDisk's Public folder.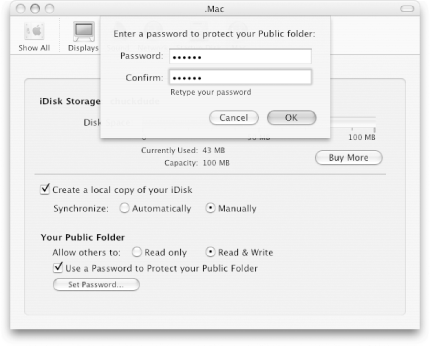
If you plan to enable Read & Write access privileges, you should assign a password to protect your Public folder. If you don't password-protect your Public folder, any malcontent could come along and drop files into it, quickly taking up precious space on your iDisk. The first rule of thumb should be: protect yourself. You can also enable password-protection for your iDisk's Public folder if it's "Read only". While that may seem a little extreme, since nobody will be able to write files there, it does protect prying eyes from viewing and downloading your Public folder's contents unless they have the proper password. 3.3.2 Connecting to Public FoldersDepending on your situation, there may come a time when you'll want or need to connect to another .Mac member's Public folder. This section shows you the various ways you can make the same connection from Mac OS X, including:
Since the iDisk Utility is covered later in the chapter, we'll just cover the first two ways in the subsections that follow.
3.3.2.1 From the Address BookTo connect to another .Mac member's iDisk from the Address Book, follow these steps:
Figure 3-10. Connecting to another .Mac member's iDisk from their Address Book record.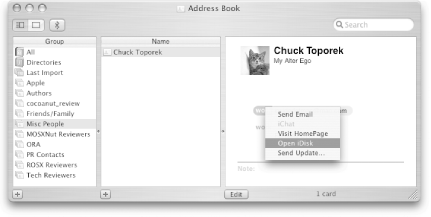 After selecting the Open iDisk option, the .Mac member's Public folder will mount on your Desktop and a Finder window will open, revealing its contents. 3.3.2.2 From the Go menuThere are two ways you can connect to another .Mac member's Public folder from the Go menu:
When you select Go Figure 3-11. Connecting to a .Mac member's Public folder from the Go menu.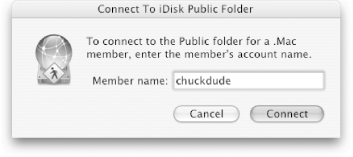 Simply type in the .Mac member name for the person whose Public folder you need access to, and then click on the Connect button. If the Public folder isn't password-protected, it will mount on your Desktop, and a Finder window will pop open revealing its contents. However, if the Public folder is password-protected, you will be challenged for a password, as shown in Figure 3-12. Figure 3-12. If a Public folder is password-protected, you'll be challenged for a password.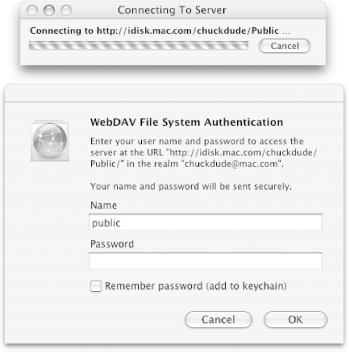 If you will be connecting to this user's Public folder regularly, you should click on the checkbox next to "Remember password (add to keychain)" so the next time you need to connect, the iDisk Public folder will automatically mount on your system without challenging you for a password. Using the Go menu is the easiest way to mount another user's iDisk or iDisk Public folder, but it's not the only way. You can also select Connect to Server ( Figure 3-13. Using the Connect to Server window to connect to a .Mac member's Public folder.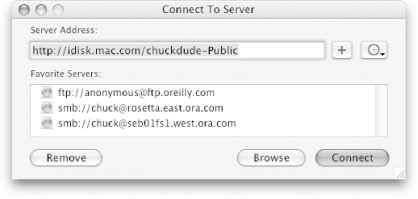
If the .Mac member's Public folder is password-protected, the window shown in Figure 3-11 will pop up. Enter the proper password to mount the Public folder and don't forget to select the checkbox next to "Remember password (add to keychain)" so you'll never have to enter the password again. 3.3.3 Public Folders and PermissionsOnce you've mounted a Public folder, you'll see them pop up in the Finder and on your Desktop. We all know by now that Public folders are read-only by default, but there's an easy way to tell for sure once they're mounted. The first way is by just looking at the Public folder's icon on your Desktop. Most Public folders have a yellow sign attached to them, which looks like the pedestrian crosswalk signs here in the States. However, if you look closely at Figure 3-14, you'll see some Public folders that are missing the crosswalk sign. Figure 3-14. Look closely at the Public folder's icon to see whether it is read-only or read-write. The Public folders with the yellow crosswalk symbol attached to them are read-only, and the ones without are read-write. The way to confirm this is to select one of the Public folders in the Finder's Sidebar. If you look at the bottom of the Finder window, you'll see a little pencil symbol that's crossed out, as shown in Figure 3-15. Figure 3-15. If you see a crossed-out pencil at the lower-left corner the Finder window, you cannot save files to this Public folder.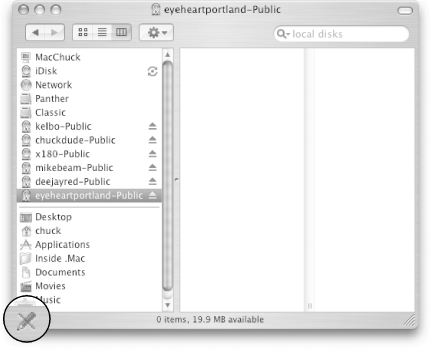 This is yet another queue to let you know that the Public folder is read-only. |
 .Mac
.Mac 
| < Day Day Up > |