| The iTunes preferences allow you to adjust a number of settings. From the iTunes menu, choose "Preferences…." General preferences Click the General button to see the General preferences. Source Text and Song Text: Choose to use "Small" or "Large" text in the Source pane and in the Detail window (the large pane of songs). The actual size difference between "Large" and "Small" is not dramatic. Show Party Shuffle or Radio: Select these to show them in the Source pane. Show genre when browsing: This option can be helpful when using the Browse feature (page 79) to search through a large collection of music files. It adds a "Genre" column to the "Artist" and "Album" columns that become visible when you click the "Browse" button. Group compilations when browsing: This creates an item in the "Artist" column of the Browser (see page 79) named "Compilations" (see page 94). Click on "Compilations" to see a list of albums (in the "Album" column) that contain songs marked as compilations. | A compilation is a collection of songs that you choose to group together. |
| To make any song part of a compilation, select the song, then press Command-I to open the Song Information window. Click the "Info" button, then click "Part of a compilation." |
Show links to Music Store: This option makes the Quick Link buttons show in iTunes' Source pane and Detail window. Quick Links are shortcuts to that song's page on the iTunes Music Store site. 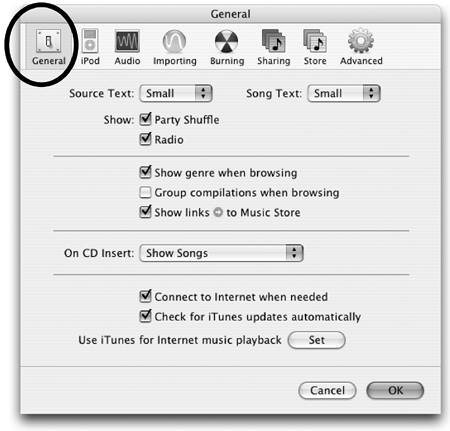
See pages 126-127 for iPod preferences. 
| In the Browser, the song will appear in "Compilations" under its album name. |
On CD Insert: This pop-up menu offers options for what happens when you insert a CD. Choose one of these options: Show Songs displays the music titles, artist, and album information, but will not play music until you double-click a song. If you haven't retrieved the CD track names from the Internet, only the CD track numbers and times will show. Begin Playing automatically starts playing a CD when it's inserted. Import Songs automatically begins importing songs and placing them in iTunes' Library when a CD is inserted. Import Songs and Eject does the same thing as above, then automatically ejects the CD when complete.
Connect to Internet when needed: This option enables iTunes to connect to the Internet whenever you insert a CD so it can retrieve song titles and other information from CDDB, an Internet database of CD albums. iTunes also connects to the Internet when you select "Radio" or "Music Store" in the Source pane. And whenever you click a Quick Link button (a white arrow in a gray circle), iTunes connects to the iTunes Music Store. If you have a modem connection instead of a broadband Internet connection, you may prefer to uncheck this item to avoid having your modem dial up at unwanted times. If you choose to uncheck this option, you can manually retrieve CD titles whenever you like: Connect to the Internet, then from the "Advanced" menu in the menu bar, choose "Get CD Track Names." Check for iTunes updates automatically: This option checks Apple's web site for you to see if software updates are available for iTunes. Use iTunes for Internet music playback: This option sets iTunes as your default multi-media audio player when you download an audio file or click an audio file link on the web.
Audio preferences Click the Audio button to change how your music plays. Check the Crossfade playback checkbox to fade music smoothly between songs without a long gap of silence. This effect is one of our favorites. The slider adjusts the amount of time it takes to fade out of one song and to fade in to the next song. Move the slider all the way to the right for the smoothest transition with the least silence between songs. Check the Sound Enhancer box to add depth and liven the quality of the music. The slider increases or decreases the effect, which is subtle but noticeable. Check the Sound Check box to make all songs play at the same volume level. Leave the "Sound Check" box unchecked if you want to vary the volume level of different songs using the volume control in the iTunes window. When you burn a CD, these effects do not carry over to the CD. 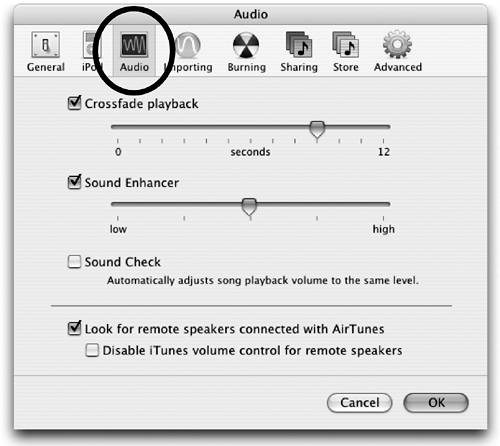
Select Look for remote speakers connected with AirTunes if you have an AirPort Express connected to remote speakers. AirPort Express is a small device you plug into the wall, then connect it to powered speakers. AirTunes is the technology that lets iTunes stream music wirelessly to the remote speakers through the AirPort Express. When an AirPort Express device is plugged into a power outlet within wireless range of your computer, iTunes detects it and adds a pop-up menu to the iTunes window from which you can select the connected remote speakers. 
Select Disable iTunes volume control for remote speakers if you want to control the volume of remote speakers from the remote speakers, instead of using the iTunes volume control on your computer. This can be very useful when the remote speakers are in a different room from your computer.
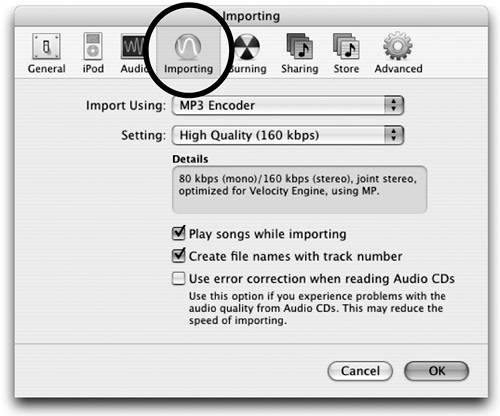
Importing preferences Click the Importing button to set encoding and configuration preferences. | If you have a version of QuickTime installed that's older than version 6.2, songs are by default imported in the MP3 format instead of the AAC format. |
Import Using lets you choose which encoder will be used to import music files: AAC Encoder, AIFF Encoder, Apple Lossless Encoder, MP3 Encoder, or WAV Encoder (these file formats are described on page 73). The default setting of AAC is ideal for listening to and storing music on your computer because it combines maximum compression (smaller file sizes) and good sound quality. Setting is a quality setting. For most users it's best to leave "Setting" on its default settings. You can listen to a song as it's being ripped (encoded) by checking the Play songs while importing option. Encoding is very fast, usually four to ten times faster than the music plays if you have a newer system. The encoding of a song finishes well before the music has finished playing. Check Create file names with track number to force imported songs to be stored in your Music folder in the same order they appear on the CD. Check Use error correction when reading Audio CDs if you're having problems with CD audio quality. Error correction slows the importing process, but may be helpful.
Burning preferences Click the Burning button to set preferences for burning discs. Preferred Speed: Set the speed at which your CD burner will burn CDs. The default setting of "Maximum Possible" lets iTunes adjust to the speed of your hardware. If you have problems, try setting "Preferred Speed" to a low number. Disc Format: Choose a disc format for burning CDs. Audio CD uses the standard CD-DA format common to all commercial CD players. You can store approximately 75 minutes of music on a CD using this format. Gap Between Songs lets you set the amount of silence you want between songs. Use Sound Check creates a consistent volume for all songs. MP3 CD format can store over 12 hours of music, but can only be played on computers and some special consumer CD players. If you want to archive MP3 music files on CDs for backup choose "MP3 CD" for the most efficient storage solution. Data CD or DVD formatted discs include all files in a playlist, but may not work in many players. Use this option to make a backup of your music.
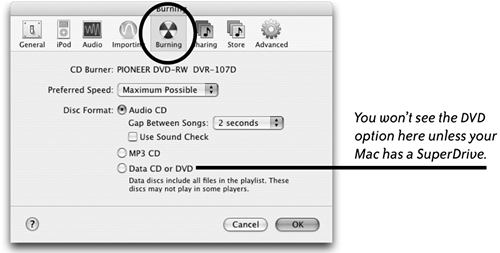 You can burn music CDs using either CD-RW discs or CD-R discs. CD-RW (CD-ReWritable) discs will play in your computer, but most stereos and commercial CD players don't recognize them. CD-R (CD-Recordable) discs can play on computers and most CD players.
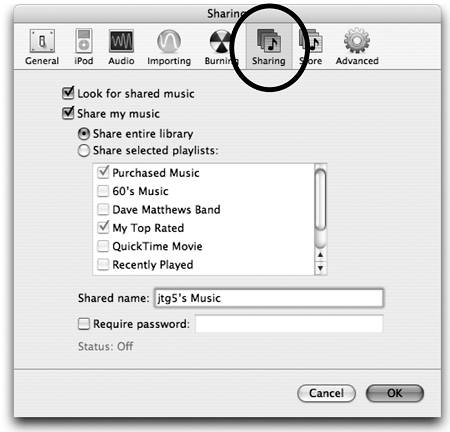
Discs must be blank to record music on them. You can erase a CD-RW disc and then use it to burn a music CD. A CD-R disc cannot be erased, and it cannot be used if it already has files on it. Sharing preferences The Sharing pane is where you enable iTunes to share music with others on a local network. Instead of copying music from another computer on your network, you can have it stream to you (see page 94). Look for shared music: Check this box and your computer will look for other Macs on the local network that have music sharing enabled. Share my music: Select this option to make your iTunes Library or individual playlists available to others on the network. With this option selected, choose to Share entire library or Share selected playlists. If you choose to share selected playlists, put a checkmark next to one or more of your playlists that are shown in the scrolling window pane. Shared name: Type a name to identify your shared music collection when it appears in another user's iTunes Source pane. Require password: If you want to limit access to your shared music collection, select this option. Type a password in the text field, then give the password to certain people. When anyone tries to access the playlist by clicking the shared playlist icon in their Source pane (as shown on page 94), they'll be asked for the password. Status: This line of text reports how many users on the local network are connected to your shared playlist.
Store preferences The Store preferences pane lets you choose how you want to shop at the iTunes Music Store, along with several other options. Show iTunes Music Store: Put a checkmark in this box to show the "Music Store" icon in the Source pane. If you uncheck this box, the "Music Store" icon disappears from the Source pane, and all Quick Link buttons disappear from the Source pane and the Detail window. Buy and download using 1-Click: If you have an Apple Account, when you click a song's "Buy" button in the Music Store the song is purchased and downloaded immediately. Very easy and convenient. Buy using a Shopping Cart: This selection puts a "Shopping Cart" icon in the Source pane, under the "Music Store" icon. All "Buy Now" buttons in the Music Store change to "Add" buttons. When you click a song's "Add" button, the song is added to the shopping cart until you're ready to buy. Then you can click "Buy Song" to purchase a single song in the shopping cart, or click "Buy Now" to purchase all items in the shopping cart. A shopping cart is useful for collecting songs you want to consider buying or for reviewing songs that your children have selected. Play songs after downloading: If you want a song to automatically play as soon as it's downloaded, click this box. Load complete preview before playing: If a slow Internet connection causes the streaming previews in the Music Store to stutter and stop, click this box to ensure a full-quality song preview. iTunes will download the complete preview stream before playing it.

Advanced preferences The Advanced button has settings to designate a location for storing your music files, as well as options for burning CDs. iTunes Music folder location: Music files created by iTunes are automatically stored on your startup hard disk. Specifically, they are stored in a folder called "iTunes Music," which is in a folder called "iTunes," which is in your "Music" folder. This folder contains all of the music files you've encoded. You can change this default location to any location you choose: Click the "Change…" button and choose another folder or hard disk. Every individual user account has her own "iTunes" folder inside the home "Music" folder. Streaming Buffer Size: Refers to the Radio Tuner and the Music Store preview songs. The buffer size determines how much streaming data is cached (temporarily stored) on your hard disk when you listen to an Internet radio stream or play a preview. The buffer is like padding that compensates for connection problems that would affect the quality of a direct stream. If you've determined that your connection to the Internet is low-quality, change this setting from "Medium" to "Large." A large buffer gives iTunes more downloaded streaming data to use for compensation as it deals with slow or faulty connections. Shuffle by: Shuffle the playing order of songs by Song or Album. Keep iTunes Music folder organized: This places song files into album and artist folders (in the iTunes Music folder), and names the files based on the disc number, track number, and song title. Copy files to iTunes Music folder when adding to library: Puts a copy of a song in the iTunes folder if you import songs from other locations on your computer. The original song remains in its original location. This is similar to the "Consolidate Library" command in the Advanced menu, which puts a copy of all songs in your Library when the original is located somewhere else on your computer. 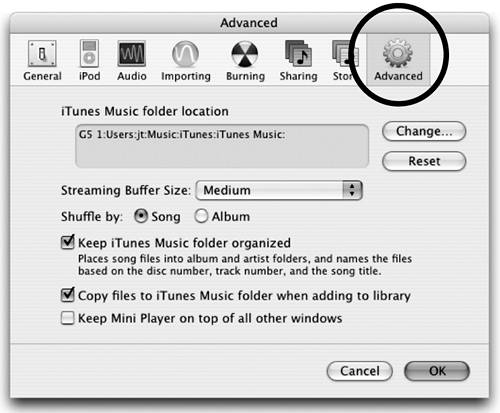
When you click the green Zoom button in the top-left corner of the iTunes window, the window minimizes to a small, space-saving Mini Player. Select Keep Mini Player on top of all other windows to always keep the Mini Player visible and on top of other windows.
|


