3.2 Installing the Net8 Client Software The easiest way to set up a client to use Oracle over Net8 is to insert the Oracle software CD-ROM, run Oracle's Universal Installer, select Oracle8 i Client as the product to install, and accept the option of doing a Typical Install . You'll get the Net8 client software along with other client products such as the ODBC drivers, SQL*Plus, and the database utilities (Export, Import, and SQL*Loader). To install just Net8, without all the other client software, you need to do a Custom Install . Select only the Net8 Client option, as shown in Figure 3.2. Figure 3.2. Installing the Net8 client software 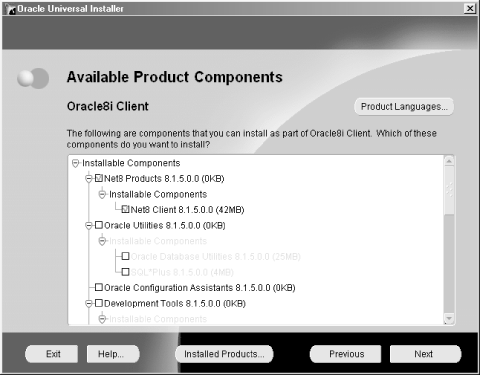 Before you actually install Net8 on a client, you need to make sure that you have properly configured your client for the network protocols that you plan to use. 3.2.1 Automatic Protocol Detection When you install Net8 client software, Oracle's installer checks your machine to determine which networking protocols you are using. If your client is running Windows, the installer checks for the following: After the installer detects the protocols that are present, the screen shown in Figure 3.3 appears, prompting you to select and confirm the protocols that you want Net8 to support. Figure 3.3. Choosing the protocols to support with Net8 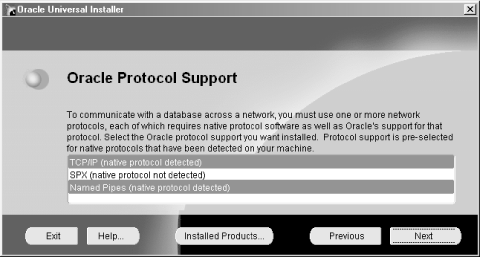 The screen shown in Figure 3.3 indicates that adaptors will be installed allowing you to run Net8 over TCP/IP and Named Pipes which are the two protocols that Oracle detected . You can shift-click other protocols to add them to the list, or you can shift-click a highlighted protocol in order to deselect it. If you know that you are going to use Net8 over a protocol that you don't have installed yet, you should highlight that protocol on the Oracle Protocol Support screen. That way, the Net8 protocol adaptors will be installed for that protocol. Later, you can install support for the protocol itself, and you'll be all set. The rub with automatic detection is that if you do not have any network support installed on your machine, auto detection won't work, and you will never see the screen shown in Figure 3.3. Net8 will be installed, but you won't get any protocol adapters with it. You will be able to define a Net8 service, but when you try to use it to connect to a database, you will get an error such as the following: ORA-12538: no such protocol adaptor error. This error tells you that there is no Net8 protocol adaptor for the network protocol that you are attempting to use. Even if you subsequently install support for that protocol at the operating-system level, you still won't have the correct Net8 adaptor. If you run into this situation, you'll need to reinstall Net8. Your new protocol will be detected, and the proper Net8 protocol adaptor will be installed. 3.2.2 Network Configuration Under Windows Net8 supports a wide variety of client operating systems, but Windows clients are arguably the most common. This section shows you how to verify that you have the correct networking components installed. The information presented here is not comprehensive. If you run into problems configuring your network under Windows, seek out a knowledgeable Windows system administrator. To verify the network protocols installed on a Windows system, go to the Network control panel applet (Start  Settings Control Panel Network). You should see a screen that looks like the one shown in Figure 3.4. Settings Control Panel Network). You should see a screen that looks like the one shown in Figure 3.4. Figure 3.4. The Windows Network control panel applet 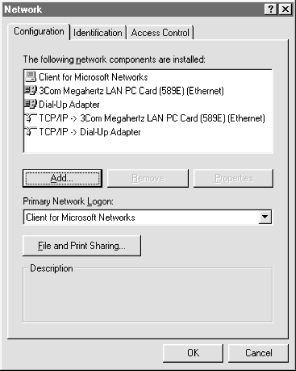 The list in the Configuration tab should show that you have a network interface card (NIC) installed, and it should show the protocols over which you intend to run Net8. In other words, if you intend to run Net8 over TCP/IP, you should see the TCP/IP protocol in the list. If you don't see the desired protocol when you open the Network control panel applet, you can add it. Be sure to have your Windows distribution CD handy, and click the Add button. A dialog opens asking you which type of network component you want to install. Click the word "Protocol" in the list to highlight it, and click the Add button again. You can then select the protocol to be added in the dialog that appears next . For example, if you were planning to run Net8 over TCP/IP, you would select Microsoft's TCP/IP protocol. Figure 3.5 shows this being done. Figure 3.5. Adding the Microsoft TCP/IP protocol 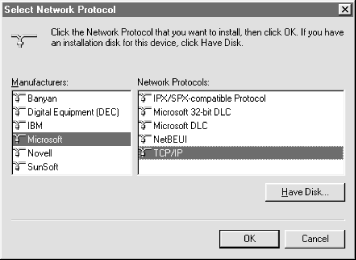 Once you've selected the protocol to add, click the OK button to close the dialog. You may need to configure the protocol at this point. TCP/IP won't work without an IP address. If your network doesn't supply IP addresses automatically, you'll need to set a static IP address by highlighting the protocol and clicking the Properties button. In the TCP/IP properties dialog that opens, click the IP Address tab. Either specify an IP address or check the box to obtain one automatically. You may also need to go to the Gateway tab to define a gateway address. Consult your network administrator for configuration details if you are not certain of them yourself. When you are done, click the OK button to close the Properties dialog. It's been our experience that neither IPX/SPX or Named Pipes require any properties to be set. When you've finished installing and configuring your required protocols, click the OK button to close the Network control panel applet. Windows may ask you for your distribution CD so that it can copy the files needed to support the new configuration. Be sure to have it ready. After that, you will be prompted to restart the machine, which you must do before any new protocols can be used. If you aren't certain what protocols to install, or which one you want to use for Net8, you should confer with your network administrator and decide. Net8 must run over one of the protocols that Oracle supports. TCP/IP is most often used, but other choices are available. It's up to you to decide which to use. Using Windows? Turn Off Autodial If you have Windows Dial-up Networking installed, you may find that an attempt to make a Net8 connection causes a Dial-up Connection dialog to open. This happens when you have Internet Explorer set to automatically dial your service provider whenever you invoke your browser. If you're using Net8, you may want to disable that feature. To disable autodial, right-click your Internet Explorer icon, and select Properties from the pop-up menu. Then click the Connections tab in the Internet Explorer Properties dialog. Around the middle of the dialog, you should see a radio button titled "Never dial a connection." Make sure you have that radio button checked, and then click the OK button. Disabling autodial prevents Net8 from invoking the Dial-up Networking dialer. The tradeoff is that you must now manually initiate your Dial-up Networking connections. | 3.2.3 Net8 Configuration Assistant Oracle's installer will automatically invoke the Net8 Configuration Assistant after any install that includes the Net8 client software. The Net8 Configuration Assistant uses a wizard-like interface to walk you through the process of configuring your Net8 profile and defining your net service names . If you've done a typical client install, you may find that Net8 Easy Config gets invoked as well. You can use Net8 Configuration Assistant and Net8 Easy Config to configure your Net8 client software immediately upon installing it, or you can cancel out of these assistants and do the configuration later. If you put off the configuration until later, you can choose to edit your configuration files by hand, edit your configuration using the Net8 Assistant (a very well-done utility in our opinion), or copy a set of standard Net8 configuration files to your client. As an alternative, you can choose to rerun the Net8 Configuration Assistant. If you're not sure what information to enter in response to the Net8 Configuration Assistant's prompts, you should cancel out of that program and read the remainder of this chapter. You can configure Net8 later, after you've developed an understanding of what needs to be done. 3.2.4 What Software Is Installed? Much of what you get when you install Net8 client software is in the form of shared libraries. Under Windows, these will be dynamic link library (DLL) files. Under the various forms of Unix, these will be .so files. These shared libraries are what make Net8 work. They are used by all client programs that need to connect to an Oracle database. In addition to the shared libraries, a few executable programs are also installed. These programs, listed in Table 3.1, are used to configure and debug Net8. Table 3.1. Net8 Executables | Program Name | Executable Name [1] | Description | | Net8 Assistant | netasst | A GUI interface that you can use to maintain Net8 configuration files such as sqlnet.ora , tnsnames.ora , listener.ora , and names.ora . | | Net8 Configuration Assistant | netca | A wizard-like interface used to initially configure Net8. This is similar to Net8 Assistant, but the screens are more process-oriented . | | Net8 Easy Config | netec | A wizard-like interface used to define new net service names. Essentially, this program provides an alternative to manually editing your tnsnames.ora file. Net8 Easy Config is now considered a deprecated feature in favor of Net8 Assistant. | | TNS Ping | tnsping | A program similar to the TCP/IP ping utility that tests connectivity between a client and a Net8 listener. tnsping is a command-line executable. | | Oracle Directory Manager | oidadmin | A GUI interface you can use to manage entries, including net service names, in the Oracle Internet Directory. This executable is part of Oracle's Internet Directory product and is located in the $ORACLE_HOME /ldap directory. | [1] Oracle8 i 8.1.5 and higher The first three executables named in Table 3.1 will only exist on Linux and Unix machines, and they are located in the $ORACLE_HOME/bin directory. Under Windows, these are all .cl files, and they are invoked using an executable named launch.exe . For example: E:\Oracle\Ora81\BIN\launch.exe "E:\Oracle\Ora81\network\tools" netasst.cl The launch.exe executable resides in the Oracle bin directory, and the .cl files reside in the network\tools directory. The directory containing the .cl file should always be the default directory (or the Start in directory) whenever one of these programs is invoked. The installer automatically creates appropriate Start menu entries for these utilities. The Windows program group containing the icons you use to invoke the various Net8 utilities is named Network Administration. It's found under the program group corresponding to your Oracle home. Figure 3.6 shows the complete path from the Start Programs menu to the Network Administration program group. Figure 3.6. The Network Administration program group 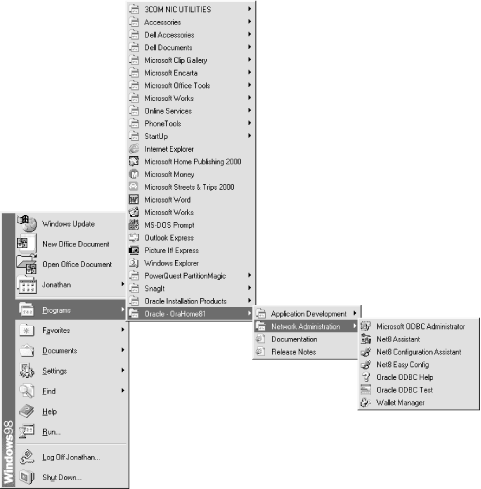 As you can see from Figure 3.6, if you install Oracle's ODBC support, the icons related to that also go in the Network Administration program group.  |