The importing options you can set in iTunes also determine the default destination format for when you convert audio files from other formats, as shown in  Convert Audio Files to Other Formats.
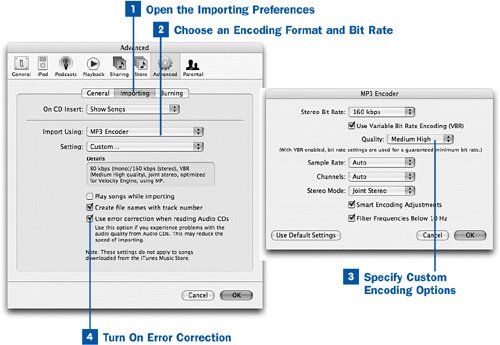
 Open the Importing Preferences
Open the iTunes Preferences window. (Choose Edit, Preferences in Windows or iTunes, Preferences on the Mac.) Click the Advanced tab, and then click the Importing subtab.
 Choose an Encoding Format and Bit Rate
From the Import Using drop-down list, choose an audio file format (an "encoder"). You might choose the MP3 Encoder to create MP3 files you can burn onto a data CD that will play in the car or on a portable MP3 CD player. (See  Create an MP3 CD.) You might select the AIFF or WAV Encoder option to create uncompressed audio streams converted directly from the raw CDDA data, without file-size reduction, for use in high-quality sound editing. Or you might opt for the Apple Lossless Encoder, which creates files about half the size of the original CDDA music, but with the same dynamic range and clarity (worthwhile if you're a hard-core audiophile).
Note
The iPod shuffle doesn't support the Apple Lossless or AIFF formats.
From the Setting drop-down menu, choose one of the available bit rates. The MP3 Encoder option, for example, has three different encoding quality settings from which you can choose. Most of the other formats have only a default Automatic setting and some Custom options you can tweak if you're an expert.
Tip
If you're importing a spoken-word album (such as an audiobook or a comedy show), the default AAC Encoder option has a setting called Spoken Podcast that is specially tuned for exactly that kind of audio stream, with voice filtering technology that ensures high-fidelity voice reproduction with a minimal file size footprint. This setting is particularly helpful if you're using iTunes to encode a podcast that you're creating; be sure, however, to switch back to High Quality (128 kbps) if you want to import regular music CDs again!
 Specify Custom Encoding Options
Choose the Custom option from the Setting menu. This option is most useful if you've selected the MP3 Encoder option from the Import Using menu; the Custom setting opens a secondary dialog box that allows you to adjust many of the parameters of the MP3 encoding policy. For instance, you can enable Variable Bit Rate (VBR) encoding, a popular technique that saves file size by reducing the bit rate in regions of the song that don't require as much sound resolution. You can also adjust the sample rate and number of channels, as you can with other encoding formats. Other options, such as Smart Encoding Adjustments and Filter Frequencies Below 10 Hz, are likely to be useful to experts only.
If necessary, click the Use Default Settings button to return to the default behaviors for the encoding format. Then click OK to return to the Importing Preferences window.
 Turn On Error Correction
Back in the Importing Preferences window, enable the Use error correction when reading Audio CDs check box to ensure that imported CD music is subjected to several levels of checking as it's being copied and encoded. This option slows down the importing process, but on a fast computer such as a Pentium IV or a Power Mac G5 (or a PC or Mac using the Intel Core chip), you likely won't even notice.
Click OK when you're done adjusting the settings. When you import CD music in the future, the music will be saved according to these settings.
 Before You Begin
 See Also