These days, the mix CD is starting to fall from favor as the preeminent way to create discs of your digital music. Without an inherent way to identify the track names or artists, and with the capacity to hold only about 75 minutes of music when you use uncompressed CDDA audio format, you're stuck with burning dozens of discs if you want enough to keep you entertained on a long road trip.
The music on an MP3 CD will sound just as good as any mix CD you create from songs in iTunes because those songs are compressed to begin with; uncompressing them to burn them to a disc doesn't increase their sound quality in comparison to how they sounded on the original source discs. Fortunately, it's difficult to tell the difference unless you're a real hard-core audiophile.
iTunes does not convert tracks to MP3 format on the fly as it burns, so you can create an MP3 CD only from tracks that are already in MP3 format. If you plan to burn a lot of MP3 CDs, consider importing your CDs' music in MP3 format instead of in AAC format (which you can't burn directly to an MP3 CD). See  Customize Importing Options for details or
  Create an MP3 CD from Purchased AAC Music for instructions on how to create an MP3 CD using existing music in formats other than MP3.
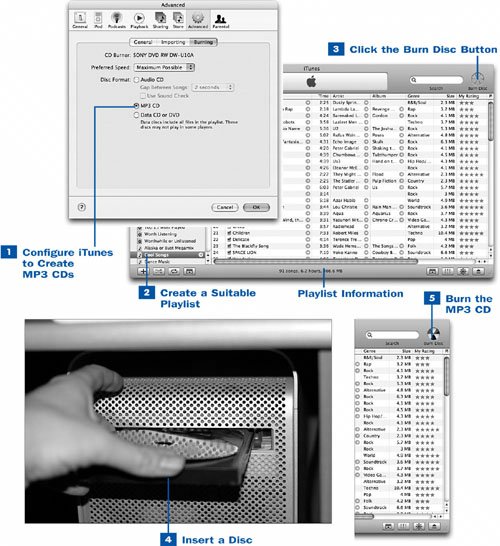
 Configure iTunes to Create MP3 CDs
Before you can burn an MP3 disc, you must set up iTunes' Preferences to do so as the default burning behavior. As described in  Customize CD Burning Options, set the Disc Format option on the Burning subtab of the Advanced tab of the iTunes Preferences window to MP3 CD. Click OK. Each disc you create from now on will be an MP3 CD, until you go back into the Preferences window and change the Disc Format back to Audio CD.
 Create a Suitable Playlist
Make a playlist containing the songs you want on the disc. As discussed in  Create a Playlist, navigate into the Library and drag songs from it into the playlist, keeping in mind that typical CD-R discs can hold up to 650 or 700MB of music data (depending on the type of disc; the disc packaging will note the exact capacity). Use the statistics shown at the bottom of the iTunes window to determine how large (in megabytes) your playlist will be. (For MP3 CDs, the total file size of the playlist is a more important consideration than the playback duration, which you used in
  Create an Audio CD from a Playlist.)
Note
If you create a playlist that's larger than the capacity of the disc, iTunes presents a warning at the time you burn the disc, telling you that it will burn only a portion of the playlist. You can choose to burn as much of the playlist as will fit on a single disc or cancel the operation so that you can reduce the playlist's size yourself. iTunes won't burn a playlist to multiple MP3 CDs because Apple figures that 12 hours of listening time should be enough for any playlist you've constructed.
The playlist name becomes the volume name for the burned disc. Be sure to use a short, simple name (15 characters or less) that doesn't contain special characters, because the standard ISO 9660 CD-ROM format that iTunes creates doesn't support long or complex volume names.
To skip burning certain songs in the playlist, disable the check boxes next to the song names in the list.
Note
An MP3 CD can contain only MP3 files, so tracks in the playlist that are not in MP3 format become grayed out and their check boxes are disabled during the burn.
 Click the Burn Disc Button
When you're viewing the playlist, the Browse button in the top-right corner of the iTunes window becomes a Burn Disc button; click it to begin the creation of the new disc.
 Insert a Disc
In the display pane at the top of the window, iTunes prompts you to insert a blank disc and tells you the total burned capacity and playing time of the selected playlist. (This can differ from the reported length of the playlist at the bottom of the iTunes window if you disabled any of the songs' check boxes.) If your computer has a CD tray, it is automatically ejected so that you can insert the disc. Otherwise, insert the disc into the drive slot until the drive pulls it in.
Note
You can use a burnable DVD (DVD-R, DVD-RW, DVD+RW) disc instead of a CD in this task to create a data disc with up to 4.7GB of music files on it; however, be aware that hardly any players on the market will be able to read it. (It won't play in a car stereo, even if your car player supports MP3 CDs.) You can only use an MP3 DVD in computers. DVDs are great for backup purposes, however. See  Back Up Your Music to CD or DVD for more information.
When you insert the disc, iTunes recognizes the blank media and automatically changes the message in the display oval to a prompt telling you to click the Burn Disc button again (it is now throbbing gently) to begin burning the playlist to the disc.
Note
If iTunes can't burn one or more tracks in the playlist to a disc (for example, if they're video files or items from the iTunes Music Store that have been barred from being burned by users), it pops up a dialog box giving you information on all tracks that have problems. Click OK to proceed without burning the problematic tracks.
If you don't click Burn Disc within about 10 seconds, iTunes cancels the operation and ejects the disc.
 Burn the MP3 CD
Click the Burn Disc button for the second time to begin the burn process. When the process is complete, the MP3 CD appears in the Source pane in the iTunes window to show the tracks you've just burned.
Eject the disc from your computer. It's formatted as a data CD-ROM (with a volume name equal to the name of the playlist) that you can mount in any PC or Mac and play in any CD player that is capable of reading MP3 CDs.
 Before You Begin
 See Also