Installing and Configuring Samba
| Samba is available in the ports at /usr/ports/net/samba3 (or samba for the unsupported legacy version that lacks some of the newer Windows interoperability features) or in the packages. Refer to Chapter 16, "Installing Additional Software," for details on how to install a package or port. After you have installed the Samba package, a variety of new items will be installed, including daemon executables (in /usr/local/sbin), administrative tools (in /usr/local/bin), documentation and examples (in /usr/local/share), and configuration files that go into /usr/local/etc. Some of the possible config files don't exist in the default installation; you have to create them from scratch if you want to take advantage of their functionality. There are also code pages (in /usr/local/etc/codepages) that map Windows character sets to UNIX ones. The only configuration file that exists in the package is smb.conf.default, which you must rename to smb.conf for it to work. Similarly, the /usr/local/etc/rc.d/samba.sh.sample startup script must be renamed to samba.sh. For the very easiest way to get Samba running, you only need to edit smb.conf and modify the workgroup line to reflect the workgroup or domain of which your machine is a part: # workgroup = NT-Domain-Name or Workgroup-Name, eg: REDHAT4 workgroup = MYGROUPSamba will now start automatically when the system boots. To start it manually, run the samba.sh script with the start parameter: # /usr/local/etc/rc.d/samba.sh start Samba#Note There is no line break in the script output after the service name Samba. This cosmetic flaw exists because during startup, each service in /usr/local/etc/rc.d is started sequentially, and the echoed output of each startup script goes onto the same line. The smbd and nmbd DaemonsIf the samba.sh script runs successfully, you will notice two new processes runningsmbd and nmbdas shown here: # ps -wwaux | grep mbd root 3855 0.0 1.5 2368 1816 ?? Is 2:43PM 0:00.00 /usr/local/sbin/smbd -D root 3857 0.0 1.2 1940 1496 ?? Ss 2:43PM 0:00.02 /usr/local/sbin/nmbd -DThe smbd daemon is the actual data server, the process that handles SMB/CIFS requests from connected Windows clientsfile transfers, print jobs, listings, and so on. Unlike NFS, SMB doesn't require a separate process to be running for each simultaneous connection; the master smbd process forks off a new copy of itself for each new client session and handles all that client's requests for the duration of the session. The -D option specifies that smbd should operate as a standalone daemon, listening for requests on TCP port 139. Operating in parallel with smbd is nmbd, the NetBIOS name server. It's the process that allows Windows clients to see the FreeBSD machine in the network browser view, as you saw in Figure 34.1. It also has the job of responding to client requests for a particular NetBIOS host if it's specified by name; if a Windows client uses the \\name syntax to connect to a particular server by name, the client sends out a broadcast name request asking for the IP address of the server with that NetBIOS name. It's the job of nmbd to send back a response with the requested host's IP address so that the client can open an SMB session directly to the server. It's somewhat like DNS (in that it maps a common name to a direct address), and it also has a lot in common with ARP (in that it operates on a LAN through broadcast name requests, rather than to a designated central name server). smb.conf and SWATThe main configuration file for Samba is /usr/local/etc/smb.conf, in which you can set any of dozens of different options and create shares with customized settings. In this file, lines beginning with # or ; characters are comments; the usage in smb.conf.default (the sample config file) is to use the # characters as comments and the ; characters to enable and disable configuration lines. Each option is pretty well documented in comments in smb.conf.default. However, it can become very daunting to try to keep track of everything in that file because there are so many possible options (listed in man smb.conf) that you can set, with so many subtle differences between them. There's an alternative method to administering smb.conf, however, if your network circumstances permit it. This method involves SWAT, the Samba Web Administration Tool, which is shown in Figure 34.2. Figure 34.2. SWAT, the Samba Web Administration Tool.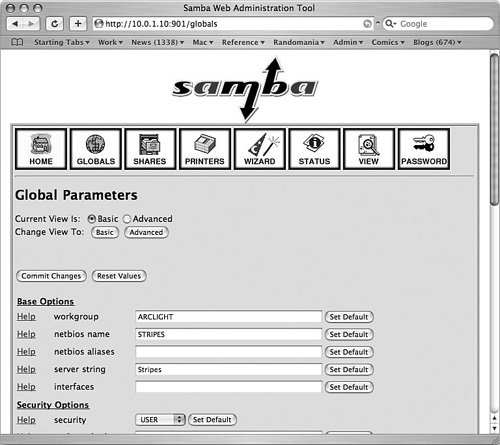 SWAT comes with the Samba port and allows you to configure Samba graphically through a web browser interface. This graphical configuration capability simplifies the process of managing the smb.conf file and reduces the risk of errors. As a web application, however, the security risks associated with SWAT are significant. SWAT authenticates users against the system user database in /etc/master.passwd; authentication passwords are sent in clear text over the network from your client machine to the Samba server you want to configure. Unless you're configuring Samba from the local machine (localhost, using an X11-based web browser), this presents a major security risk. The risk can be managed a number of ways, but it's still not foolproof. You must take one of the following routes when deciding to run SWAT:
If the security risks are acceptable to you, and you can adhere to one of these methods of accessing SWAT, you can enable it by uncommenting the following line in /etc/inetd.conf: swat stream tcp nowait/400 root /usr/local/sbin/swat swatNote The /etc/services file is what maps TCP and UDP port numbers to well-known service names. Make sure that the swat service is listed in that file and assigned to TCP port 901; if it isn't in there, add it. Then restart inetd: # /etc/rc.d/inetd restartYou can now access SWAT by the URL http://stripes.example.com:901, substituting your Samba server's hostname or localhost, as appropriate. You will be prompted for a username and password. Use the system username you have decided to use for SWAT access: root, if your security situation allows it, or the dummy user otherwise. SWAT allows you to access and modify your shares and printers as well as global settings; you can also view the current status of the server and do Samba user management. If SWAT recognizes that the username under which you are logged in has full access to the smb.conf file, you will see all eight action buttons shown in Figure 34.2. Otherwise, you will see only four, allowing you to view Samba information and status, but not make any configuration changes. Because SWAT operates as a front end to smb.conf, and because SWAT is not necessarily a viable administrative option, the rest of this chapter will concentrate on configuring Samba through smb.conf directlynot on SWAT's equivalent actions. Sharing DirectoriesMany examples for how to configure a shared directory can be found in smb.conf.default. To enable any of them, make the appropriate change in smb.conf; then restart Samba: # /usr/local/etc/rc.d/samba.sh restartShare examples are displayed below the ===== Share Definitions ===== line in smb.conf. Each share's name is listed in brackets, and the configuration lines following it apply until the next bracketed block. The smb.conf file begins with a [global] block, allowing you to set global parameters; the rest of the blocks each define a share whose settings override the previously defined global settings, much in the same way httpd.conf works for Apache (as you saw in Chapter 26, "Configuring a Web Server"). Tip The man smb.conf page lists all available configuration parameters and describes in detail what each does. However, you may find it easier to view the page in HTML format, in which headings and examples are set apart with text formatting and made easier to read, as well as being contextually hyperlinked. Refer to the online documentation at http://www.samba.org/samba/docs/man/manpages-3/smb.conf.5.html for the formatted version. To share a regular public directory, define a share block like this: [my-public] comment = Public Stuff path = /usr/local/share/samba-stuff public = yes writeable = yes printable = no write list = @staff With this share enabled, a client will see a share called my-public at the top level of the server's share listing. However, unless the user is authenticated and is a member of the UNIX group staff, the files in the share will be read-only. Remove the write list line to make the share writable by all users. Note that writeable = yes is equivalent to saying read only = no. By default, a [homes] share is defined and enabled. This special share is built-in, allowing access to each user's home directory on the Samba server if the Windows client connects to it with the proper credentials (you learn about user-level and share-level security a little later): [homes] comment = Home Directories browseable = no writeable = yes Because this share is set as not browsable, home directories that are not owned by the client user are not displayed; if a client connects as a valid user with a home directory on the Samba server, her home directory (labeled with her username because that's the name of the directory in UNIX) appears as one of the available shares. No other users' home directories appear. Sharing PrintersLike [homes], [printers] is a special share that behaves a little differently from regular shares. Under FreeBSD, all attached printers that are defined in /etc/printcap are available to Samba users. Chapter 17, "Printing," explains how to set up your FreeBSD machine to support local printers in /etc/printcap. By default, the [printers] share is set up like this: [printers] comment = All Printers path = /var/spool/samba browseable = no # Set public = yes to allow user 'guest account' to print guest ok = no writeable = no printable = yes As stated in the embedded comment, you can make your printers public so that anyone on the network can use them. This involves the use of a guest user, which you learn about in an upcoming section of this chapter. Note that public is a synonym for guest ok, so you would change the guest ok line to yes instead of adding a public = yes line to allow the guest user to print. In Samba 2.2.0 and later, Windows 2000-style printing RPCs are supported, meaning that you can push the appropriate printer drivers to a client that lacks them. For documentation on this feature, see the Samba website. Access ControlSamba access control involves a number of abstract concepts that can be very difficult to reconcile. Windows user authentication schemes include LAN Manager (LANMAN), Windows NT/2000/XP, Windows 95/98/Me, and Windows for Workgroupsall subtly different in how they handle encryption, login names, and challenge/response procedures. In Samba, there are two widely used ways to perform access control: user-level and share level. The default setting is user level, defined by the security option: # Security mode. Most people will want user level security. See # security_level.txt for details. security = user User-Level Access ControlIn user-level security, the client presents a username/password pair to the server upon the initial setup of the connection. The server determines whether to accept the client based on the username/password pair and the identity of the client machine itself. If it accepts the client, all shares are accessible. It can be tricky to set up user-level security properly. The Windows username, which is defined either when logging in to a local profile or to a domain controller in a Windows session, must exist on the Samba server as a regular UNIX user (or mapped to a UNIX user). For instance, if the Windows user Harris logs on to his Windows machine, opens up the My Network Places window, and tries to connect to your Samba server, he will be denied access (and given a password prompt for a share called \\STRIPES\IPC$) unless the user harris exists on the UNIX machine. Tip Instead of authenticating users directly on your FreeBSD machine, you can specify security = server, instead of security = user, and then use the password server = Windows-Server-Name line to specify the machine name of the server you want to do the authenticating. That server must be running in user-level mode, whether it's a real Windows machine or another Samba server. Samba will pass off the task to this second server and authenticate the user based on what the other machine says. Note In Windows 2000/XP, the password prompt allows you to enter a username as well as a password. However, in Windows 95/98/Me, all you get is a password prompt, and the username is derived from the login name. Samba users must exist in a password database at /usr/local/private/smbpasswd, similar to /etc/master.passwd in that encrypted passwords are stored in it for each local UNIX user. When Samba is installed, users from /etc/master.passwd are converted into Samba format and placed into /usr/local/private/smbpasswd, with both the LANMAN password and the Windows NT/2000/XP password (both are present for compatibility) set to strings of 16 X charactersindicating that the user cannot log in: harris:1001:XXXXXXXXXXXXXXXXXXXXXXXXXXXXXXXX: XXXXXXXXXXXXXXXXXXXXXXXXXXXXXXXX: [U ]:LCT-00000000:Pauline Harris To enable a user, you must set the password to something valid; you can do so with the smbpasswd program. It works similarly to passwd, prompting you for your old Samba password and then requiring you to enter a new one twice, unless you're rootin which case, you need not supply the old password, and you can change any user's password as well as your own: # smbpasswd harris New SMB password: Retype new SMB password: Password changed for user harris.The new password for the user harris is now stored in an encrypted string in the smbpasswd file: harris:1001:2E89BF7B23B65C7EB79AE2610DD89D4C: DADDCE7852B574A9EAE9F164F876D025: [U ]:LCT-4421CC23:Pauline Harris Caution Passwords negotiated between Windows clients and a Samba server are encrypted by default before being transmitted (although encryption can be turned off for compatibility with very early Windows clients). Encrypted passwordsalthough they seem like a sensible security measuredon't actually increase security on the server endquite the contrary. The encrypted Samba passwords that are stored in the /usr/local/private/smbpasswd file are the same as the passwords that are sent over the wire. Encrypted Samba passwords, therefore, are equivalent in security to passwords stored in clear text. An intruder who gains access to the smbpasswd file could immediately log in as any user (including root) through Samba, whereas the encrypted passwords in /etc/master.passwd must be cracked through some brute-force method. (By contrast, a UNIX password is transmitted in clear text and then encrypted on the server and compared to what's in the password file; this arrangement renders a compromise of the server's password file itself harmless.) Guard the smbpasswd file just as carefully as you would master.passwd, if not more so! Tip You can map Windows users on a many-to-one basis to UNIX users, allowing you to give groups of Windows users the same privileges as a single UNIX user. To do this, create a file containing the mappingsfor example, /usr/local/etc/smbusers.map. The format of this file is with one mapping per line, as follows: UNIX-user = win-user-1 [win-user-2 ...] For example, to map three different Windows users to the UNIX username webadmin, use the following statement: webadmin = harris erodriguez mfoster Next, enable the username mapping file by adding the following anywhere in the [global] section of smb.conf: username map = /usr/local/etc/smbusers.mapEach aliased Windows user must log in with the correct password for the UNIX user to which she maps. Share-Level Access ControlIn share-level access control, a client can connect to the Samba server without any username/password authentication and receive the list of shares; the client will be refused access only if denied by IP address in the smb.conf file (the hosts allow line). However, each share has its own user authentication, using the same password scheme as you already saw in the discussion on user-level access control. A public share, in which access is open to all, can be entered without any barriers. A share that is restricted to a particular user (such as a home directory from the [homes] block), however, presents the same username/password challenge as user-level security presented at the initial connection. More details on the workings of user-level and share-level security can be found at http://www.samba.org/samba/docs/man/Samba-HOWTO-Collection/ServerType.html#id2526819. Guest UserFor some Samba services, notably printing, you will want any user on the network to be able to have access regardless of authentication. You accomplish this with a guest account. A guest account is an unprivileged user account that has access as a UNIX user only to the service you want to provide. Note that guest users are primarily intended for Samba servers running in share-level security mode because guest user access is allowed or disallowed on a share-by-share basis. To enable a guest user, uncomment the guest account line in smb.conf: # Uncomment this if you want a guest account, you must add this to /etc/passwd # otherwise the user "nobody" is used guest account = pcguest You must then add the pcguest account (or any other name you choose) to the system using adduser. Use chfn to tune the user's capabilities; the ftp user is a good model for the Samba guest account. (The ftp user is created by Sysinstall if your system allows anonymous FTPsee Chapter 27, "Configuring an FTP Server," for details on FTP server setup.) With this account enabled, any Windows user connecting to the Samba server will have full access to any share where the guest ok or public parameter is set to yes. No authentication challenge will be presented for that share. Be sure to use a read only statement on shares that you don't want getting messed around with by every Tom, Dick, and Harris on your network! Tip The guest only = yes parameter can be specified to indicate that only guest connections are permitted for a service. Samba Log FilesIn /var/log, there are various log files for Samba, one for each type of service and for each client that has connected. These files' names are of the form log.service: # ls -l /var/log/log.* -rw-r--r-- 1 root wheel 468 Jun 9 12:42 /var/log/log.gaming-pc -rw-r--r-- 1 root wheel 2343 Jun 9 14:49 /var/log/log.nmb -rw-r--r-- 1 root wheel 1606 Jun 9 14:44 /var/log/log.smbThe log.nmb and log.smb files report status and error conditions for the nmbd and smbd servers, respectively. Additionally, whenever any errors are reported for any connecting client host (such as authentication failures), these messages are printed into a log.name file for that client. Note that this can result in a lot of files cluttering up your /var/log directory, on a network with lots of client PCs. You can switch to a combined log format by commenting out the log file line in smb.conf: # this tells Samba to use a separate log file for each machine # that connects ; log file = /var/log/log.%m SMB errors for individual hosts will go into log.smb with this line commented out. Another useful line to modify is the max log size line, which is set to 50KB by default. This control allows you to set the "rollover" size for any of the log files. When any Samba log file reaches the size you've designated, the file is renamed by appending .old to the filename, and new log entries are added to a new file. The .old file is overwritten at the next rollover. # Put a capping on the size of the log files (in Kb). max log size = 50 Samba VariablesConfiguration parameters in smb.conf don't have to be hard-wired. You have a number of variable substitutions at your disposal, so you can set certain options to be dynamically determined, depending on the conditions of the connection. For example, you can set an option to reflect the client's username with the %u variable, allowing you to set a parameter such as path = /usr/local/share/user-files/%u. The user harris would thus receive the path /usr/local/share/user-files/harris. Here are a few of the most useful variables:
The complete list of variable substitutions is available in man smb.conf. |