Creating Partitions and Assigning Mount Points
| After you press Enter on the informational message telling you about creating a DOS-style (fdisk) partitioning scheme, one of two things will happen:
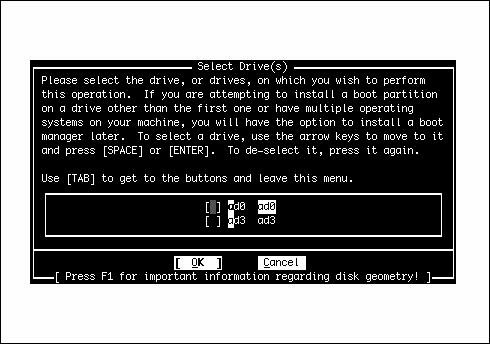
Caution Creating partitions and assigning mount points are areas in which a mistake can cause the loss of all data on your hard disk. If your hard disk contains anything you want to keep, make sure you back it up first. Also, read Chapter 3 if you will be installing FreeBSD on a drive that already has another operating system on it. Selecting Hard DisksIf you have multiple hard disks on your system, you will see a menu that looks similar to Figure 2.2. Figure 2.2. Selecting the hard disks on which to install FreeBSD. Your menu might not look exactly like the one shown in the figure. Table 2.2 lists some of the values you might see in the menu and what they mean.
You might also have ad2 and ad3 in your listor da2, da3, and so on. Just remember that the number represents the number of the drive in your system and that FreeBSD starts numbering the drives at zero instead of one. Use the spacebar to select which disk or disks you want to use for FreeBSD. You can select more than one disk for the FreeBSD installation. This is fairly common, and the end result is transparent for everyday operation. In other words, even if FreeBSD is installed across multiple disks, it appears to the end user that everything is on a single disk. You will see in the next section, "Partitioning the Disk(s)," why it might be advantageous to install on multiple disks. When you select a disk from this menu, you are placed in the FreeBSD Partition Editor, where you can edit the partition table for that disk. After you finish editing the partition table and leave the Partition Editor, you are placed back at this menu. You can then select another disk to edit or press Enter to leave the menu and continue with the installation. After you finish editing disks, you are placed into the FreeBSD Disk Label Editor (more on that after the next section, which explains the Partition Editor). Caution If you're going to install FreeBSD on a second hard disk, you have another operating system on the first hard disk, and you don't plan to make any changes to the first hard disk, you need to install a boot manager so that you can choose which operating system you want to boot at system startup. FreeBSD will give you the option of installing the boot manager later in the process. However, the boot manager must be installed on the first disk in your system. In order for this to happen, you must select the first drive in this menu. If you do not want to make any changes to the first disk, simply select it in the menu and then exit the Partition Editor without making any changes to the disk. You can then select a different disk in the menu and partition it for use with FreeBSD. This allows FreeBSD to install the boot manager on the first disk. If you do not do this, the boot manager will not be installed on the first disk, and you will not be able to boot FreeBSD after the installation is finished. Partitioning the Disk(s)Here is what the Partition Editor looks like: Disk name: ad0 FDISK Partition Editor DISK Geometry: 29795 cyls/16 heads/63 sectors = 234436482 blocks (113664MB) Offset Size(ST) End Name PType Desc Subtype Flags 0 63 62 - 12 unused 0 63 30033297 30033359 ad0s1 8 freebsd 165 The following commands are supported (in upper or lower case): A = Use Entire Disk G = set Drive Geometry C = Create Slice F = 'DD' mode D = Delete Slice Z = Toggle Size Units S = Set Bootable | = Wizard m. T = Change Type U = Undo All Changes W = Write Changes Use F1 or ? to get more help, arrow keys to select. In this case, the first line tells you that you are working on the disk ad0, which, as mentioned previously, is the first ATA disk in the system. The second line gives you information about the geometry of this disk. (See Chapter 20, "Adding Hard Disk Storage," if you need help with this. It's not important that you understand the geometry of your disk unless FreeBSD is having trouble detecting it.) The next several lines give you information about each currently defined partition on the system. If this is a new disk, or if you deleted all the partitions on it before installing FreeBSD, there will be only one partition with the description "unused" that takes up the entire disk. Table 2.3 explains what each column of information means.
Note If you are unfamiliar with the terms used in the next section (such as sectors), see Chapter 20, which provides an introduction to hard disks and the terminology related to them. Tip Press Z to toggle the display units between sectors, kilobytes, megabytes, and gigabytes. To assign all available space on this hard disk to FreeBSD, simply select A for Use Entire Disk. After this, you should see a line that shows a single partition of subtype 165 with the description freebsd. You will also see a line with the description unused. Don't worry about thisit's normal, even when you're selecting the entire disk for use. Press Q to exit the Partition Editor. Do not press W (Write Changes) first because that option is intended only for making changes to existing filesystems, not for initial installs. Caution Selecting the entire disk for use deletes everything currently on the disk. Make sure you have backed up any information you want to keep from the disk. If you don't want to delete everything on this disk, see Chapter 3 before you proceed with the install. Note Unlike with Linux, you do not create multiple partitions on a single disk for FreeBSD, even if you will probably be creating more than one partition on the disk to hold your FreeBSD filesystems. You use the Disk Label Editor to create the separate areas for your different filesystems. The difference between BSD-style "partitions" (slices) and DOS/Linux-style partitions is explained in Chapter 20. FreeBSD will then ask whether you want to install the FreeBSD boot manager. If you are installing FreeBSD on a drive other than the first one, select the BootMgr option. You also select this option if you are installing more than one operating system on this drive. If FreeBSD is the only operating system to be installed and it will be installed on the primary drive, you can select the Standard option. If you have only a single hard disk on your system, you will receive a message that tells you to create BSD partitions inside the fdisk partition(s) just created. Go ahead and press Enter to go to the Disk Label Editor. If you have multiple disks, go back to the disk selection menu. Note If you want to spread your FreeBSD installation out across more than one disk (either because you don't have enough space on one disk for a complete install or for performance reasons), select any other disks you want to use for FreeBSD, repeating the previous steps outlined in this section. When you have partitioned all the disks you want to use for FreeBSD, make sure OK is highlighted and then press the Enter key. The Disk Label EditorThe Disk Label Editor is where you will actually create the filesystems that will hold the FreeBSD installation. In this system, you subdivide the storage space in the partitions (slices) you created in the Partition Editor into subpartitions (BSD partitions) that are attached to specific locations in the system. When you first enter the editor, it will look like this: FreeBSD Disklabel Editor Disk: ad0 Partition name: ad0s1 Free: 234436482 blocks (113664MB) Part Mount Size Newfs Part Mount Size Newfs ---- ----- ---- ----- ---- ----- ---- ----- The following commands are valid here (upper or lower case): C = Create D = Delete M = Mount pt. W = Write N = Newfs Opts Q = Finish S = Toggle SoftUpdates Z = Custom Newfs T = Toggle Newfs U = Undo A = Auto Defaults R = Delete+Merge Use F1 or ? to get more help, arrow keys to select. Your system may have one or more disks listed here. It depends on how many disks you selected to use with FreeBSD. Beginning with FreeBSD 5.0, the Auto Defaults option provides reasonable defaults that will work for most purposes. If you aren't sure about partitioning (explained in the next section), you should probably choose the Auto Defaults option (press A) and then press Q to quit the editor and move on to "Selecting a Canned Distribution Set," later in this chapter. If you use more than one disk, you need to manually set up the partitions. If you need to manually create your partitions or if you aren't sure whether you need to create custom partitions, read on. Manual PartitioningAt a bare minimum, you need to create two partitions: a root filesystem and a swap partition. The minimum is not the best way to do things, however. You might be tempted to do this because it ensures you won't end up in a situation in which you run out of space on a partition where you need it and have 150 zillion gigabytes of free space on a different partition that you can't use for what you need. In fact, there is at least one well-known Linux distribution that encourages putting everything in the root filesystem. This is a dangerous way to live for two reasons. First of all, FreeBSD and all other versions of UNIX are powerful multitasking operating systems. They are almost always doing somethingespecially on a busy server. These systems usually have several files open at the same time, and they often write to the disk. If the system crashes, a power failure occurs, or the janitor runs the vacuum cleaner over the server's power cord while a write is in progress, the filesystem can be damaged. Depending on what was being written when the crash occurred, the damage can be severe enough to destroy the filesystem. Filesystem damage is far less likely to occur if the filesystem is not being written to when the crash or power failure occurs. This is why it is a good idea to use multiple filesystems. It not only helps to restrict damage to one areainstead of the entire systemit also helps protect the all-important root filesystem. In a properly laid-out filesystem, the root partition is almost never written to. The second reason why having everything in one partition is dangerous is that it opens a server to various forms of malicious Denial of Service (DoS). Whether these situations are intentional or not, they can occur, and all too frequently they do. For example, on a system in which user disk quotas are not enforced, a user could either intentionally or accidentally (through the misuse of the command that copies files) create a file that fills up the entire partition where the home directory is located. If all the filesystems are located on that same partition, this would do far more than prevent users from saving files in the home directory. Other fallout from this event could include denial of mail service because there is no room in the mail spool directory, and denial of print service because there is no room to queue print jobs. Also, the web server could stop serving because it can't write its log file. syslogd (the program that logs system messages) will be unable to record important messages, which could allow crackers to enter your system undetected. Any programs that need to write temporary files will fail because no room is left in the tmp filesystem. Predicting when you'll run out of space on all filesystems is difficult. However, having more partitions than you need is generally better than having too few; accordingly, I recommend a minimum of five partitions: One for the root filesystem (/), one for the swap space, one for the user filesystem (/usr), one for the var (/var) filesystem, and a final one for temporary files that's writable by all users (/tmp). Some people recommend placing the /var filesystem in the same partition as /usr because it is difficult to judge how much space to give /var. I don't recommend doing this, however, because it subjects your system to various possible Denial of Service attacksespecially if users' home directories are also located in the same partition as the /usr filesystem. Note FreeBSD has the capability to use more memory than is actually installed in the system, through the use of what's known as virtual memory. To use virtual memory, FreeBSD moves to the disk any memory pages that are not currently in use. That frees up room in memory for data that's currently needed. When a memory page that was moved out to disk is needed again, FreeBSD moves it back into memory and, if necessary, moves something else in memory out to the disk to make room. These operations are known as swapping, and the area of the disk that the swapped-out memory pages are stored in is called the swap partition. To help you better decide what filesystems you want to put on each partition, Table 2.4 describes some of the directories in FreeBSD and what they are used for. Note that this is not a complete list; it has only the directories for which you might want to have separate partitions. For a complete list of all directories and their purposes, see Chapter 12, "The FreeBSD Filesystem."
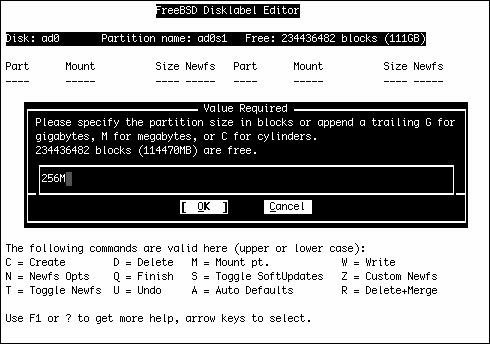
Tip If you have more than one hard disk on your system, you can optimize your system's performance by carefully dividing up disk-intensive tasks between multiple hard disks. For example, if you run a Usenet news server (which is rather disk-intensive) and a web server (also quite disk-intensive), you should put the news directory and the directory where the web server keeps its pages on separate disks. Similarly, keeping your database content on a separate disk from your static web content can speed up a web server by a huge amount. The Root PartitionIf you aren't using a dedicated /boot partition, the first partition on your drive should be the root partition (/). To create the root partition, use the up or down arrow key to highlight the disk slice (labeled with Disk and Partition name fields, as well as a readout of how much unallocated space is available on it) at the top of the Disk Label Editor that you want to put the root partition on. Then press C for Create Partition. You then see a dialog box that asks you for the size of the partition (see Figure 2.3). Figure 2.3. Setting the size of the partition. As mentioned previously, 256MB should be sufficient for the root partition. As the dialog box says, you can specify a size in megabytes by adding an M to the end of the number. So, assuming you want to make your root partition 256MB in size, enter 256M at the prompt and then press Enter. You are then asked to choose a partition type for this partition. Because this will hold the root filesystem, select the FSA File System option and press Enter. You are then asked to specify a mount point for this partition. The mount point is the directory under which the filesystem will be available. Because this is the root filesystem, enter / in this box and press Enter. Your screen should now look similar to this: FreeBSD Disklabel Editor Disk: ad0 Partition name: ad0s1 Free: 29761379 blocks (113408MB) Part Mount Size Newfs Part Mount Size Newfs ---- ----- ---- ----- ---- ----- ---- ----- ad0s1a / 256MB UFS1 Y The following commands are valid here (upper or lower case): C = Create D = Delete M = Mount pt. W = Write N = Newfs Opts Q = Finish S = Toggle SoftUpdates Z = Custom Newfs T = Toggle Newfs U = Undo A = Auto Defaults R = Delete+Merge Use F1 or ? to get more help, arrow keys to select. This code shows that you now have a filesystem at ad0s1a (the device name and slice entry that FreeBSD uses to refer to this filesystem), it is mounted on /, the size is 256MB, and it is of type UFS1 (the standard filesystem type for FreeBSD). Next, you deal with the swap partition. The Swap PartitionFreeBSD is a virtual memory operating system; it can use more memory than it has available in physical RAM. It does this by swapping memory pages of programs that are not currently being used out to the hard disk. When those pages are needed again, FreeBSD swaps them back into memory from the hard disk and, if necessary, swaps something else out to the hard disk to make room for the pages it is bringing in. Of course, accessing something from the hard disk is many times slower than accessing something from RAM, so swap space is no alternative for having enough RAM in a system. But still, swap space is a crucial part of how UNIX and all modern operating systems operate, and a key reason why you seldom have to worry about "Out of Memory" errors these days. The proper (or improper) configuration of your swap partition can have a significant impact on the performance of your system. Here are some guidelines for choosing where to put your swap partition:
So, how much space should you allocate for your swap partition? Long ago, when RAM was an expensive commodity and most users made do with 4MB to 16MB of RAM, the rule of thumb was to have 2.5 times as much swap space as you had RAM. But today, RAM is cheap and affordable. A high-end workstation with 1GB of RAM and servers with 4GB or more of RAM are not uncommon these days. The average user can afford to have more RAM than he actually needs. At the same time, though, hard disk space is cheap too, and it's easy to outfit a new system with a disk that's far larger than you need. Because it's much easier to boost the RAM in your system (simply by plugging in new memory modules) than upgrade your primary installation to a bigger disk, you might still want to make sure to start out your FreeBSD career with a swap partition that's at least twice the size of your available RAM. That way, when you double your system's RAM, you won't have to worry about resizing your swap partition because it will still be at least the size of the physical RAM, and thus still useful. 512MB of swap space is a nice number to use if you have 512MB of RAM or less and you aren't really pressed for disk space. If at all possible, you should try to have at least as much swap space as you have RAM. If you plan to do development or track the FreeBSD CURRENT branch, this is practically a necessity. Here is why. Occasionally, something happens that the operating system's kernel doesn't know how to handle. When such an event occurs, the kernel gives up, panics (you get a message that reads "Kernel panic"), and then reboots the system. If configured to do so, however, the panicked kernel attempts to dump the contents of RAM into the swap partition before it reboots. The contents of RAM when the panic occurred are essential to programmers for debugging what is causing the panics. One of two things happens if there is more information in RAM than can fit in the swap space:
Kernel panics don't happen often in FreeBSD. When they do happen, it's nice to be able to use the RAM dump feature so that you or someone else can examine the contents of RAM when the panic occurred and attempt to figure out what is causing the panic. Therefore, try to make your swap partition at least as big as the amount of RAM you have in your system, and bigger if you can spare the disk space. Note UNIX kernel panics are similar to the infamous BSOD (Blue Screen of Death) errors in Windows NT/2000/XP. If you are used to working with Windows, you can breathe a sigh of reliefyou won't be seeing nearly as many kernel panics with FreeBSD as you see blue screens in Windows, especially if you don't use any experimental kernel patches or untested features. I've personally only had one kernel panic on my FreeBSD workstation in nearly 12 years of working with FreeBSD. After you decide on a size for your swap partition, create it just like you created the root partition, except this time select SwapA Swap Partitionwhen prompted for the filesystem type. The swap partition does not get a directory mount point, so you will not be asked the question about where you want to mount the partition when you are creating a swap partition. Creating the Rest of the PartitionsAfter you create the root (and possibly boot) partition and the swap partition, create the rest of the partitions as filesystems, give them the sizes you decided on earlier, and set the mount points to the proper directories when asked (for example, /usr or /var). Don't forget to include the leading slash. Tip If you prefer to let Sysinstall figure out how to allocate disk space to your partitions, simply delete any partitions you've created already and press A for Auto Defaults. The mount points and partition sizes created by this option are usually appropriate for all but the most specialized configurations. You can correct any mistakes and re-create your partitions at any time during this session; no changes are made to your disk until the very end of the process. Simply highlight a partition and press D to delete it, and then move up to the slice at the top of the screen and press C to create a new partition. If you have more than one hard disk on your system and you need to switch between them, use the up and down arrow keys to move the highlighted line over the disk at the top of the screen on which you want to create the partition. Here is an example of what a final result might look like: FreeBSD Disklabel Editor Disk: ad0 Partition name: ad0s1 Free: 0 blocks (0MB) Disk: ad1 Partition name: ad1s1 Free: 0 blocks (0MB) Part Mount Size Newfs Part Mount Size Newfs ---- ----- ---- ----- ---- ----- ---- ----- ad0s1a / 256MB UFS1 Y ad0s1b swap 756MB SWAP ad0s1e /var 256MB UFS1+S Y ad0s1f /tmp 256MB UFS1+S Y ad0s1g /usr 48817MB UFS1+S Y ad1s1e /home 124664MB UFS1+S Y The following commands are valid here (upper or lower case): C = Create D = Delete M = Mount pt. W = Write N = Newfs Opts Q = Finish S = Toggle SoftUpdates Z = Custom Newfs T = Toggle Newfs U = Undo A = Auto Defaults R = Delete+Merge Use F1 or ? to get more help, arrow keys to select. This example has two hard disks in the system, and the /home directory is on a partition in the second hard disk that takes up the entire disk. Note When creating a partition, if you get an error message at the bottom of your screen that reads "You can only do this in a master partition (see top of screen)," it means that you have to highlight one of the filesystem partitions (slices) at the top of the screen. Use the up arrow until the highlight is on the disk slice on which you want to create the partition and then try again to create the partition. Notes on Soft UpdatesStarting with FreeBSD 5.0, Soft Updates are enabled by default on most filesystems (except for /). You learn more about Soft Updates in Chapter 12, but for now simply know that they can greatly increase the performance and reliability of most filesystems, so you probably want to leave them enabled. To enable Soft Updates on a filesystem, move the highlight over the filesystem you want and press S to toggle Soft Updates on or off. A filesystem that has Soft Updates enabled will have +S following the filesystem type (for example, UFS1+S). After you finish creating partitions, press Q to leave the Partition Editor. Once again, do not use the W option because this is intended for making changes to existing filesystems, not for installing new ones. As long as you're still in the same Sysinstall session, all the changes you've made so far are stored in memory and pending the final commitment after you choose the type of software installation you want. The next screen will ask you what parts of FreeBSD you want to install. | |||||||||||||||||||||||||||||||||||||||||||||||||||||||||||||||||||||||