Section 3.6. Working with Shapes
3.6. Working with ShapesA shape in MapPoint 2004 context is an entity that can be drawn on top of a map, queried for location information, or altered in appearance. MapPoint 2004 APIs allow you to draw, query, and alter the shapes on any given map. These shapes include circles, polygons, polylines, text boxes, drivetime zones, and so on. Remember that the circles, pies, series columns, and all other shapes drawn using the DisplayDataMap do not belong to shape category, since there is no way for you to either query or alter the circle shape appearance. Now, let's see how to work with shapes in MapPoint 2004. 3.6.1. Drawing ShapesMapPoint 2004 APIs expose all shapes on any given map as a Shapes collection (similar to the DataSets collection). Using this Shapes collection, you can add a new shape or retrieve an existing shape. To add a new shape, the Shapes collection offers AddXXXX methods (where XXXX can be a line, text box, polyline, and so on). Table 3-8 provides a list of these methods and their descriptions:
When you call one of these Add methods, a shape is created on the map and added to the Shapes collection. The method also returns a reference to the newly created shape as a Shape object. You can also access a shape using the Shapes collection indexer via the shape index or name. Next, we'll draw a shape using the MapPoint 2004 APIs. 3.6.1.1. Drawing a circleUsing the AddShape method from the Shapes collection, you can add a circle or oval at any location on the current map. The AddShape method accepts the type of shape, which is of MapPoint.GeoAutoShapeType enumeration, and the location around which to draw this shape at the same height and width.The GeoAutoShapeType enumeration supports drawing ovals, circles, and rectangles. The following example shows how to draw a circle around the location Seattle, WA: //Find a location object index = 1; MapPoint.Location location = (MapPoint.Location) map.FindResults("Seattle").get_Item(ref index); //Add a circle with radius = 50 miles MapPoint.Shape shape = map.Shapes.AddShape(MapPoint.GeoAutoShapeType.geoShapeOval, location, 50, 50); //Zoom to shape shape.Location.GoTo( );To draw an oval, pass a different height and width. What if you want to draw a circle that shows the radius? You'll have to use GeoAutoShapeType.geoShapeRadius as the shape type. You can also draw a rectangle using the same method but passing the GeoAutoShapeType.geoShapeRectangle value for the shape type argument. 3.6.1.2. Drawing a lineDrawing a line using MapPoint 2004 is very simple. Since a line is basically a shape that connects only two locations, pass two locations to this method. So, if you want to draw a line between Seattle, WA, and Los Angeles, CA, use the following code: object index = 1; //Find Seattle, WA MapPoint.Location location1 = (MapPoint.Location) map.FindResults("Redmond, WA").get_Item(ref index); //Find Los Angeles, CA MapPoint.Location location2 = (MapPoint.Location) map.FindResults("Los Angeles, CA").get_Item(ref index); //Now, add a line MapPoint.Shape shape = map.Shapes.AddLine(location1, location2);3.6.1.3. Drawing a polylineWhile a line connects two locations, a polyline connects more than two locations. The AddPolyline method takes an array of locations as an argument and draws a polyline connecting the input locations. The following example shows how to draw a polyline connecting Redmond, WA, Portland, OR, and Los Angeles, CA: object index = 1; MapPoint.Location location1 = (MapPoint.Location) map.FindResults("Redmond, WA").get_Item(ref index); MapPoint.Location location2 = (MapPoint.Location) map.FindResults("Portland, OR").get_Item(ref index); MapPoint.Location location3 = (MapPoint.Location) map.FindResults("Los Angeles, CA").get_Item(ref index); //Add a polyline MapPoint.Shape shape = map.Shapes.AddPolyline(new MapPoint.Location[] {location1, location2, location3});3.6.1.4. Drawing a polygonYou can extend the polyline to draw a polygon by closing the polyline to form a polygon. For example, if you have four locations that you are drawing a polyline with, you can form a polygon using these four locations by connecting the last location with the first location. The following example shows how to create a polygon using the AddPolyline method: object index = 1; MapPoint.Location location1 = (MapPoint.Location) map.FindResults("Redmond, WA").get_Item(ref index); MapPoint.Location location2 = (MapPoint.Location) map.FindResults("Portland, OR").get_Item(ref index); MapPoint.Location location3 = (MapPoint.Location) map.FindResults("Los Angeles, CA").get_Item(ref index); MapPoint.Location location4 = (MapPoint.Location) map.FindResults("Boise, ID").get_Item(ref index); //Add a ployline MapPoint.Shape shape = map.Shapes.AddPolyline(new MapPoint.Location[] { location1, location2, location3, location4, location1}); Since "location4" is now connected back to "location1," this method draws a polygon that includes the aforementioned four locations as vertices. 3.6.1.5. Accessing shape verticesFor any non-GeoAutoShapeType shape, you can access vertices/locations at the vertices that make up that shape. You can obtain values for vertices for any shape that is drawn using AddLine or AddPolyLine methods: //Add a ploygon MapPoint.Shape shape = map.Shapes.AddPolyline(new MapPoint.Location[] {location1, location2, location3, location4, location1}); //Now get the vertices for this polygon object[] vertices = shape.Vertices as object[]; foreach(object vertex in vertices) { MapPoint.Location loc = vertex as MapPoint.Location; }The vertices are exposed as an array of objects, and you have to typecast them as Location objects to access the location properties of the vertex. Sometimes you have to find distance from a given point or location to a shape. In such cases, since there is no direct API available for this purpose, use the vertices of the shape to find the nearest vertex to the input location using the Location.DistanceTo method: //Start with a location object MapPoint.Location loc; //Obtain a valid location instance such as Redmond, WA //and assign it to loc object. . . . //Now get the vertices a polygon from where //we want to measure distances object[] vertices = shape.Vertices as object[]; foreach(object vertex in vertices) { MapPoint.Location shapeLoc = vertex as MapPoint.Location; //Now get distance Console.WriteLine(shapeLoc.DistanceTo(loc)); }While this is does not give exactly the nearest location, it provides a workaround for this situation. 3.6.1.6. Drawing a text boxFinally, the Shapes collection provides a method to draw a text box on the map. This is useful to draw labels that are specific to your business needs. The following example shows how to draw a text box at the center of a circle that indicates your market area: //Find a location object index = 1; MapPoint.Location location = (MapPoint.Location) map.FindResults("SEA").get_Item(ref index); //Add a circle MapPoint.Shape shape = map.Shapes.AddShape(MapPoint.GeoAutoShapeType.geoShapeOval, location, 150, 150); //Draw a text box MapPoint.Shape tBox = map.Shapes.AddTextbox(location, 50, 20); //Now assign text to the text box object name = "MarketingAreaTextBox"; //Assign it to the shape tBox.Name = name.ToString( ); //Now assign text by accessing the shape from the collection map.Shapes.get_Item(ref name).Text = "Marketing Zone A"; The shape can be accessed via either the name of the shape or the index of the shape from the Shapes collection. So far, you have seen how to draw shapes. Next, let's look at how to customize the shape's appearance using the MapPoint 2004 APIs. 3.6.2. Altering Shape AppearanceUsing the MapPoint 2004 APIs, you can not only draw shapes but also modify their look and feel. There are some limitations related to the color settings, but I will discuss how to work with the OLE color palette using the .NET colors. 3.6.2.1. Altering line widthWhen you draw a shape in MapPoint 2004, the shape is drawn with a default line width and color. However, you can change these attributes by altering the settings available using the Shape.Line property, which is a LineFormat object. The LineFormat object exposes Width and ForeColor properties to alter the width and color of the line. The properties are Integer type. The integer represents the RGB color value of the OLE color format. In order to convert the .NET Color structure to the OLE color structure , use the .NET Framework's ColorTranslator class available in the System.Drawing namespace. The following example shows how to set the line color and line width of a circle shape: //Add a circle MapPoint.Shape shape = map.Shapes.AddShape(MapPoint.GeoAutoShapeType.geoShapeOval, location, 75, 75); //Customizing the line format shape.Line.Weight = 1; shape.Line.ForeColor = ColorTranslator.ToOle(Color.LightSteelBlue); You can change the visibility of the line using the LineFormat.Visible property: //Do not want to show the line shape.Line.Visible = false; 3.6.2.2. Changing the fill colorYou can change the fill color of a shape using the Shape.Fill property, which is a FillFormat object. The FillFormat object exposes properties such as ForeColor and Visible to change the appearance of the shape. The following sample shows how to change the fill color of a circle shape: //Add a circle MapPoint.Shape shape = map.Shapes.AddShape(MapPoint.GeoAutoShapeType.geoShapeOval, location, 75, 75); //Customizing a shape look-and-feel shape.Fill.ForeColor = ColorTranslator.ToOle(Color.LightBlue); //Set visibility to true shape.Fill.Visible = true; When I talk about fill color, you may be wondering whether it is possible to fill the shape with alpha blending (or translucency ). Actually, OLE fill color does not support alpha blending; however, MapPoint 2004 allows you to create and fill shapes so that the map beneath the shape is still visible. 3.6.2.3. Simulating translucencyThe Shape object has a method, ZOrder, which you can use to make a shape transparent even with fill color visible. The ZOrder method takes an argument of type GeoZOrderCmd enumeration, which provides values for sending the shape behind objects (such as roads on the map), bringing it in front of objects, or sending it behind another shape. To make a shape transparent by sending it behind the roads, use the following code: //Add a circle MapPoint.Shape shape = map.Shapes.AddShape(MapPoint.GeoAutoShapeType.geoShapeOval, location, 75, 75); //Customizing a shape look-and-feel shape.Fill.ForeColor = ColorTranslator.ToOle(Color.LightBlue); shape.Fill.Visible = true; shape.Line.Weight = 1; shape.Line.ForeColor = ColorTranslator.ToOle(Color.LightSteelBlue); //Send back to the map shape.ZOrder(MapPoint.GeoZOrderCmd.geoSendBehindRoads);3.6.2.4. Toggling shape visibilitySometimes you have to toggle the visibility of a shape completely. Even though the MapPoint 2004 API provides Visible properties for both line and fill color of shapes, setting them as false does not make the shape disappear completely. You can work around this by moving a shape to an obscure location (such as the North Pole) and bringing it back to its original location when needed. The following steps show how to achieve the visibility toggling effect:
This method works well within a single application session. However, if you want to persist the shape across the application sessions, you may have to persist the shape name and the original location in an external store, such as a config file or a text file. Now that you know how to draw shapes and customize their look and feel, it's time to explore using the shapes for location information. 3.6.3. Querying ShapesYou can use a shape to query a dataset to find the matching records that reside within that shape. To find out how many records or locations are contained within the specified shape, use the querying shapes technique. Here is a sample scenario: you have a list of customers spread across the United States. You happen to be in Chicago on a business trip, and you want to find out how many of your customers are within 50 miles of where you are staying so that you can visit them. You create a circle shape with 50-mile radius and query for all customers that are contained within this circle shape. The following code shows this implementation: //Using the MapPoint Sample sales data from mdb file string filePath = @"C:\MApPointData\Clients.mdb!Addressestable"; //Define missing fields object missing = System.Reflection.Missing.Value; //Import data and create a dataset MapPoint.DataSet dataset = map.DataSets.ImportData(filePath, missing, MapPoint.GeoCountry.geoCountryUnitedStates, MapPoint.GeoDelimiter.geoDelimiterDefault, MapPoint.GeoImportFlags.geoImportAccessTable); //Now Find O'Hare Airport in Chicago (Airport Code ORD) to draw a circle around //Find a location object index = 1; MapPoint.Location location = (MapPoint.Location) map.FindResults("ORD").get_Item(ref index); //Draw a circle around this location with 50 mile radius MapPoint.Shape shape = map.Shapes.AddShape(MapPoint.GeoAutoShapeType.geoShapeOval, location, 50, 50); //Now query for customers that fall within this shape MapPoint.Recordset records = dataset.QueryShape(shape); //Customer Name field index from the source file object fieldIndex = 2; //Now loop through the records if(records != null && !records.EOF) { records.MoveFirst( ); while(!records.EOF) { //Store the address - you need to meet this customer . . . records.MoveNext( ); } }This method works well for querying records based on distance (such as the 50-mile radius) constraint. However, don't you think it would be easier if you could query for the records based on time constraints instead of just a distance constraint? You can do this using drivetime zones . 3.6.4. Working with Drivetime ZonesA drivetime zone is a free form polygon shape that represents the maximum driving distance from a location on a map within a specified amount of time. In our example, you can modify the query to be: "Find all customers that can be reached within 60 minutes of driving from O'Hare Airport." So, a drivetime zone is essentially a shape that can be added to a map around a prespecified location. You can add a drivetime zone shape using the Shapes.AddDrivetimeZone method: //Add a 60 minute drivetime zone around a location MapPoint.Shape shape = map.Shapes.AddDrivetimeZone(location, 60 * MapPoint.GeoTimeConstants.geoOneMinute); This method uses the location around which the driving distance is calculated to express the time value in a GeoTimeConstants enumeration. This enumeration provides values for days, hours, and minutes. A 60-minute drivetime zone is shown in Figure 3-17. Figure 3-17. A 60-minute drivetime zone around O'Hare Airport (Color Plate 7)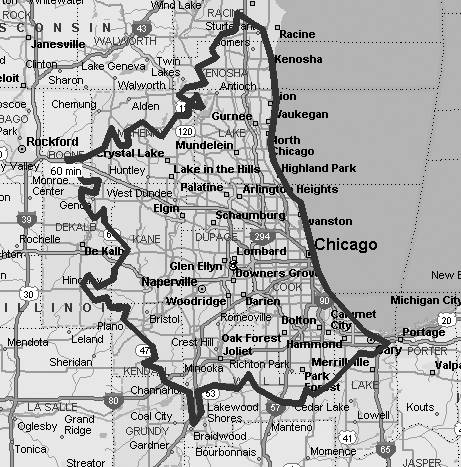 Once you have the drivetime zone, you can use the shape like any other MapPoint shape to find the locations that fall inside that shape using the DataSet.QueryShape method. When thinking of customers all across the United States, it is sometimes helpful to find out which customer falls into which account representative's territory. When you have 20 account representatives, it is a common practice to assign them geographic territories to streamline account management and communication processes. You can use the MapPoint 2004 APIs to display territory maps based on external information. |
EAN: 2147483647
Pages: 136