28.10 Step 10: Install Expansion Cards A modern motherboard includes some or all of the bus slot types shown in Figure 28-40. All motherboards provide PCI slots, most provide ISA slots (although the newest motherboards have no ISA slots), and many provide an AGP slot. You can install an expansion card only in a slot that is designed to accept it, either ISA, PCI, or AGP. The best rule to follow is to avoid installing any ISA cards if at all possible. If you have a choice between installing a PCI video card or an AGP video card, choose AGP. For everything else, use PCI. Figure 28-40. An Intel SE440BX "Seattle" motherboard showing, from left to right, one ISA slot, one combined ISA/PCI slot (which can accept an ISA or a PCI card, but not both simultaneously), three PCI slots, and an AGP slot 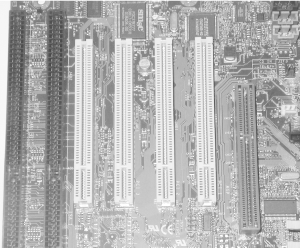 To install expansion cards: Decide where to install each expansion card. If you have more slots than cards, leave empty slots between cards to improve air flow and cooling. Video cards, particularly high-performance ones, generate significant heat, so always leave an unoccupied slot between the video card and adjacent cards if possible. Sound cards are also significant heat sources, so give them second priority when juggling empty slots. If your case came with slot covers preinstalled, remove and set aside the slot covers and screws for each position where you will install a card. You may find that removing all slot covers makes it easier to install cards. If internal cables connect to the card (e.g., a SCSI host adapter or a sound card), connect those cables before installing the card. Install each card as follows: Align the card bracket so its bottom tab will slide into position between the case and the motherboard. Align the card-edge connector on the bottom of the card with the expansion slot. Before proceeding, make certain that the card aligns with the slot both side-to-side and front-to-back. Well-designed motherboards, cards, and cases are built to close tolerances, and nearly always align properly, as shown in Figure 28-41. Figure 28-41. With a high-quality case (this one a PC Power & Cooling mini-tower), expansion cards align properly front to back  Inexpensive components, particularly cases, are often built sloppily and may make it impossible to align the card with the slot front-to-back, as shown in Figure 28-42. We have seen cheap cases cause a misalignment of a quarter inch (6.35 mm) or more. If you encounter this problem, the best solution is to replace the case with a better model. If for some reason you can't do that, use your needle-nose pliers to bend the card bracket slightly to allow the connector to align with the slot. Figure 28-42. With a cheap case (this one a no-name Taiwanese product), it may be impossible to align expansion cards with the expansion slots  With the card aligned properly with the slot, use both thumbs to press straight down until the card seats fully in the slot, as shown in Figure 28-43. This may require significant pressure. You should be able to feel and hear the card seat. When the card is fully seated, the top of its bracket should be flush with the chassis, and the screw slot in the card bracket should align with the screw hole in the chassis. When the card is fully seated and properly aligned, insert a screw to secure it. Figure 28-43. When you're sure the card is aligned, press down firmly with both thumbs until it seats fully  Install a slot cover in each open slot position and secure it with a screw. Do not leave slot covers off unoccupied slots. Doing so damages cooling air flow.  | We usually install all expansion cards first, and then install and configure the operating system. If you are building a heavily loaded Windows 9X/2000 system, it may be easier to configure if you install expansion cards incrementally. That is, install Windows with only essential cards (video and perhaps SCSI) in place. Once the system is configured properly, shut it down and install the sound card. Sound cards are notorious resource hogs, and should be installed immediately following video to give them first choice of available resources. Once video and sound work, install the other cards one by one. Using this piecemeal method sometimes allows Windows Plug-N-Play to configure the system properly when attempting to configure everything at once fails. Also note that some motherboards allow "locking down" specific IRQs to specific slots. If your motherboard supports this feature, you can use it to solve problems that may occur when Windows shares an IRQ with multiple devices. For example, slow video may be cured by making sure the video IRQ is not shared. Windows NT does not support Plug-N-Play, so there is no advantage to using this incremental method with it. Also be careful using this method with Windows XP, because if you add or change the hardware environment significantly after activating Windows XP, you'll have to get a new activation code. |
|
|