Hack 34. Clean Your Primary Mirror  
Eliminate crud and protect against corrosion. The primary mirror of a Newtonian reflector, exposed as it is to outside air, inevitably gathers dust, water spots, film and haze from air pollution and other contaminants. Depending on how often you use your scope, how well you protect it against dust and other contaminants when it is not being used, and the environment at your observing site, your mirror may become dirty enough to need cleaning every few months or it may remain acceptably clean for years on end. The only way to determine if a primary mirror needs to be cleaned is to remove it from the scope and examine it. Newbies often shine a flashlight down the tube and are invariably horrified at how dirty the mirror appears, even when the telescope is new. No mirror, even one freshly cleaned, can survive the "flashlight test." Every speck of dust and every smudge jumps out at you. Dust and smudges appear ugly, but the truth is that they have little effect on image quality. Consider this: your secondary mirror sits directly in the path of the incoming light, and so is the equivalent of a chunk of dust or a smudge a couple of inches in diameter, and it has almost zero effect on image contrast and clarity. How little, then, will a few small smudges and some dust affect what you see? Not at all. The real reason for cleaning a mirror is to remove the surface film of air pollutants that may eventually eat into your mirror's surface, etching it and exposing the reflective aluminum coating to airborne pollutants. Salt air is an even greater danger to your mirror. If your observing site is near the ocean, we recommend cleaning your mirrors frequently. Conventional advice emphasizes the dangers of cleaning a mirror and recommends doing it as seldom as possible, usually at most every year or two. We think that's overly cautious, although it is true that the mythical average astronomer's mirror probably needs to be cleaned no more frequently than that. But judge for yourself based on your own environment and usage pattern. More importantly, check your mirror periodically. (Just don't judge by shining a flashlight down the tube; no mirror, even one just cleaned, looks good under that harsh lighting.) When your mirror looks as though it needs to be cleaned, clean it. In truth, a mirror is a pretty rugged item. It is, after all, a chunk of glass an inch or two thick. We've seen bullet-proof glass that was thinner than some primary mirrors. It's true that the mirror surface is finished to an accuracy measured in millionths of an inch and that the reflective aluminum coating is only a few atoms thick. But careful cleaning, no matter how frequently done, has no effect on the surface figure or the reflective coating. The aluminum reflective layer is covered with a thin layer of silicon dioxidethat's quartzwhich is very hard and reasonably resistant to scratching.  | The real risk of cleaning your mirror isn't scratching the coatings; it's dropping the mirror. When you clean your mirror, take precautions to prevent dropping it. Actually, if you drop a typical primary mirror on your foot, you're more likely to hurt your foot than the mirror. But mirrors have been known to shatter when dropped, and even if the mirror remains in one piece you may scratch the optical surface. Wear rubber gloves for a surer grip, and try to keep the mirror only inches above a padded surface at all times. |
|
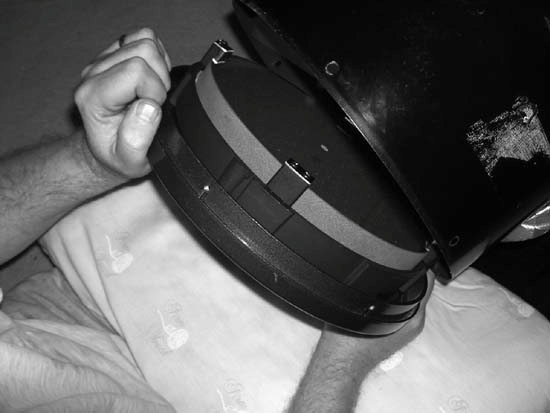
We suggest the following method to clean small and medium primary mirrors, those up to about 12.5" in diameter that weigh no more than 20 pounds or so. Prepare your work area. Using the kitchen sink is traditional, but if you clean your mirror there make absolutely sure the sink and surrounding surfaces are completely clean. Even one particle of abrasive cleaner grit can scratch the mirror. Pad the bottom of one side of the sink with a frequently-washed folded towel or use a RubberMaid tub to provide a soft resting surface for the mirror. Fill that side of the sink to a depth of three or four inches with lukewarm water, adding a good squirt of Dawn or a similar clear dishwashing liquid. If your mirror is particularly filthy, add a pint of isopropanol for every gallon of water. Remove the primary mirror cell from your scope, as shown in Figure 3-4, and carry the mirror in its cell to your work area. The mirror cell may be difficult to remove. In extreme cases, you may even need to use a hammer to free the cell from the tube. (Use a rubber mallet or a scrap piece of lumber to protect the tube and cell.) Because the primary mirror cell may come loose suddenly, it's a good idea to have a pillow or other soft landing spot under the mirror cell in case you drop it. Also, if you are removing the mirror cell from a Dobsonian scope, remember that the tube will nosedive as soon as you pull the mirror cell. We generally support the front end of the tube with a chair, stool, or similar object, or have a helper support the front of the tube until the primary mirror cell is removed. Remove the primary mirror from its cell. If it is not already marked, it's a good idea to make index marks on the side of the mirror and on the mirror cell so that you can later reinstall the mirror in the original orientation. When you handle the mirror itself, wear rubber gloves, which both prevent getting fingerprints on the mirror and give you a much better grip on the mirror, particularly once it's wet and slippery. Avoid touching the surface of the mirror; handle it only by the edges as much as possible. Figure 3-4. Removing the primary mirror cell 
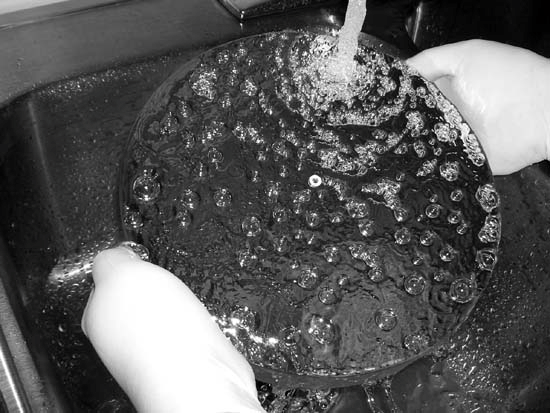
Run the tap water until it is lukewarm. Hold the primary mirror at an angle, as shown in Figure 3-5, and rinse the surface thoroughly with tap water. The goals are, first, to rinse off any grit or other abrasive particles, and, second, to remove as much as possible of the water spotting, film, and other grunge without touching the surface of the mirror. Don't hurry this process. We generally spend five minutes or more rinsing our 10" primary mirror. Make sure the water stream touches every part of the surface. The stream of water from the tap is a gentle, safe way to dislodge grunge without touching the mirror.  | If you are concerned about thermal shock, make sure your mirror has equilibrated to room temperature and rinse it with room temperature water. Many mirrors use Pyrex glass, which is very resistant to thermal shock. But even plate-glass mirrors are not at risk if the temperature difference is small. We wouldn't bring a mirror in from a cold outdoor storage place and run hot water over it before it had a chance to warm up to room temperature, but we can't imagine that running lukewarm water over a room-temperature mirror could cause a problem. |
|
Figure 3-5. Rinsing the primary mirror 
After the mirror is thoroughly rinsed, lower it gently (face-up) into the sudsy water on the other side of the sink. Swish it around gently in the sudsy water for a minute or so, and then allow it to rest on the towel or other soft surface at the bottom of the sink. Then allow the mirror to soak for at least 10 minutes or so. If it's particularly dirty, it won't hurt to let it soak for an hour. Swish the mirror one last time for a minute or so, and then carefully lift it from the sudsy water and rinse it thoroughly under tap water set to about the current temperature of the sudsy water. Examine the surface of the mirror carefully. Unless the mirror was truly filthy, it's probably now as clean as it needs to be. If any streaks or smudges remain on the mirror, decide whether to continue cleaning the mirror or declare the job done. Minor streaks and smudges have almost no effect on image quality, so it's usually best and always safer to accept whatever minor problems remain. If in doubt, play it safe by skipping the following step. Otherwise, proceed to the next step.  | The center of the mirror, that portion shaded by the secondary mirror, does not contribute to the image you see in the eyepiece. Any spots or other contamination near the center of the primary mirror (including, of course, the center spot) can safely be ignored. |
|
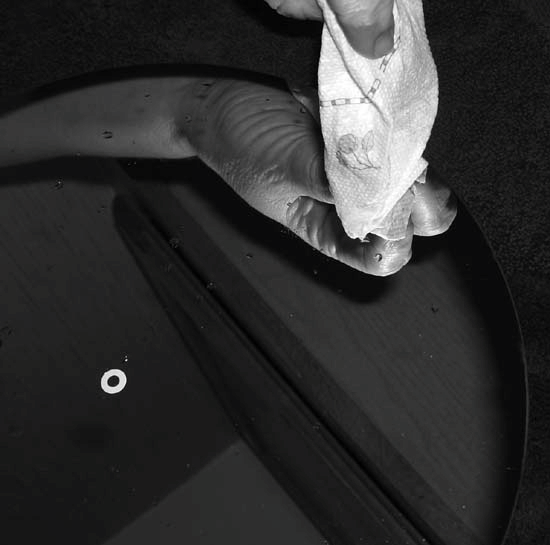
Resubmerge the mirror in the sudsy water. Holding the mirror at a slight angle under the surface of the water, draw a pad of sterile surgical cotton or a cotton ball across the surface of the mirror from one side to the other. Do not press down on the cotton. You're not scrubbing the mirror, but only using minor pressureusually the weight of the cotton itself is sufficientto remove any remaining film, spots, or other contaminants. Use each piece of cotton only once; replace the cotton for each swipe. Once the mirror is clean and thoroughly rinsed with tap water, the next step is the final rinse. Hold the mirror nearly vertical, resting on a soft pad, and flood it with at least a gallon of distilled water to which you have added a drop or two of surfactant to reduce the surface tension of the water and prevent beading. We use Kodak Photo-Flo surfactant, which many astronomers prefer, but a drop or two of clear dishwashing liquid such as Dawn works just as well and leaves no residual film. Hold the mirror vertically and allow the final rinse to drain completely. If the mirror is clean, the rinse water will "sheet" off the mirror, leaving few or no droplets on the mirror surface. You can remove whatever droplets remain by using the corner of a paper towel to absorb them without touching the mirror's surface, as shown in Figure 3-6. When the mirror surface appears pristine and dry, place the mirror face up on a folded towel or other soft surface and allow it to dry thoroughly. If you're concerned about dust, cover the surface of the mirror with sheets of facial tissue. Once the mirror is completely dry, put it back in the mirror cell and reinstall it in the telescope.
After you reinstall the mirror, you'll need to recollimate your scope [Hack #38] and realign the finder [Hack #55]. Figure 3-6. Removing water droplets with a paper towel 
 | For large, heavy mirrors, the best cleaning method is a matter of debate. Mirrors in amateur instruments can be as large as 40" in diameter and weigh up to several hundred pounds. Obviously, it's impractical to clean a mirror even half that size using the method described previously. Handling a large, heavy, wet piece of glass that costs thousands of dollars is a recipe for disaster. But, there are alternatives. Some astronomers clean their large mirrors in situ using water, alcohol, and cotton. Others clean their large mirrors using collodion, which is a highly flammable solution of nitrocellulose or guncotton in diethyl ether. Collodion is applied directly to the mirror surface, where it dries quickly to a thin, tough film. The film is then peeled away from the mirror, carrying dust, smudges, and other contaminants with it. A mirror cleaned properly with collodion is as clean as it is possible for it to be, but collodion is expensive and we consider it too dangerous for routine use. |
|
|


