Lesson 1: Assessing Patch Levels
|
| < Day Day Up > |
|
Auditing is one of security's core concepts. Without auditing, security degrades over time. Updating is certainly no exception to this; even if you configure an airtight updating infrastructure, at some point a computer on your network will go unpatched. This can happen when a mobile computer is disconnected from the network for an extended period, when a user changes a computer's configuration settings, and when the installation process of an update is interrupted.
MBSA is a powerful tool that you can use to assess the patch levels on your network. If and when a computer fails to install an update, MBSA can detect it. If there are rogue computers on your network that are not participating in your patching infrastructure, MBSA can find them. You can even schedule MBSA to scan your network for unpatched computers at night, so you can review the reports in the morning without waiting for the scan to occur.
After this lesson, you will be able to
-
Use the graphical MBSA console to identify unpatched computers on your network.
-
Use the command-line MBSACLI tool to identify unpatched computers on your network.
-
Schedule automatic scanning for unpatched computers.
Estimated lesson time: 60 minutes
The MBSA Console
Microsoft Baseline Security Analyzer (MBSA), which was also discussed in Chapter 4, is used to analyze one or more computers for vulnerabilities in two categories: weak security configurations and missing security updates. This section focuses on using MBSA to scan for updates that should have been installed but have not been.
After installing MBSA, you can use it to scan all computers on your network or domain for which you have administrator access. To scan all computers on a specific subnet using your current user credentials:
-
Start MBSA by clicking Start, pointing to All Programs, and then clicking Microsoft Baseline Security Advisor.
-
On the Welcome To The Microsoft Baseline Security Analyzer page, click Scan More Than One Computer.
-
On the Pick Multiple Computers To Scan page, type the IP address range you want to scan. To speed up the scanning process, clear all check boxes except for Check For Security Updates. If you have a Software Update Services (SUS) server on your network, you can further speed up the process by selecting Use SUS and specifying the server. Figure 6.1 shows MBSA configured to scan the 192.168.1.0 subnet for security updates.
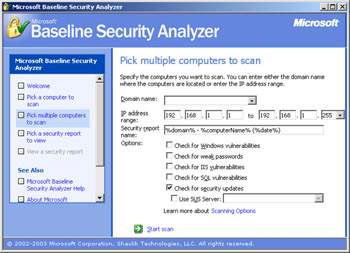
Figure 6.1: MBSA configured to scan a subnet -
Click Start Scan.
As MBSA performs the scan, it will keep you updated on the progress, as shown in Figure 6.2.
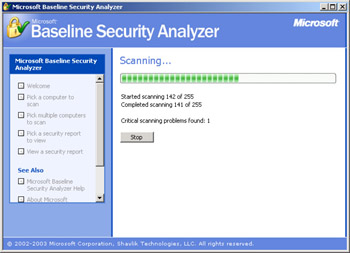
Figure 6.2: MBSA scanning a subnet -
After the scan is completed, the View Security Report page appears, listing the computers that were scanned.
| Note | If you do not have sufficient credentials on a computer, MBSA will display the Internet Protocol (IP) address of the computer and the message, 'User Is Not An Administrator On The Scanned Machine.' |
Missing updates are marked by a red X, and out-of-date updates are marked with a yellow X. A green checkmark denotes a scan that was completed successfully with no missing updates found. Scan reports are stored on the computer from which you ran MBSA in the %userprofile%\SecurityScans folder. An individual security report is created for each computer that is scanned.
During the scanning process, MBSA uses NetBIOS over Transmission Control Protocol/ Internet Protocol (TCP/IP) and Common Internet File System (CIFS) protocols to connect to computers, which requires TCP ports 139 and 445. If there is a firewall blocking these ports between you and the target computers, or if the computers have Internet Connection Firewall enabled and these ports have not been opened, you will not be able to scan the computers.
At the beginning of the scan, MBSA must retrieve an XML file that provides information about updates and security vulnerabilities. By default, this file is retrieved from the Microsoft Web site at http://go.microsoft.com/fwlink/?LinkId=16932 and includes every current update available from Microsoft. If you use SUS to approve specific updates, select the Use SUS check box and provide your SUS server's host name. This will cause MBSA to retrieve the ApprovedItems.txt file located at the root of Internet Information Services' default Web site. Specifying this option will configure MBSA so that it does not mark updates that you deliberately choose not to deploy.
I spent several years at a company that had a few hundred Internet-connected servers that ran Microsoft Windows. Whenever there was a major worm or virus making the rounds, we would scan all of our computers for vulnerabilities to make sure they had all been updated. Normally, we did this by checking each of the IP addresses that we had listed for our servers.
One day I was feeling lazy and decided to simply scan all the subnets in our data center instead of scanning just the IPs listed in our database of servers. What I found surprised me-we had dozens of servers that were vulnerable and that were not listed in the database! Most of these computers had passed by unnoticed, but a handful had been intentionally removed from the database. They all had one thing in common, though: they had not been updated.
There might be cases in which MBSA reports that an update is not installed, even after you complete an update or take the steps documented in a security bulletin. There are two reasons for these false reports, both of which should simply be noted and ignored for future scans:
-
Files scanned were updated by an installation that is unrelated to a security bulletin. For example, a file shared by different versions of the same program might be updated by the newer version. MBSA is unaware of the new version and, because it does not encounter what is expected, it reports that the update is missing.
-
Some security bulletins are addressed not by a file update but by a configuration change that cannot be verified. These types of flags will appear as Note or Warning messages, marked with blue asterisks or yellow Xs, respectively.
MBSACLI
Scanning a large network should be done on a regular basis to find computers that have not been properly updated. However, scanning a large network is a time-consuming process. While the MBSA console is the most efficient way to interactively scan a network, the Microsoft Baseline Security Analyzer command-line interface (MBSACLI) provides a way to script an analysis. By using scripts, you can schedule scanning to occur automatically, without your intervention. In this way, you can have MBSACLI generate a report that you can refer to on demand.
| Security Alert | It's convenient to schedule MBSACLI scans after business hours so you don't consume network resources during working hours; however, if you do this, you won't scan computers that users take home with them. It's a good idea to schedule scans at various times during the day. |
Another good reason to schedule scans by using MBSACLI is to scan from multiple points on your network. For example, if your organization has five remote offices, it is more efficient to scan each remote office by using a computer located in that office. This improves performance, reduces the bandwidth used on your wide area network, and allows you to scan computers even if a perimeter firewall blocks the ports that MBSACLI uses to scan.
MBSACLI runs in one of two modes: MBSA and HFNetChk. MBSA mode provides similar functionality to that of the graphical MBSA console. HFNetChk mode provides backward compatibility with earlier versions of the tool, and also provides additional functionality not supported in MBSA mode. Some of the additional features provided by HFNetChk mode are connecting to network resources as another user, specifying an XML data source, and scanning a set of computers specified in a text file. HFNetChk mode scans only for missing updates; it will not scan for other types of vulnerabilities, such as weak configuration settings.
As with the MBSA graphical console, you need administrative access to use MBSACLI to scan a computer. If you are scanning a remote computer and need to verify your administrative access and network connectivity from a command prompt, you can use the command Net use \\computername\c$. Establishing a connection to the hidden administrative C$ share uses the same network protocols that MBSACLI will use. After a connection is established, MBSA will use the existing connection and credentials. Therefore, if you need to connect to a remote computer using different credentials, and do not want to use HFNetChk mode, first establish a connection with the Net Use command. The following example scans the remote computer with the IP address 192.168.1.204 using the user name admin1 and the password je#o23$sti:
net use \\192.168.1.204\c$ /user:admin1 je#o23$sti mbsacli /i 192.168.1.204 net use \\192.168.1.204\c$ /delete
Table 6.1 lists the parameters available in MBSACLI's MBSA mode.
| Parameter | Description |
|---|---|
| /c computername | Scans the host with the specified computer name. |
| /i ipaddress | Scans the host with the specified IP address. |
| /r ipaddress1- ipaddress2 | Specifies an IP address range to be scanned, beginning with ipaddress1 and ending with ipaddress2, inclusive. |
| /d domain_name | Scans all computers in a specified domain. Of course, your computer must be able to identify those computers. It uses the same mechanism as Network Neighborhood, so if you can browse computers in Network Neighborhood, this switch will work. |
| /n scans | Skips specific scans. You can choose OS, SQL, IIS, Updates, and Password. If you want to suppress multiple scans, separate them with a + sign. For example, to scan only for updates, use the command Mbsacli /n OS+SQL+IIS+Password. |
| /o 'template' | Uses a different template for the report file name. By default, the name is %domain% - %computername% (%date%). If you put one or more spaces in the template, be sure to enclose it in quotes. |
| /f filename | Redirects Mbsacli summary output to the specified file. This does not redirect all the output you would normally see on the console-just the summary of the scanned computers. Copyright and status information is still displayed on the console, but it is not recorded in the file. |
| /qp, /qe, /qr | Does not display the scan progress, error list, and report list, respectively. |
| /s suppress_level | Specifies a suppression level of 0, 1, or 2. Specifying a level of 1 suppresses security update check notes; the default level of 2 suppresses both security update check notes and warnings. Specifying a level of 0 suppresses nothing. |
| /baseline | Causes MBSACLI to check only for baseline security updates. |
| /nosum | Prevents MBSACLI from testing file checksums. This option is automatically enabled when you use the /sus option. |
| /sus susserver | Checks only for updates that have been approved at the specified SUS server. Provide the computer name or IP address with the http:// prefix. For example, to only scan for updates approved on a SUS server named Computer1, execute the command Mbsacli /sus http://computer1. |
| /e | Lists the errors from the latest scan, without actually performing a scan. |
| /l, /ls | Lists all available reports, or just the reports created in the latest scan, respectively. |
| /lr 'reportname', / ld 'reportname' | Displays an overview or detailed report summary, given the file, name of the report. You do not need to specify the full file name-only the name of the report. For example, the following command would show a report for Computer1: mbsacli /ld "Cohowinery.com - Computer1 |
| /v | Displays security update reason codes when you are viewing a report by using the /lr or /ld options. For example, the /ld parameter will list every update that could not be verified, and will provide the security update number and description. Add the /v parameter, and MBSACLI will add a detailed explanation for every update, such as 'File C:\WINDOWS\system32\hhctrl.ocx has a file version [5.2.3735.0] greater than what is expected [5.2.3669.0]'. In this example, viewing the reason code might allow you to determine that there is no cause for alarm. |
| /hf | Switches to HFNetChk mode. When used, this must be the first parameter. All parameters following this parameter must be HFNetChk-mode parameters. |
MBSACLI does not output information about vulnerabilities directly to the console. Instead, it only displays the computers scanned and the overall assessment. The details of the scan are stored in an XML report that is saved in your %userprofile%\SecurityScans\ folder. By default, the file name for each report is set to domain - computername (date).
You can view the reports by using the graphical MBSA console, however. Simply start MBSA and then click View Existing Security Reports. MBSA will show the Pick A Security Report To View page, listing all of the available reports. You can also view them from the command line by using the /ld parameter and specifying the report file name.
To use the HFNetChk mode of MBSACLI, use /hf as the first parameter. Then provide the standard HFNetChk parameters. Table 6.2 lists each of the parameters that can be used in HFNetChk mode. To call each of these parameters, execute the command MBSACLI /hf parameters.
| Parameter | Description |
|---|---|
| -about | Shows copyright information before performing standard scanning functions. |
| -h computername | As with MBSA mode, scans the host with the specified computer name. |
| -i IP_Address | As with MBSA mode, scans the host with the specified IP address. |
| -r range | As with MBSA mode, scans a range of IP addresses. |
| -d domain_name | As with MBSA mode, scans an entire domain. |
| -fh hostfile | Specifies a file containing a list of computer names to scan. To create the hostfile, simply create a text file and list each computer name on a separate line. The list can have up to 256 computer names. |
| -fip ipfile | Specifies a file containing a list of IP addresses to scan. To create the ipfile, simply create a text file and list each IP address on a separate line. The list can have up to 256 IP addresses. |
| -fq ignorefile | Specifies a file containing a list of Knowledge Base articles relating to updates that should be ignored. To create the ignorefile, simply create a text file and list each Knowledge Base article number on a separate line. |
| -n | Scans all computers in the local workgroups or domains. This switch is similar to the -d switch for a domain, but all computers from all domains in the network neighborhood are scanned. |
| -history level | Displays hotfixes that have been explicitly installed, explicitly not installed, or both. You can use any of three values with this switch:
|
| -t threads | Displays the number of threads that are used to run the scan, which controls how many actions the scanner will perform simultaneously. Possible values are from 1 to 128. The default value is 64. Setting a value over 64 might increase the speed of the scanner, and setting the value lower than 64 might slow it down. You might want to slow the scanner down to reduce the network capacity consumed by the scanner. |
| -o outputtype | Specifies the output format. You can specify -o tab to generate output in a tab-delimited format that can be easily parsed, or the default -o wrap to generate output in a more readable format. You must use tab output when you scan more than 255 hosts. Use only the tab format when importing the output into another application, such as Microsoft Excel. |
| -x datasource | Specifies the XML data source that contains the hotfix information. The location can be an XML file name, a compressed XML .cab file, or a Uniform Resource Locator (URL). The default file is the Mssecure.cab file from the Microsoft Web site. When you run mbsacli /hf without the -x switch, the XML file is downloaded from the Microsoft Web site. The XML file is named Mssecure.xml and is typically located in the same folder as the Mbsacli_/hf.exe file. After you download the file, you can run future scans with the -x switch. For example: mbsacli /hf -x http://computer1/hotfixes.xml or mbsacli /hf -x s:\security\hotfixfile.xml |
| -s suppress | Suppresses note and warning messages. Using the -s 1 parameter suppresses note messages only. Using -s 2 suppresses both note and warning messages. By default, both notes and warnings are displayed. |
| -z reg checks | By default, the hotfix registry key specific to each update is examined to determine if the update is installed. If the registry key does not exist, MBSACLI reports that the update is missing. If the registry key does exist, MBSACLI examines the file versions and checksums. Under some circumstances, a registry key might not exist even if the hotfix is installed. Under these circumstances, you can use the command mbsacli /hf -z to perform only the file checks. |
| -nosum | Specifies that the tool should not perform checksum validation for the hotfix files. This switch exists primarily because earlier versions of MBSACLI did not detect non-English language versions of Windows, which use different checksums. |
| -b | Scans your computer only for those hotfixes that are marked as baseline critical by the Microsoft Security Response Center (MSRC). Use this parameter only if you have determined that your computers need only the baseline critical updates. |
| -v verbose | Displays the specific reason a test failed, and should almost always be used. This switch is enabled by default when the -o tab parameter is used. |
| -f outfile | Unlike MBSA mode, the HFNetChk mode of MBSACLI does not create an XML file containing the results of the report. Instead, you need to use the -f switch to specify the name of a file in which to store the results. For example, to store the results of a tab output to a file named Update- scan.txt on drive C, you would use the command mbsacli /hf -o tab -f c:\Update-scan.txt |
| -u username -p password | By default, mbsacli /hf scans computers by using the credentials of the user who is currently logged on to the computer that is performing the scan. This switch specifies the user name to use when you scan a local or a remote computer or group of computers. |
| -sus susserver | As with MBSA mode, this parameter specifies to check only for updates that have been approved at the specified SUS server. Unlike in MBSA mode, if you do not specify a server, MBSACLI in HFNetChk mode will try to obtain the list of approved security updates from the SUS server that is listed in the registry of the scanning computer. |
| -sum | Forces a checksum scan when you scan a non-English-language computer. Use this switch only if you have a custom XML file with language- specific checksums. |
| -trace | Creates a file named Hf.log in the local folder that contains debugging information to help with troubleshooting. You must specify the -trace switch immediately after the /hf parameter. |
Practice: Assessing Patch Levels on the Current Network
In this practice, you will asses the patch levels on your network by using both the graphical and command-line MBSA tools.
Exercise 1: Assess Patch Levels on the Current Network Using MBSA
In this exercise, you will install MBSA and scan your local network.
-
Log on to the cohowinery.com domain on Computer1 using the Administrator account.
-
Temporarily connect Computer1 to the Internet, and download MBSA from http:
//www.microsoft.com/technet/security/tools/tools/mbsahome.asp. -
Transfer the MBSA setup files to Computer1, and install MBSA.
-
Start MBSA by clicking Start, pointing to All Programs, and then clicking Microsoft Baseline Security Analyzer.
-
Click Scan More Than One Computer.
-
In the IP Address Range boxes, specify 192.168.1.1 to 192.168.1.255.
Important If you used a different IP subnet for your computer, specify the start and end of that subnet instead.
-
Clear Check For Windows Vulnerabilities, Check For Weak Passwords, Check For IIS Vulnerabilities, and Check For SQL Vulnerabilities.
-
Click Start Scan.
-
After the scan completes, click the first security report.
-
Scroll to the Security Update Scan Results section. If a red X appears beside the Windows Security Updates row, click Results Details.
-
Examine the list of missing updates for that computer. Close the window.
-
If it is available, click Next Security Report at the bottom of the page. Examine the results of the Windows Security Updates assessment, as described in steps 10 and 11. Repeat this step until you have assessed the patch level on all computers in the subnet.
Exercise 2: Automating Scanning with MBSACLI
In this exercise, you will schedule your local network to be scanned every day at 3:00 A.M. To complete this exercise, you must have Computer1 connected to the Internet and MBSA installed, as described in Exercise 1.
-
Log on to the cohowinery.com domain on Computer1 using the Administrator account.
-
Create a folder named C:\Scripts.
-
In the C:\Scripts folder, create a text file named scan_network.bat. Edit the new file by using Notepad, and add the following line:
'C:\Program Files\Microsoft Baseline Security Analyzer\mbsacli' /n OS+IIS+SQL+PASSWORD /r '192.168.1.1-192.168.1.255'
Important If you used a different IP subnet for your computer, specify the start and end of that subnet instead.
-
Click Start, point to All Programs, point to Accessories, point to System Tools, and then click Scheduled Tasks.
-
Double-click Add Scheduled Tasks.
The Scheduled Task Wizard appears.
-
Click Next.
-
Click the Browse button, and navigate to the C:\Scripts\Scan_network.bat file. Click Open.
-
Click Daily, and then click Next.
-
Set the Start Time field to 3:00 A.M., and then click Next.
-
Enter your user name and password in the appropriate fields, and then click Next.
-
Click Finish.
-
Verify that the scheduled task will run correctly by launching it immediately. Right- click the scan_network task, and then click Run.
-
After the scan has completed, start the graphical MBSA console.
-
Click Pick A Security Report To View. Note that the reports generated by the scheduled task appear in the list and can be viewed.
-
Close the MBSA console and disconnect Computer1 from the Internet.
Lesson Review
The following questions are intended to reinforce key information presented in this lesson. If you are unable to answer a question, review the lesson materials and try the question again. You can find answers to the questions in the 'Questions and Answers' section at the end of this chapter.
-
By default, where do MBSA and MBSACLI store security reports?
-
C:\MBSA
-
C:\Documents and Settings\username\
-
C:\Documents and Settings\username\Security Scans\
-
C:\Documents and Settings\username\My Documents\Security Scans\
-
-
Which of the following commands would scan the subnet 192.168.5.0?
-
mbsa -n 192.168.5.0
-
mbsacli -i 192.168.5.1-192.168.5.255
-
mbsacli -n 192.168.5.1-192.168.5.255
-
mbsacli -r 192.168.5.1-192.168.5.255
-
Lesson Summary
-
The graphical MBSA console is the most efficient way to scan a single computer or multiple computers for the presence of updates.
-
The graphical MBSA console can be configured to scan a single computer, a range of IP addresses, or all computers contained within a domain.
-
MBSA stores reports in XML format in the C:\Documents and Settings\username\SecurityScans folder by default. At any time, you can view these reports by using MBSA.
-
MBSACLI provides a command-line interface to MBSA's scanning functionality. MBSACLI functions in two modes: standard MBSA mode and the backward compatible HFNetChk mode.
-
Scanning a large number of computers can take several hours and consumes significant network resources. Therefore, you should schedule the scanning to occur after business hours by using the command-line tools.
|
| < Day Day Up > |
|
EAN: 2147483647
Pages: 217
- Chapter IV How Consumers Think About Interactive Aspects of Web Advertising
- Chapter X Converting Browsers to Buyers: Key Considerations in Designing Business-to-Consumer Web Sites
- Chapter XI User Satisfaction with Web Portals: An Empirical Study
- Chapter XIII Shopping Agent Web Sites: A Comparative Shopping Environment
- Chapter XVI Turning Web Surfers into Loyal Customers: Cognitive Lock-In Through Interface Design and Web Site Usability