Getting Pictures onto Your PC
One of the ironies of computers is that they're ruthlessly logical yet allow people to pursue their creative hobbies. Photography is just one example, and there are usually two ways of getting pictures onto your PC: using a digital camera or using a scanner. We'll look at both methods here, starting with digital cameras.
Transferring Photos from a Digital Camera
Digital cameras have been around for a while now and offer a genuine alternative to traditional film photography. They store pictures on computer memory cards rather than on film, meaning their images can quickly and easily be downloaded to a PC. This means you don't need to have prints made, and then scan them in to your PC.
There are usually two ways of getting the pictures off digital cameras: via a direct cable connection to the camera into your USB or serial port, or by using a card reader. The latter requires buying an extra piece of hardware into which you insert the memory card from the camera so you can download images from it, but this is the method preferred by professional digital photographers and serious hobbyists. SUSE Linux supports both ways of working.
Using a Card Reader
When you use a card reader, SUSE Linux simply mounts the contents of the memory card into a folder on your hard drive. I'll describe how mounting works in Chapter 15, but basically it makes a virtual folder on your hard disk, from which you can access the contents of the memory card. In most cases, you can read, delete, and even write new contents to the card in this way. No extra software is necessary, and you can simply use Konqueror, the standard hard disk file browser under SUSE Linux, to access the folder's contents.
| Note | If there's no card in the reader, it probably won't be identified by SUSE Linux when you plug it in. Only when there's a card present will the reader hardware actually be installed and made ready for use. |
With a card reader, the setup procedure is simple: attach it to your PC and insert the memory card. You'll see a message on the screen telling you in which folder the contents have been made available, and this should open in a Konqueror window so you can access the files. You'll need to remember this folder name, because you won't be told next time you insert the card; the card reader will simply be mounted in the background without any feedback. However, if necessary, you can usually track down the folder by clicking My Computer on the desktop and browsing to the removable storage devices on your computer, as shown in Figure 8-15.
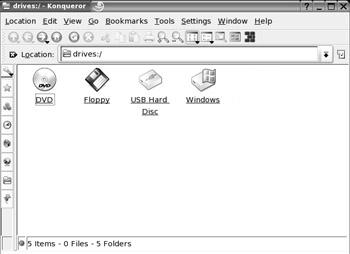
Figure 8-15. When the card reader or camera has been mounted, it will be available under My Computer on the desktop as USB Hard Disc.
When you're finished, close the file browser window, and then remove the card.
| Caution | Be very careful not to remove a memory card from a card reader while you're writing or reading from it on your PC. This will most likely damage the card irreparably. At the very least, it will wipe the contents of the card, so you'll lose your photographs. |
Using a Cable Connection
Setting up a digital camera cable connection is usually easy. In most cases, you can simply plug it in to your USB port, turn it on, and SUSE Linux will recognize it and make its contents available in a folder (in a virtually identical way to that described above for a card reader).
SUSE Linux comes complete with the Digikam software, which includes support for the vast majority of digital cameras, including many older cameras (those a few years old that connect to your PC by its serial port). Because of the way these cameras work, they are not usually automatically configured by SUSE Linux, hence the need for a separate software package. To configure your camera through Digikam, follow these steps:
-
Select K menu ® Graphics ® Photograph to start Digikam.
-
Select Settings ® Configure Digikam and click the Cameras tab. This is where you let Digikam know the make and model of your camera, as well as how you connect it to your PC.
-
If your camera connects via USB, as most modern models will, simply click the Auto-Detect button (assuming you've plugged your camera in). With any luck, your PC should automatically find the camera and set it up for you. You can then click the OK button.
-
If your camera isn't detected, click the Add button, and then select it from the list. You should find most of the other settings are selected automatically for you once you make the selection, as shown in Figure 8-16. Click OK.
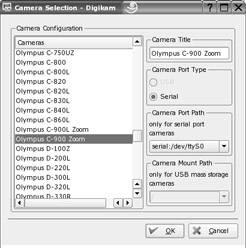
Figure 8-16. Select your camera from the list, and you should find that the technical settings are chosen automatically.Tip If your camera isn't listed but similar models are, try selecting the nearest available match. For example, I used an Olympus C920 Zoom to test this feature. This wasn't in the list, but the C900 Zoom was. Using this setting worked fine with my camera.
-
From the main program window, click Camera on the menu and then select your model from the list.
Once you select your camera in Digikam, it will attempt to connect to and read the images on your camera. After a few seconds (possibly longer if you're connecting via a serial cable rather than USB), you should see thumbnails of the images.
Viewing Photos with Digikam
Digikam likes to work with what it calls Albums, which are effectively ordinary folders on your hard disk that you can fill with photos from particular occasions—a wedding, birthday party, and so on. These folders can be browsed using the Konqueror file manager (which we'll discuss in depth in Chapter 12).
After you've loaded some pictures from your camera, as described in the previous section, click the New Album button to create an album into which to store your pictures, giving it a memorable name. To download your pictures into the album, simply click and drag the thumb-nail onto the main Digikam program window, and into the right side that shows the contents of the album.
| Tip | When naming albums, try to be as descriptive as possible. Rather than calling an album Birthday Party, for example, why not call it Jack's 8th Birthday Party – 10 June 04? But remember that, as with Windows, some punctuation marks (such as slashes) are not allowed in file and folder names. |
You can then close the camera window. In Digikam, double-click any picture you would like to see full size. If you look at the bottom of the window, you'll see a progress display showing how much of the picture has been downloaded.
Additionally, by clicking various icons on the Digikam toolbar, you can correct minor errors such as brightness and contrast (hover your mouse over each icon to see what it does).
When you're happy with the picture, simply click the Save icon in the top-right corner, and then close the window.
Setting Up a Scanner
Although scanners have fallen out of favor recently with the advent of digital photography, there's little doubt that they're vital for getting photographs and old documents onto your PC.
SUSE Linux scanner support can be a little hit and miss. However, the list of supported models grows bigger by the day, and this is just one reason why regular online updating is a good idea (we'll cover how to update your system online in Chapter 9).
| Note | Agfa scanners are particularly bad in terms of support. It is possible to get them working, but a firmware upgrade is necessary. To see how it's done and to download the necessary files, see http://snapscan.sourceforge.net. |
Configuring a Scanner
As with most hardware configuration, YaST2 is used to get the scanner up and running initially. Select K menu ® Control Center, click the YaST2 Modules, click the Hardware icon, and then click the Scanner icon. With luck, your scanner will be automatically identified. If not, YaST2 will let you know that it must be manually configured, as shown in Figure 8-17.
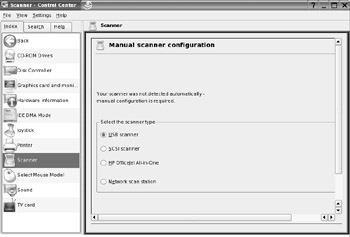
Figure 8-17. YaST2 will let you know if it cannot automatically detect your scanner.
To manually configure your scanner, just select your scanner's make and model from the list, as shown in Figure 8-18.
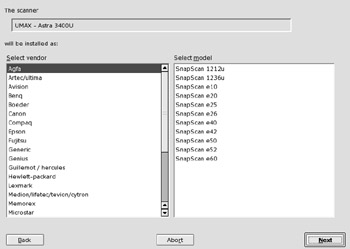
Figure 8-18. Select your scanner from the list.
Once this is complete, there's nothing else to set up, and it's simply a matter of clicking the Next and Finish buttons. You can opt to test the scanner if you wish to ensure it's working correctly (you might need to wait a minute or two for the scanner to start up).
Scanning Pictures
You can scan your pictures and documents using the Xsane program. Select K menu ® Graphics ® Scanning to start the program. It operates in a similar way to TWAIN scanner drivers under Windows, with similar configuration options. However, it works as a stand-alone program, rather than tying in with your favorite image editor.
In the main Xsane program window, you can set the scanning resolution with the topmost slider. A setting of 100 to 300 DPI is usually good enough for photographs; any setting above this will result in a massive file.
Beneath the DPI slider, you can set the gamma and contrast/brightness of the scanned picture. To help judge this, you can click Acquire Preview in the preview window. This will prescan the picture and give you an idea of how it will look when the actual scan takes place, as shown in Figure 8-19.
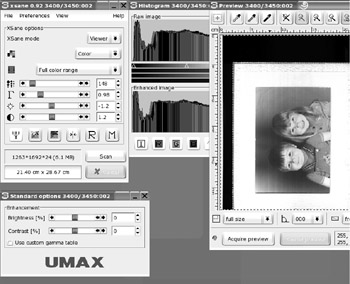
Figure 8-19. Once you've previewed the image with Xsane, you can adjust the brightness and contrast to get a better scan.
When you're happy with the results, return to the main Xsane program window and click the Scan button. This will scan the picture at the resolution you selected and, when it's finished, present the image in another preview window, which will fill the screen. If you're satisfied with what you see, select File ® Save the Image to the Hard Disk.
EAN: 2147483647
Pages: 293