Using 3D Effects
In addition to Fontwork effects, Impress includes a powerful 3D tool, which can give just about any on-screen element a 3D flourish. Start by creating a text box or shape using the Main toolbar on the left. Then select Format ® 3D Effects. This will open a floating palette window. Make sure your text box or shape is selected, and then simply double-click any of the 3D effects in the Favorites window. This will instantly apply the effect. Beneath the window are two icons that give you a choice of simply applying the 3D effect to the selection (the left icon), or applying the color and texture within the preview as well.
If you would like more control over the effect, you can click the icons at the top of the 3D Effects palette. These will let you construct your own effects, although if you've previously selected one of the ready-made designs (which is a good idea if you're new to the tool), it will be used as a template. There are five other configuration panels, which each affect not only the type of 3D effect, but also its lighting:
-
Geometry: This defines how the 3D effect will look when it's applied to on-screen selections. For example, you can increase or decrease the rounded-edges value, and this will make any sharp objects on the screen appear softer when the 3D effect is applied.
-
Shading: This affects not the actual texture of the 3D object, but instead alters its color gradient. This is best demonstrated in action, so select the various shading modes from the drop-down list to see the effect. In addition, you can choose whether a shadow is applied to the effect, as well as the position of the virtual camera (the position of the hypothetical viewer looking at the 3D object).
-
Illumination: This lets you set the lighting effect. All 3D graphics usually need a light source because this helps illustrate the 3D effect; without a light source, the object will appear flat. Various predefined light sources are available. You can click and drag the light source in the preview window.
-
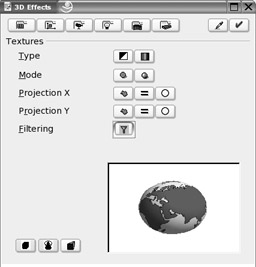
Textures: This affects how the textures will be applied to the 3D object. A texture is effectively a picture that is "wrapped around" the 3D object. Clever use of textures can add realism to a 3D object. A map of the world applied to a sphere can make it look like a globe, for example, or you could add wood or brickwork textures to make objects appear as tabletops or walls. A variety of texture modes are available, as shown in Figure 26-5.

Figure 26-5. You can apply textures to any object, basically meaning that pictures are wrapped around the item. -
Material: This lets you apply various color overlays on the texture. This can radically alter the texture's look and feel, so it is quite a powerful option. To change the texture itself, right-click the object and select Area. This will present a list of predefined textures. Alternatively, you can select to use a color or pattern.
As with the other presentation effects, the best policy is simply to experiment until you're happy with the results.
EAN: 2147483647
Pages: 293