6.3 Introduction to Firewall Filters
| Packet Filtering, as a concept, is the same regardless of the syntax needed to implement it. If you are reading this book, you have presumably done some type of filtering during your career. When working with Juniper Networks routers, the whole filtering process is known as firewall filtering. Thus, this chapter will focus on understanding the syntax behind the functionality present in Juniper Networks routers. The implementation of filtering within Juniper Networks routers is extremely powerful and based on many of the RFCs governing advanced IP services. It is also documented in the following RFCs:
Juniper Networks uses the name firewall filters not to imply in-depth firewall functionality, but rather, to generalize on the JUNOS ability to filter IP packets based on their content. This type of packet filtering allows you to protect your network and comes with a rich set of functions:
Note Remember the caveat that JUNOS only allows for IP-based filters! Filtering in a Juniper Networks router implies that upon the matching of criteria within a packet, an action can then be taken. However, firewall filtering has some dependencies based on the hardware that you have deployed in your network:
Firewall filters allow for the controlling of packets destined to and from the routing engine. There is no measured limit to the length and depth of the filters possible. However, common sense applies here; the more terms and conditions you apply with a filter, the longer it will take to process each IP packet against it. In practice, Juniper Networks reports filters in use with over 1,000 terms and conditions. 6.3.1 Firewall-Filter Terms and ProcessingStandard filtering, more commonly known as ACL regardless of vendor, follows a series of conditions that can be acted upon. These are known as conditions. When using Cisco Systems or Ericsson-manufactured routers, the packet filtering conditions are collectively known as statements within an ACL. In JUNOS, we use firewall filters that are built using terms. These terms, or statements, have conditions within them. As with other vendors ' products, the order of the terms affects the processing of the filter. When a match is found, the packet is immediately processed without further processing of the filter. As expected, if no match is found, the packet is discarded (implicit deny all). There are two types of conditions that are possible in JUNOS firewall filters: match and action. A match condition allows you to specify the conditions that a packet will be judged against. The possible parameters available for matching are as follows:
The action condition within a term specifies what the router is to do with the packet if it matches one of the match conditions defined above. The possible actions are as follows:
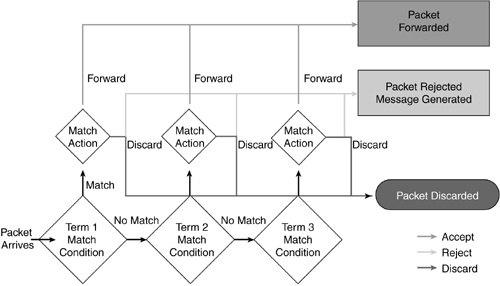
With firewall filters, packets can be statistically sampled, counted, or logged to provide data on traffic within your network, the effectiveness of your filter, or proof of possible attacks. Firewall filters can be applied to either a physical or a logical interface. Through the use of filters, you can implement rate limiting to prevent your router or network from being overwhelmed by certain types of packets. This can protect you from certain types of DoS attacks. 6.3.1.1 How Firewall Filters Are EvaluatedWhen a router receives a packet and a firewall filter is present, the packet will be judged to see if it matches the various conditions. Figure 6-9 traces the steps that the router will take as it processes a packet through a firewall filter. When a packet arrives (lower left of figure), the router checks its contents against each term in the filter. When a match occurs, the packet is then subject to the match action. If a term does not contain a from statement, the packet is considered a match and the action in the term's then statement is taken. If a term does not contain a then statement, or if an action is not configured in the then statement, and the packet matches the conditions in the term's from statement, the packet is accepted. Figure 6-9. Packet Process Using a Firewall Filter If a match does not occur, the packet is processed against the next term in the filter. These steps are repeated until either the packet matches a term and is processed according to the match condition, or until there are no more terms and the packet is discarded. Each firewall filter has an implicit discard action at the end of the filter, which is equivalent to the following explicit filter term: term implicit-rule { then discard; } Therefore, if a packet matches none of the terms in the filter, it is discarded. When a discard occurs, a Juniper Networks router does this silently. In essence, this means that the packet is discarded and no ICMP message is sent back to the transmitter letting it know this discard has happened . Please keep this in mind when troubleshooting your filters. 6.3.2 Configuration GuidelinesWhen configuring a firewall-filter layout, you should plan the terms and their associated match conditions before configuring the router to verify the logic. A good configuration rule of thumb is that you would want to place your most specific terms first to ensure that the processing (top-down) makes the filter function as you desire . There are a series of configuration steps that you must follow to activate and apply a filter properly. You need to configure the firewall in the [edit firewall] configuration hierarchy level and apply the filter to an interface for the filter to be considered active. When you create a firewall filter, the syntax needed is as follows: [edit firewall] filter filter-name { term term-name { from { match-condition; } then { action; action-modifiers; term implicit-rule { then discard; } } } The steps for configuring a firewall filter correspond to the syntax the router expects to see. The filter in this example stops IP packets sourced from martian routes from reaching the routing engine. In the many networks, there is no reason for packets sourced from these martian networks to be transmitted. Of course, you can easily apply a filter like this to prevent access to the routing engine from a network that is attacking your router. To configure the firewall filter, you need to do the following:
The following sections describe how to use these steps to create a firewall filter. 6.3.2.1 Naming the FilterEach firewall filter is introduced by the keyword filter and is identified by a unique filter name. In the following example, we are in the process of creating a filter named RE-SECURE . set filter RE-SECURE We always recommend that you name your filter something that bears a relation to the filter's purpose. In the above example, RE-SECURE is a filter to secure access to the routing engine. The filter and term names can contain letters , numbers , and hyphens, and they can be up to 24 characters long. To include spaces in the name, enclose the entire name in quotation marks. 6.3.2.2 Naming Each Term in the FilterEach filter statement consists of one or more terms. Each term is introduced by the keyword term and identified by a term name. Each term name must be unique within the larger filter and allow for multiple terms to be included within a single filter. In this example, we are creating our term with the name BLOCK-MARTIANS , and if we desire, we can add additional filter terms, thereby creating a chain of possible conditions. set filter RE-SECURE term BLOCK-MARTIANS Again, name your filters in such way that you understand what their function is at a later date. Be aware that many Juniper Networks examples use names like Term 1, which is horrible and not self-documenting ; we are trying to avoid nonsensical naming conventions in this book as they don't reflect how things are done in the real world. Note Firewall-filter terms are evaluated in the order in which you specify them in the configuration. To reorder terms, use the configuration-mode insert command. For example, the command insert term up before term start places the term up before the term start. This is definitely a very useful feature. 6.3.2.3 Determining Match ConditionsIn firewall filters you should use the from statement, which defines conditions that are used to match packets. Essentially, this statement tells the router what to look for in each packet. There are a few caveats to be aware of at this point in the configuration. You can specify none or many from conditions, and if you specify none, then the router assumes that all packets match and acts accordingly . In the following example, we chose the from source-address condition: set filter RE-SECURE term BLOCK-MARTIANS from source-address Then, we configured the various source addresses as shown below, after we did all the set commands for brevity: [edit firewall filter RE-SECURE term BLOCK-MARTIANS from source-address] user@Chicago# show 127.0.0.0/8; 128.0.0.0/16; 191.255.0.0/16; 192.0.0.0/24; 223.255.255.0/24; 240.0.0.0/4; We mentioned earlier that the capabilities of firewall filters are rather extensive . The following configuration output shows the long list of possible match conditions: user@Chicago# set filter RE-SECURE term BLOCK-MARTIANS from ? Possible completions: > address Match IP source or destination address + apply-groups Groups from which to inherit configuration data > destination-address Match IP destination address + destination-port Match TCP/UDP destination port + destination-port-except Don't match TCP/UDP destination port > destination-prefix-list Match IP destination prefix-list + dscp Match diffserv codepoint + dscp-except Don't match diffserv codepoint first-fragment Match if packet is the first fragment fragment-flags Match fragment flags + fragment-offset Match fragment offset + fragment-offset-except Don't match fragment offset + icmp-code Match ICMP message code + icmp-code-except Don't match ICMP message code + icmp-type Match ICMP message type + icmp-type-except Don't match ICMP message type + interface-group Match interface group + interface-group-except Don't match interface group ip-options Match IP options is-fragment Match if packet is a fragment + packet-length Match packet length + packet-length-except Don't match packet length + port Match TCP/UDP source or destination port + port-except Don't match TCP/UDP source or destination port + precedence Match IP precedence value + precedence-except Don't match IP precedence value > prefix-list Match IP source or destination prefix-list + protocol Match IP protocol type + protocol-except Don't match IP protocol type > source-address Match IP source address + source-port Match TCP/UDP source port + source-port-except Don't match TCP/UDP source port > source-prefix-list Match IP source prefix-list tcp-established Match packet of an established TCP connection tcp-flags Match TCP flags tcp-initial Match initial packet of a TCP connection We should note that in the example we are using for this configuration explanation, there is but one single from statement with lots of associated addresses. When the syntax is presented in this manner, any packet with any of the listed source addresses indicated will be considered a match. You can also use multiple from conditions. Notice the from protocol tcp statement in the following configuration: [edit firewall] user@Chicago# show filter RE-SECURE { term BLOCK-MARTIANS { from { source-address { 127.0.0.0/8; 128.0.0.0/16; 191.255.0.0/16; 192.0.0.0/24; 223.255.255.0/24; 240.0.0.0/4; } protocol tcp; } } } This statement has the effect of introducing a second match condition. Logically, packets will now have to have one of the source addresses as shown and be TCP-based packets. The order in which you specify the match conditions is not important because the term must match all conditions in order for a match to occur. 6.3.2.4 Assigning the Action StatementAt this point, we have all the names of our filter and terms in place, and we know what kind of packets we are looking to match. The next logical step is to tell the router what to do with the packets once they are matched through the use of a then statement as follows: [edit firewall filter RE-SECURE term BLOCK-MARTIANS] user@Chicago# show from { source-address { 127.0.0.0/8; 128.0.0.0/16; 191.255.0.0/16; 192.0.0.0/24; 223.255.255.0/24; 240.0.0.0/4; } } then { log; syslog; reject administratively-prohibited; } In the case of a match, the router will this time log the match to a log file on the hard drive, send a syslog message, and transmit back an administratively prohibited message. Of course, whether that message has any impact on the sender is open to debate, but it will be sent because the RFC says it must. The following CLI example shows the then actions possible with a firewall filter: user@Chicago# set then ? Possible completions: accept Accept the packet and transmit count Count the packet in the named counter discard Discard the packet log Log the packet output-queue Set output queue for packet (0..3) plp Mark the packet (0..1) policer Police the packet using the named policer > reject Reject the packet and send reject message routing-instance Provide routing instance sample Sample the packet syslog Syslog information about the packet Do not forget to tell the router what packets to accept as shown below. If you do not include an accept (permit) statement, the router will silently discard all packets by default. This concept is identical to filtering in other vendors' products. user@Chicago# show term BLOCK-MARTIANS { from { source-address { 127.0.0.0/8; 128.0.0.0/16; 191.255.0.0/16; 192.0.0.0/24; 223.255.255.0/24; 240.0.0.0/4; } } then { log; syslog; reject administratively-prohibited; } } term PERMIT-OTHERS { then accept; } 6.3.2.5 Applying Firewall Filters to InterfacesThe last step in creating and using firewall filters is to assign them to an interface. Until you assign the filter to an interface, it is not active on the router and is ineffective . When applying filters to an interface, you must decide on the direction in which they are to be applied. The direction is an easy decision: You are either going to have the router check packets coming inbound into the interface or packets trying to go outbound from the interface. Once you have determined the direction in which to filter traffic, applying the filter is straightforward. In our sample, we are creating a filter to stop martian routes from being allowed to access the routing engine. When using a Juniper Networks router you can restrict access to the routing engine by applying a filter to the loopback interface. When applying our sample filter, RE-SECURE , to the loopback interface, we will choose a direction as shown below: [edit interfaces lo0] user@Chicago# set unit 0 family inet filter input RE-SECURE The completed interface and firewall filter configuration will appear in the router as follows: } } lo0 { description "ROUTING ENGINE IS ACCESSIBLE VIA THIS INTERFACE"; unit 0 { family inet { filter { input RE-SECURE; } } } } } } firewall { filter RE-SECURE { term BLOCK-MARTIANS { from { source-address { 127.0.0.0/8; 128.0.0.0/16; 191.255.0.0/16; 192.0.0.0/24; 223.255.255.0/24; 240.0.0.0/4; } } then { log; syslog; reject administratively-prohibited; } } term PERMIT-OTHERS { from { source-address { 0.0.0.0/0; } } then accept; } } } user@Chicago> Remember that we can use the same filter multiple times and that the Internet Processor II from Juniper Networks is required. Thus, if we had wanted to, we could have applied this same filter to every interface on the router, thereby ensuring that our router never accepted invalid martian routes. The logic that we discussed in this chapter forms the foundation for route filtering (route maps) and other ways to manipulate packets that we will be discussing in later chapters. 6.3.3 IP-Packet Bit MatchingAs IP routers, Juniper Networks routers are very powerful and allow you to build filters based on the following values within a packet's header:
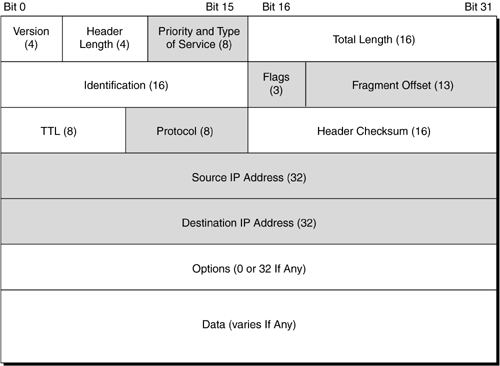
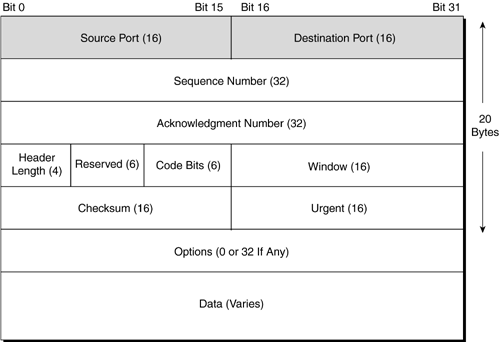
The primary technology in use is of course TCP/IP in a Juniper Networks router. In Figure 6-10 the highlighted fields are available to be looked at by a filter. Figure 6-10. IP Header Fields To implement filtering based on the packet-header values, you will need to use a variety of keywords that have been preprogrammed for you and represent the appropriate bit within the packet. These keywords always map to a single bit value and can be used to match in either decimal or hexadecimal (if you really want to bake your brain!). Fortunately though, there are a variety of keywords that represent common bit-field values to make filter creation much easier ( tcp-established is one such keyword). We will discuss some of the mathematical and textual keywords in the following section, but let's first discuss some guidelines to follow when using these terms. 6.3.3.1 Protocol Configuration GuidelinesThere are several default conditions within JUNOS that affect how the router is configured. In Figure 6-11 the highlighted fields are those available for use with filter match conditions. Figure 6-11. TCP Header Fields When a firewall filter is configured to test a specific field in a packet, by default it does not check to ensure that the packet being checked is an IP packet. Therefore, if you specify a filter to match on a port, TCP flag, or ICMP, the filter is not checking to ensure the protocol type of the packet. Juniper Networks recommends that you state explicitly the protocol (in a term statement) that you are testing to ensure a successful filter. This is an interesting default behavior, so let's look at an example of how this will actually work. Consider that you have created a filter that is to match on the destination port 23 (Telnet) of a TCP packet (see Figure 6-11). The firewall filter will not look to determine what protocol the packet is; instead, it will look to determine only the destination port being used by the packet. There are a variety of match conditions that can be used to express the packet content. These values are listed in Table 6-2 and are taken from Juniper Networks documentation. Table 6-2. Firewall-Filter Match Conditions
Like with regular expressions, the more detailed filters have several logical operators that can be used to combine the filter match conditions. These operators allow you to group conditions and set a precedence of order as Table 6-3 shows. The precedence is from the top of the table down and follows traditional mathematical rules (i.e., the items in parenthesis are performed first, and then left to right). Table 6-3. Firewall-Filter Logical Operators
Using the keywords in Table 6-2 and values provided in Table 6-3, we can create some effective filter terms. Some examples are as follows:
6.3.3.2 Configuration Example: Blocking Telnet and SSHWe are network engineers and management has some concerns about who can access our routers. Apparently, the security department has detected a substantial number of attempts to gain access through Telnet and SSH. Your job as engineer 009 is to allow Telnet and SSH connections to every place, except a certain subnet, where the financial info and payroll information for your company is held. It is very important to ensure that no one interferes with your paycheck, so we eagerly implement a filter! In this example, the subnet is 10.0.0.0/8 , plus we want to log anyone who might be trying to access this subnet. The filter will look as follows: [edit firewall filter VIRTUAL-ACCESS-CONTROL] user@Chicago# show term DENY-ACCESS { from { destination-address { 10.0.0.0/8; } protocol tcp; port [ telnet ssh ]; } then log; discard; } term PERMIT-ACCESS { from { address { 0.0.0.0/0; } } then accept; } [edit firewall filter VIRTUAL-ACCESS-CONTROL] user@Chicago# Now, keep in mind that those familiar with Cisco terminology might find the term DENY-ACCESS from destination-address 10.0.0.0/8 a bit confusing because of the presence of the word from. Notice, however, that we clarify that by choosing the destination-address keyword. Also, do not forget to apply the filter to an interface. 6.3.3.3 Configuration Example: Blocking TFTP and Logging OccurrencesIn this example, we want to clearly stop all TFTP from being used in our network, and once again, we log every occurrence of this. This time, however, we want to send all the messages to a syslog server. Of course, in order for this to work, we obviously will have already configured a syslog server first. } filter NO-TFTP { term STOP { from { protocol udp; port tftp; } then { syslog; discard; } } } 6.3.4 Additional Applications of Firewall FiltersThis chapter has provided examples of the possible filters available to you with some sample configurations. The scope of this book, however, does not support a detailed look into the many different possibilities, and you should explore some of the following uses, as they would apply to your network and routers. Additional information on firewall filters can be found in the Juniper Networks interfaces documentation. Please refer to the case study for more examples. 6.3.4.1 Policing and Rate LimitingThere are times when you must police the traffic flowbe it incoming or outgoingon an interface. This policing is associated with many of the new CoS initiatives; however, it is still possible to use this concept as it has been previously known, rate limiting. In fact JUNOS refers to policing and rate limiting as the same thing. You use rate limiting to limit the bandwidth on an interface to match the speed the customer is paying for. For example, you can connect a customer to your router via a 100Mbps Fast-Ethernet interface, then rate-limit the level of traffic you will accept, which will typically be equal to what that customer is paying for. This has the added benefit of making it quite easy to quickly upgrade customers' speeds as they grow. Alternatively, you can also thwart the impact of a DoS attack by rate-limiting a certain type of traffic. This chapter's case study provides a bit more information on how to create a firewall filter to prevent a DoS attack. JUNOS also has ability to rate limit. This is an excellent capability used by service providers all over the Internet and around the globe. The idea behind this, as we discussed, is to sell a certain amount of bandwidth to a customer. The connection to the customer will most likely come in the form of a much higher-bandwidth connection, such as a Fast Ethernet or GigE, and the customer would be rate-limited down to, for example, 20Mbps or less. When configuring rate limiting, make it as easy as possible to work going forward. The philosophy is as follows: If there is a large-capacity router, lots of customers will be accessing it. To make the future configuration of the router easier (when customers buy larger circuits), do a little extra work in the beginning. The first step is to configure a prefix list for each of the five categories of service defined in Table 6-4. Table 6-4. Comparison of Service Level
All customers that purchase a certain level of service can easily be categorized, as the table shows. So, the first thing to do is create a prefix-list for each of the service categories. Once they are defined, it is a simple matter to add a specific customer's prefix to the list, instead of creating a whole new configuration for each. Consider the following configuration scenario. The best thing to do is create and use prefix lists when configuring policing or rate limiting as this gives you the added flexibility of just adding a customer's network prefix under the appropriate list. This, in turn , maps to a policing statement where the actual rate limiting occurs. For this example, we enter into the [edit policy-options] hierarchy level of the JUNOS configuration mode and create a prefix list for each of the five categories defined previosly. Then it's a matter of applying the prefixes to each. [edit policy-options] user@Chicago# set prefix-list PLATINUM-CUSTOMERS [edit policy-options prefix-list PLATINUM-CUSTOMERS] user@Chicago# set 50.50.50.0/24 You can repeat these steps until you have created an entry for each classification and assigned a prefix. Of course, in this configuration example, the prefixes correspond to the categories' traffic rates. When the configuration is complete, it should look as follows: [edit policy-options] user@Chicago# show prefix-list PLATINUM-CUSTOMERS { 50.50.50.0/24; } prefix-list GOLD-CUSTOMERS { 40.40.40.0/24; } prefix-list SILVER-CUSTOMERS { 30.30.30.0/24; } prefix-list BRONZE-CUSTOMERS { 20.20.20.0/24; } prefix-list COPPER-CUSTOMERS { 10.10.10.0/24; } [edit policy-options] user@Chicago# Having completed the configuration of the prefix lists, the next step is to enter into the firewall configuration hierarchy to begin building the firewall-filter statements. These statements are where the actual rate limiting is configured. The JUNOS syntax here has us define a filter name, then name a policer, then give the actions to take if the bandwidth is exceeded. The steps are not accomplished in quite the order that you would expect, but we shall review the process:
The following is the complete configuration using the prefix lists to identify the customer network(s) and following the above configuration steps and explanations . firewall { filter PLATINUM-LIMIT { policer PLATINUM-CIR { if-exceeding { bandwidth-limit 50m; burst-size-limit 25m; } then discard; } term ID-PLATINUM-CUSTOMERS { from { source-prefix-list { PLATINUM; } } then policer PLATINUM-CIR; } } filter GOLD-LIMIT { policer GOLD-CIR { if-exceeding { bandwidth-limit 40m; burst-size-limit 20m; } then discard; } term ID-GOLD-CUSTOMERS { from { source-prefix-list { GOLD; } } then policer GOLD-CIR; } } filter SILVER-LIMIT { policer SILVER-CIR { if-exceeding { bandwidth-limit 30m; burst-size-limit 15m; } then discard; } term ID-SILVER-CUSTOMERS { from { source-prefix-list { SILVER; } } then policer SILVER-CIR; } } filter BRONZE-LIMIT { policer BRONZE-CIR { if-exceeding { bandwidth-limit 20m; burst-size-limit 10m; } then discard; } term ID-BRONZE-CUSTOMERS { from { source-prefix-list { BRONZE; } } then policer BRONZE-CIR; } } filter COPPER-LIMIT { policer COPPER-CIR { if-exceeding { bandwidth-limit 10m; burst-size-limit 5m; } then discard; } term ID-COPPER-CUSTOMERS { from { source-prefix-list { COPPER; } } then policer COPPER-CIR; } } } 6.3.4.2 Selectively Forward PacketsIn a Juniper Networks router, it is possible to classify packets as determined by a firewall filter, then make forwarding decisions based upon that classification. This feature is more commonly used when you have multiple flows of traffic entering your router, and you must differentiate between them and act accordingly. Consider, for example, a router connected at a global access point with multiple peers. This router has several customers connected to it, each with different service level agreements and financial charges. Therefore, we filter their traffic and forward it accordingly. This type of filtering can cover the spectrum of possibilities, from source IP address, protocol, or even DiffServ precedence. The only limitation to this type of filter is that they can only be applied against inbound traffic flows. 6.3.5 Verifying Filter OperationThe actual operation of a filter must be verified . It is very important for network engineers to have such facilities available for verification as a test lab or extra routers to practice on. This data is useful to determine that you are achieving the desired results, obtain proof of possible security violations, and reveal misconfiguration of network devices. To verify the operation of filters, Juniper Networks routers use interface counters. 6.3.5.1 Configuring Interface-Specific CountersThe configuration of interface counters allows for the tracking of packet matches from the firewall filter. Filters can be used on multiple interfaces if desired, and when configuring counters, this fact must be clear as counters are activated on a per-interface basis. To configure counters, you do not activate them in interface-configuration mode, but rather within the firewall-configuration hierarchy, where you activate counting in the then section of the filter, as shown in the following code. Counting enables you to count (sometimes known as log ) the number of times a filter is matched. } firewall { filter FE-SECURE { interface-specific; term BLOCK-MARTIANS { from { source-address { 127.0.0.0/8; 128.0.0.0/16; 191.255.0.0/16; 192.0.0.0/24; 223.255.255.0/24; 240.0.0.0/4; } } then { count MARTIAN01; log; syslog; reject administratively-prohibited; } } term PERMIT-OTHERS { from { source-address { 0.0.0.0/0; } } then accept; } } } Once your filter is actively counting packets for you and has been applied to an interface, you are able to view the packet counts. There is a catch when trying to view the counters found on the router. Juniper Networks routers append some data to the end of the log commands; the information will be the interface designation with a dash and a letter. You can view the filename by using the show firewall log command to determine what the actual filename is! user@Chicago> show firewall log Time Filter A Interface Pro Source address Destination address 15:43:39 MARTIAN01-fxp1.0-i R fxp0.0 IGM 192.168.100.1 224.0.0.1 15:43:30 MARTIAN01-fxp1.0-i R fxp0.0 TCP 192.168.254.2 192.168.254.70:23 15:43:24 MARTIAN01-fxp1.0-i R fxp0.0 TCP 192.168.254.2 192.168.254.70:23 15:43:21 MARTIAN01-fxp1.0-i R fxp0.0 TCP 192.168.254.2 192.168.254.70:23 15:40:39 MARTIAN01-fxp1.0-i R fxp0.0 IGM 192.168.100.1 224.0.0.1 15:39:27 MARTIAN01-fxp1.0-i R fxp0.0 UDP 192.168.254.69 255.255.255.255:68 15:39:27 MARTIAN01-fxp1.0-i R fxp0.0 UDP 192.168.254.69 255.255.255.255:67 15:39:19 MARTIAN01-fxp1.0-i R fxp0.0 UDP 192.168.254.69 255.255.255.255:68 You can also clear the various firewall counters with the clear firewall command as shown below: user@Chicago> clear firewall ? Possible completions: all Clear all firewall counters counter Counter name filter Filter name |
EAN: 2147483647
Pages: 176