6.2 Configuring SNMP on a Juniper Networks Router
| Now that you have an understanding of how SNMP operates and what it was designed to do, let's discuss how to configure and enable SNMP on a Juniper Networks router. The following are the default conditions for SNMP defined by Juniper Networks that will guide the configuration process:
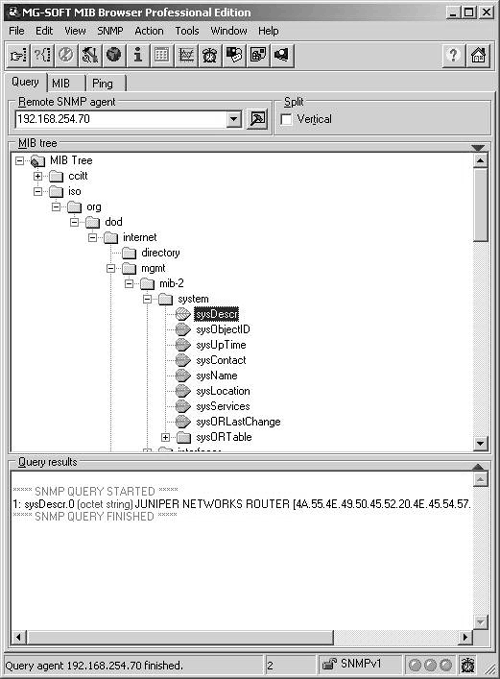
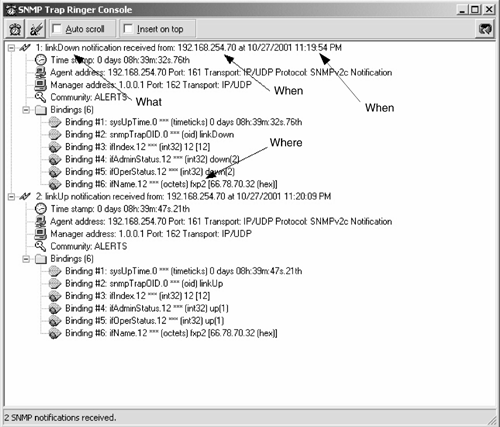
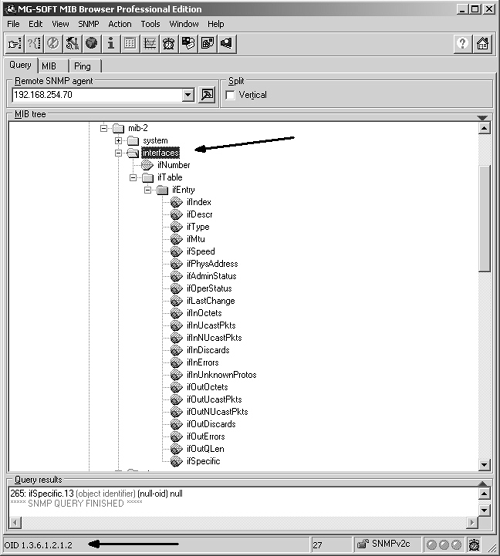
Activating SNMP is rather straightforward as SNMP has its own configuration hierarchy level; thus, all configuration statements will be made within the [edit SNMP] level. In a Juniper Networks router, there are a large number of optional parameters that can be used when configuring SNMP as listed below: [edit SNMP] snmp { description description; location location; contact contact; interface [ interface-name ]; community community-name { authorization authorization; clients { default restrict; address <restrict>; } view view-name; } trap-group group-name { categories category; targets { address; } version version; } view view-name { oid object-identifier (include exclude); } traceoptions { file <files number> <size size>; flag flag <disable>; } } It is beyond the scope of this chapter to discuss all these parameters, but we will look at enough of these options for you to get SNMP operating on a complex internetwork. If additional information is needed, refer to the appropriate RFC or the resources recommended in the bibliography, such as the Juniper Networks documentation. 6.2.1 Basic SNMP ConfigurationWhen configuring SNMP, there are two possible types of access to data that you must configure. In SNMP, access types are referenced as read-only and read-write. [edit snmp] user@Chicago# set ? Possible completions: + apply-groups Groups from which to inherit config data > community Configure a community string contact Contact information for administrator description System description + interface Restrict SNMP requests to interfaces location Physical location of system > traceoptions Trace options for SNMP > trap-group Configure traps and notifications > view Define MIB views It is also recommended that you configure the descriptive properties of SNMP as well (e.g., location, description, and contact). This provides network operation personnel with important information about who to contact if necessary. [edit snmp] user@Chicago# set location "CHICAGO, NC" user@Chicago# set description "JUNIPER NETWORKS ROUTER" user@Chicago# set contact "TOM THOMAS" When dealing with SNMP communities (read-only and read-write), you must configure a password known to access the appropriate community. Note well that community strings are passwords and should be treated as such. In the following example, the router is configured to provide read-only access to those that provide the password public and read-write access to those who possess the password 800frIP . [edit snmp] user@Chicago# set community public authorization read-only [edit snmp] user@Chicago# set community 800frIP authorization read-write The completed initial SNMP configuration looks as follows : [edit snmp] user@Chicago# show description "JUNIPER NETWORKS ROUTER"; location "CHICAGO, NC"; contact "TOM THOMAS"; community public { authorization read-only; } community 800frIP { authorization read-write; } Now that the initial SNMP configuration has been completed, you need to test access and operation. Once you configure the MIB browser with the proper password, you can access the router. Refer to Figure 6-6, where an SNMP query was sent to the router at 192.168.254.70 to retrieve the system description at the OID 1.3.6.1.2.1.1.1.0 . Figure 6-6. Testing SNMP Access and Operation 6.2.2 Configuring SNMP Trap GroupsSNMP traps are the notifications used by SNMP to alert you to a problem or change in status within a device. Trap groups in SNMP are excellent tools that allow the distribution of certain specified traps to the devices that you indicate . The trap-group name field will be transmitted within every trap sent as identified in that trap group. When configuring a trap group, make sure that you specify a target , otherwise it will not be very effective. A possible configuration is shown below: [edit snmp] user@Chicago# show description "JUNIPER NETWORKS ROUTER"; location "CHICAGO, NC"; contact "Tom Thomas"; community public { authorization read-only; } community 800frIP { authorization read-write; } trap-group ALERTS { version v2; categories link; targets { 192.168.254.7; } } [edit snmp] user@Chicago# Note An SNMP trap group target is usually the IP Address of the SNMP server. In addition to defining the target of a trap group, you can also specify which SNMP version of traps will be transmitted. By default, Juniper Networks routers will transmit all versions; thus, you may end up receiving multiple traps if you do not specify a version. The NMS is configured to receive the link traps via the ALERT trap group. Link traps consist of reporting the up-down status of router interfaces. In Figure 6-7, the NMS receives two traps: The first trap is a link-down notification and tells who (router 192.168.254.70 ), what (link-down notification), where (interface fxp2 ), and when (10/27/01 ”11:19). The second trap notifies us that the interface is back up. Figure 6-7. Link Down/LinkUp Trap Receipt 6.2.3 Controlling SNMP AccessThere has been some confusion about SNMP access and Juniper Networks routers. Note that you cannot use the SNMP set command to change any value in a Juniper Networks router ”they are read-only. Keep this in mind when configuring SNMP on a Juniper Networks router as it is a key differentiator from other vendors and a deviation from the SNMP standard. In general then, we can say that SNMP access is always read-only, regardless of what the documentation or router tells you. That a Juniper Networks router only supports read-only access does not mean you should allow just anyone to retrieve SNMP data from your router. You may want to reduce or limit the OIDs that a certain NMS or netblock has the ability to read on your routers. Say you only want to let customers read interface counters on the interfaces they are connected to, thus allowing them to see the performance of their connection. In this case, you would create an MIB VIEW associated with an SNMP community. The following example creates a community called CUSTOMER and an MIB VIEW called CUSTOMER . When you assign that MIB VIEW to the community as shown in the configuration output below, you restrict access to the interface OIDs from the SNMP tree. [edit snmp] user@Chicago# show description "JUNIPER NETWORKS ROUTER"; location "CHICAGO, NC"; contact "TOM THOMAS"; view CUSTOMER { oid .1.3.6.1.2.1.2; } community public { authorization read-only; } community 800frIP { authorization read-write; } community CUSTOMER { view CUSTOMER; authorization read-only; } trap-group ALERTS { version v2; categories link; targets { 192.168.254.7; } } [edit snmp] It is important to note that the OID is inherited in Juniper Networks routers. Thus, the OID used here ( .1.3.6.1.2.1.2 ) is that for the interface group; all more specific OIDs beneath it are considered within it. In Figure 6-8, the interface group is selected and its OID used in the configuration example. Notice that all the interface characteristics and more specific entries beneath the interface group are accessible by default. Caution is required when determining which OIDs are accessible. For example, it may not be appropriate to allow a customer access to the MIBs, which contain all the routing data for your network. Figure 6-8. OID Inheritance 6.2.4 Configuring the Interfaces on Which SNMP Requests Can Be AcceptedIn today's world, many networks are extremely security conscious, and Juniper Networks has provided a method for changing the default behavior of accepting SNMP queries on any interface. You can specify the interface names that you want to allow to receive and process SNMP requests. This feature is configured by specifying the interface type at the [edit SNMP] configuration level in the JUNOS CLI, as shown below. If you wish to allow multiple interfaces access to SNMP, then put the names of the interfaces within brackets. [edit snmp] interface [ interface-names ]; This example shows how combining MIB VIEWs and limiting interfaces increases the security of a Juniper Networks router. When we consider MIB VIEWs combined with the interface-limiting concept, the security of a Juniper Networks router is greatly increased. One of the most common uses of by enabling SNMP on an interface is the presence of a separate network used only to manage network devices. In this case you would just enable SNMP on the interface connected to the dedicated management network. 6.2.5 Verifying Operation and Troubleshooting SNMPSNMP failures in operation are not complex, and indications of it are rather easy to determine. The preceding sections showed how the ability to access and have traps reported is accomplished. SNMP failures or misconfigurations will cause this feature not to work, which, unlike a routing failure, can be extremely noticeable. In this section we will look at how to use the JUNOS trace options to track the operation of SNMP and to display SNMP statistics. 6.2.5.1 Trace OptionsTo trace SNMP traffic, you specify trace options by including the traceoptions statement at the [edit snmp] hierarchy level. As the following example shows, you can set the filename and size, among other things: [edit snmp] user@Chicago# set traceoptions filename files 10 size 500 user@Chicago# set flag ? Possible completions: all Trace everything general Trace general events interface-stats Trace interface statistics (logical and physical) pdu Dump SNMP request/response packets protocol-timeouts Trace SNMP request timeouts routing-socket Trace routing socket calls subagent Trace Sub-agent restarts timer Trace internal timer events varbind-error Trace varbind errors [edit snmp traceoptions] user@Chicago# set flag all Using the all option would result in a configuration for SNMP that has tracing enabled as follows: [edit snmp] user@Chicago# show description "JUNIPER NETWORKS ROUTER"; location "CHICAGO, NC"; contact "TOM THOMAS"; view CUSTOMER { oid .1.3.6.1.2.1.2; } community public { authorization read-only; } community 800frIP { authorization read-write; } community CUSTOMER { view CUSTOMER; authorization read-only; } traceoptions { file size 500 files 10; flag all; } The output of the tracing operations is placed into the following three files, all of which are located in the /var/log directory, which is accessible via the shell:
If you are interested in learning additional information on the trace options functionality and features, refer to Section 15.6. 6.2.5.2 SNMP StatisticsYou can see the operation and function of SNMP via the following commands:
This next example of the show command demonstrates the various parameters and statistics that you can recover from the statistics command: user@Chicago> show snmp statistics SNMP statistics: Input: Packets: 0, Bad versions: 0, Bad community names: 0, Bad community uses: 0, ASN parse errors: 0, Too bigs: 0, No such names: 0, Bad values: 0, Read onlys: 0, General errors: 0, Total request varbinds: 0, Total set varbinds: 0, Get requests: 0, Get nexts: 0, Set requests: 0, Get responses: 0, Traps: 0, Silent drops: 0, Proxy drops 0 Output: Packets: 9, Too bigs: 0, No such names: 0, Bad values: 0, General errors: 0, Get requests: 0, Get nexts: 0, Set requests: 0, Get responses: 0, Traps: 9 The clear SNMP command resets all the values displayed back to zero. This is useful when troubleshooting or monitoring the operation of SNMP by resetting the values to zero. |
EAN: 2147483647
Pages: 176