14.5 Dense-Mode Multicast Routing Protocols
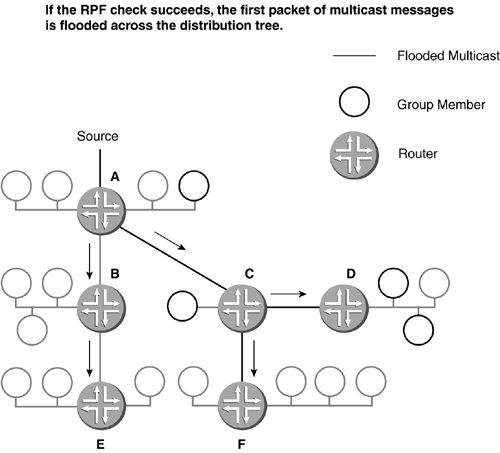
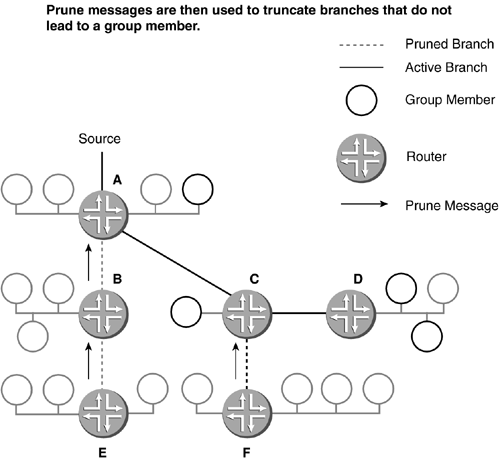
14.5 Dense-Mode Multicast Routing ProtocolsDense-mode multicast routing protocols assume that all routers in the network are to receive multicasts packets. As a result, they use a flood-and-prune mechanism to build their multicast distribution tree. This flood-and-prune mechanism floods multicast traffic out of all ports of the multicast-enabled router, except the one port closest to the multicast source. When a receiving router processes these messages and determines that it does not need to receive the multicast because it has no receivers indicating interest in the group with IGMP needing the transmission, a prune message is sent back to the flooding router. In the process of sending the flood-and-prune messages, routers running a dense-mode protocol create a source-based distribution tree. The root of the tree is the DR closest to the source of Group 1's multicast transmission. This concept is shown in Figure 14-13. Figure 14-13. Dense-Mode Operation In the figure, the network is operating in dense mode. As the example shows, the DR for the source has flooded multicast packets because in dense mode, it is assumed every router wants to participate. Once the flooding occurs to the DR's direct neighbors, they will continue the flooding, again because dense mode presumes all routers want to participate. The router that is directly connected to a host and that has indicated it is to join the multicast group continues to accept the multicast packets. However, if the router has redundant links open by which multicast traffic is received, it sends a prune message out of one of the redundant links. Routers that do not have receivers and that are members of the multicast group send a prune message to the upstream router to indicate the branch is to be pruned. This process is known as a flood-and-prune technique where each router is assumed to be a part of the multicast group, unless it indicates otherwise to the upstream router and is pruned. The use of dense-mode routing protocols guarantees the shortest, most efficient paths, but uses considerable bandwidth to maintain the distribution tree as flooding is periodically repeated. Because of dense mode's ability to create an efficient distribution tree, it is ideal as an enterprise or single routing domain solution; dense mode does not scale well across the Internet, which is, of course, why you do not use it there. 14.5.1 DVMRPThe first multicast protocol designed specifically to support multicast routing was DVMRP, which is described in RFC 1075. DVMRP was the first true multicast routing protocol to see widespread use. Based on Steve Deering's seminal work, DVMRP is similar in many ways to Routing Information Protocol (RIP) with some minor variations added to support the unique requirements of multicast. Some key characteristics of DVMRP include the following:
DVMRP is a distance-vector multicast routing protocol designed to be used as an IGP within a multicast-enabled network. DVMRP provides connectionless delivery of multicast packets by dynamically generating distribution trees. For routers that do not support multicasting, DVMRP comes with the ability to tunnel multicast packets. Because DVMRP was the first protocol, some unexpected limitations since its creation have come to light:
DVMRP is defined in the following standard:
There are not very many multicast resources, but if you wish to read more on the subject, consider the following resources:
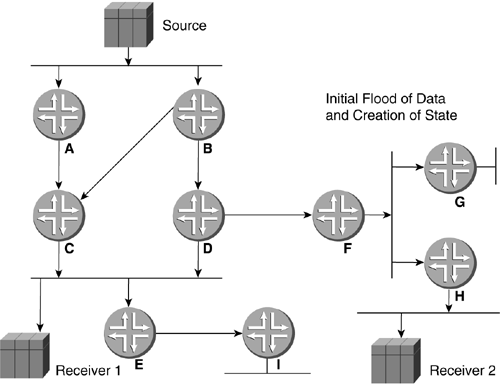
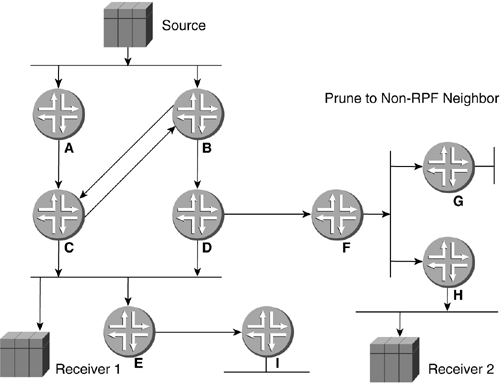
14.5.1.1 DVMRP Operational OverviewDVMRP assumes initially that every host on the network is part of the multicast group. The DR connected to the source of the multicast transmission subnet, that is, the router that has been selected to handle routing for all sources on its subnet, begins by transmitting a multicast message to all adjacent routers. Each of these routers then forwards the message to downstream routers. DVMRP constructs a different distribution tree for each source and its corresponding destination host group. The distribution tree provides a shortest path between the source and each multicast receiver in the group, based on the number of hops in the path, which is the DVMRP metric. A distribution tree is constructed on demand, using the broadcast-and-prune technique. When a router receives a multicast message, it checks its unicast routing tables to determine the interface that provides the shortest path back to the source. If this was the interface over which the multicast message arrived, then the router enters some state information to identify the multicast group in its internal tables (specifying interfaces over which messages for that group should be forwarded) and forwards the multicast message to all adjacent routers, other than that which sent the message. This mechanism, called reverse path forwarding, or RPF, ensures that there will be no loops in the distribution tree. Figures 14-14 to 14-16 show how DVMRP works. In Figure 14-14, DVMRP floods IGMP messages out from the course throughout the entire network. Figure 14-14. DVMRP Flooding Figure 14-15. Prune Messages Altering the Tree Figure 14-16. Graft Messages The next step in DVMRP convergence is the receiving of prune messages from sections of the network that do not need the multicast transmissions, as shown in Figure 14-15. The resulting network topology reflects the membership of hosts only located via routers C and D. As the multicast transmission continues and the company president continues to speak, a new host wishes to join. A graft message is then sent from router F to join the distribution tree as shown in Figure 14-16. These series of figures show the process that DVMRP uses to flood the network, prune routers that do not need to be a part of the multicast group, and graft routers into the multicast group that now need to receive the transmission. The next section will look at the basics involved in configuring DVMRP. 14.5.1.2 Configuring DVMRPThis section describes how to configure DVMRP on a Juniper Networks router. By default, DVMRP is disabled, and interfaces that can route DVMRP can either be physical or tunnel to support the connecting of multicast domains like those discussed in Section 14.1. You will also need to create a separate routing table for DVMRP routes, as this section will show. Note According to the JUNOS 5.0 documentation, you can configure DVMRP for either forwarding or unicast routing modes. In forwarding mode, DVMRP operates its protocol normally (for example, it does the routing as well as the multicast data forwarding). In unicast routing mode, you can use DVMRP for unicast routing only; the actual forwarding of multicast data is done by enabling PIM on that interface. If you have configured PIM on the interface, you can configure DVMRP in unicast routing mode only. You cannot configure PIM and DVMRP in forwarding mode at the same time. The first step is to create the routing table that is going to reflect your DVMRP routes. Juniper Networks documentation recommends that the DVMRP use inet.2 for its routing table entries, and we will follow that recommendation here. You create the routing table in the [edit routing options] level of the hierarchy, as shown below: Lab@Chicago# set interface-routes rib-group IN_FOR_MCAST [edit routing-options] Lab@Chicago# set rib-groups IN_FOR_MCAST import-rib inet.0 Lab@Chicago# set rib-groups IN_FOR_MCAST import-rib inet.2 [edit routing-options] Lab@Chicago# set interface-routes rib-group IN_FOR_MCAST [edit routing-options] Lab@Chicago# set rib-groups OUT-DVMRP import-rib inet.2 [edit routing-options] Lab@Chicago# set rib-groups OUT-DVMRP export-rib inet.2 [edit routing-options] Lab@Chicago# show interface-routes { rib-group inet OUT-DVMRP; } rib-groups { IN_FOR_MCAST { import-rib inet.0; } OUT-DVMRP { export-rib inet.2; import-rib inet.2; } } To activate DVMRP, enter the [edit protocols] hierarchy level and edit DVMRP as shown below: [edit protocols] Lab@Chicago# edit dvmrp [edit protocols dvmrp] Lab@Chicago# There are not very many optional parameters in DVMRP, and that reflects its simplicity and ease of use. However, recall the limitations of DVMRP. JUNOS does provide you with the ability to apply policies to the DVMRP routing table as needed. The important command is the rib-group assignment so that we can map the RIB created in the previous step to DVMRP. [edit protocols dvmrp] Lab@Chicago# set ? Possible completions: + apply-groups Groups from which to inherit configuration data disable Disable DVMRP + export Export policy + import Import policy > interface DVMRP interface options > rib-group Routing table group > traceoptions Trace options for DVMRP We now need to assign the routing table inet.2 that we created to the DVMRP protocol to ensure we can route multicast properly. The following example shows how to do this: [edit protocols dvmrp] Lab@Chicago# set rib-group OUT_DVMRP Lab@Chicago# To activate DVMRP on an interface, you execute the set command, as shown below. You could also use the all keyword to activate DVMRP on every interface on the router. [edit protocols dvmrp] Lab@Chicago# set interface ? Possible completions: <interface_name> Interface name [edit protocols dvmrp] Lab@Chicago# set interface fe-0/0/1 Lab@Chicago# The final configuration for IGMP and DVMRP is as follows : routing-options { interface-routes { rib-group inet IN_FOR_MCAST; } rib-groups { IN_FOR_MCAST { import-rib [ inet.0 inet.2 ]; } OUT-DVMRP { export-rib inet.2; import-rib inet.2; } } } protocols { igmp; dvmrp { rib-group inet OUT-DVMRP; interface fe-0/0/1.0; } This configuration has successfully activated IGMP and DVMRP on a Juniper Networks router ”at least we hope so. The next section gives us the tools necessary to verify the correct operation. 14.5.1.3 Verifying a DVMRP ConfigurationIt is important to be able to verify the proper operation of DVMRP after you have configured it and when troubleshooting. The show commands available to assist in this are shown below: Lab@Chicago> show dvmrp ? Possible completions: grafts Show the DVMRP graft retransmission queue interfaces Show DVMRP interfaces neighbors Show DVMRP neighbors prefix Show DVMRP prefixes prunes Show DVMRP prunes The command explanations are accurate for what you can expect to see. Now that you have created a new routing table for DVMRP, inet.2 , looking at its contents will also be of assistance. Consider the following output and keep in mind that the router has IGMP configured on all interfaces, but only DVMRP on fe-0/0/1 , so the contents of the inet.2 routing table will reflect that multicast does not know about the 30.30.30.0/24 network. Lab@Chicago> show route terse inet.0: 9 destinations, 9 routes (9 active, 0 holddown, 0 hidden) + = Active Route, - = Last Active, * = Both A Destination P Prf Metric 1 Metric 2 Next hop AS path * 10.0.0.0/24 D 0 >fe-0/0/2.0 * 10.0.0.1/32 L 0 Local * 30.30.30.0/24 O 10 20 >51.0.0.2 * 51.0.0.0/24 D 0 >fe-0/0/1.0 * 51.0.0.1/32 L 0 Local * 192.168.254.0/24 D 0 >fe-0/0/0.0 * 192.168.254.70/32 L 0 Local * 224.0.0.4/32 D 110 MultiRecv * 224.0.0.5/32 O 10 1 MultiRecv inet.2: 6 destinations, 6 routes (6 active, 1 holddown, 0 hidden) + = Active Route, - = Last Active, * = Both A Destination P Prf Metric 1 Metric 2 Next hop AS path * 10.0.0.0/24 D 0 >fe-0/0/2.0 * 10.0.0.1/32 L 0 Local * 51.0.0.0/24 D 0 >fe-0/0/1.0 D 0 >fe-0/0/1.0 * 51.0.0.1/32 L 0 Local * 192.168.254.0/24 D 0 >fe-0/0/0.0 * 192.168.254.70/32 L 0 Local Lab@Chicago> This command provides you with an abbreviated high-level view of the contents of the routing table; you can see simple things, like if a route is active, as well as the destination network, metric, and next-hop ”all crucial bits for effective routing. 14.5.2 PIM Routing ProtocolThe PIM routing protocol is currently under development by an IETF working group and has been since 1998, so don't hold your breath for it to be finalized. Regardless, PIM is being deployed widely on the Internet for intradomain multicast routing because, as we discussed, DVMRP is just too limited for use in the Internet. The objective of PIM was to develop a standard multicast routing protocol that could provide scalable intradomain multicast routing across the Internet, independent of the mechanisms provided by any particular unicast routing protocol. PIM has two operational modes:
Dense-mode routing protocols all rely on the periodic flooding of messages throughout the network with the assumption that every router wants to be a part of the multicast group. This approach can be quite effective under certain circumstances; however, it is not without its problems and drawbacks. For example, consider what would happen to a network if several thousand different multicast conferences started at once. The network would get quite busy! Clearly a different solution is needed for group members widely dispersed across a WAN. While dense-mode protocols use a data-driven approach to construct multicast distribution trees, sparse-mode protocols use a receiver-initiated process; that is, a router becomes involved as part of a multicast distribution tree only when one of the hosts on its subnet requests membership in a particular multicast group. In sparse mode, routers must join the distribution tree explicitly because other routers do not automatically forward multicast traffic. When a host joins a multicast group the local LAN router sends a join message to the router that has been designated as the rendezvous point (RP) for the multicast group. This RP designation for a router is similar to the DR designation that we discussed in Section 14.4. In sparse mode, the RP serves as the root of the shared multicast distribution tree. The RP router is responsible for forwarding multicast data from different sources to those who have joined the group and, thus, elected to receive it. The following sections describe these two modes. 14.5.2.1 PIM-DMPIM-DM is similar to DVMRP. Both protocols employ reverse path multicasting (RPM) to construct source-rooted distribution trees. The major differences between DVMRP and PIM-DM are that PIM is completely independent of the unicast routing protocol used on the network, while DVMRP relies on specific mechanisms of the associated unicast routing protocol. PIM-DM is also less complex than DVMRP. Some key characteristics of PIM-DM are as follows:
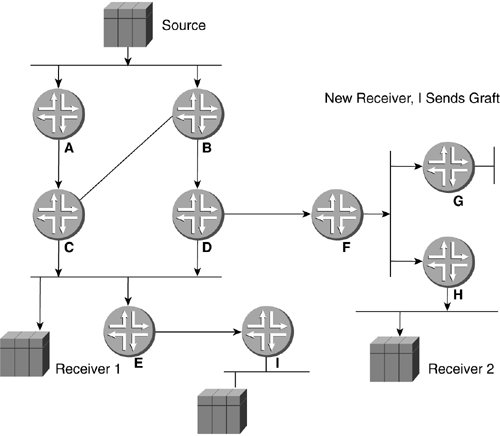
PIM-DM Operational OverviewFigures 14-17 to 14-19 show how PIM-DM works. In Figure 14-17 you can see that PIM has flooded the entire network, starting at the source and sending multicast flood messages throughout the network. Figure 14-17. PIM Flooding Figure 14-18. PIM Pruning Figure 14-19. PIM Graft Request In Figure 14-18 the network between routers B and C is pruned because it does not complete the RFP neighbor requirements. Also, during this time, routers E and I get pruned as well because they do not have receivers. In Figure 14-19, receiver 3 has entered the multicast group and the graft request is being sent to make receiver 3 part of the tree. This series of figures demonstrate the process that PIM goes through upon activation of a new multicast group, flooding, pruning, and possibly grafting . The next section will look at how basic PIM-DM is configured on a Juniper Networks router. Configuring PIM-DMThis section describes how to configure PIM-DM on a Juniper Networks router. By default, on a Juniper Networks router, PIM operates in dense mode. The configuration here will be the basic configuration from which you can alter its mode of operation should you desire to operate in PIM-SM, which we will be discussing in Section 14.5.2.2. Keep in mind that with PIM you do not need to configure a separate routing table because PIM is protocol-independent and designed not to rely on an IP unicast routing protocol like DVMRP was. You can, however, create a routing table just for multicast data if you want, although it is unnecessary. As with all protocols in JUNOS software, you must activate the protocol by telling the router which interfaces it should operate over as shown below: [edit protocols] Lab@Chicago# edit pim [edit protocols pim] Lab@Chicago# set interface all The completed basic configuration will look as follows: protocols { igmp; ospf { area 0.0.0.0 { interface fe-0/0/0.0; } area 0.0.0.10 { interface fe-0/0/2.0; } area 0.0.0.51 { interface fe-0/0/1.0; } } pim { interface all; } } There are a couple of configuration tips and JUNOS implementation nuances that you should be aware of with PIM when it is operating in dense mode.
There are additional considerations if you are running PIM-SM, which we will discuss in Section 14.5.2.2. Verifying a PIM-DM ConfigurationTo verify the operation and configuration of PIM there are a variety of useful show commands. The first example below shows the output from the show pim ? command: Lab@Chicago> show pim ? Possible completions: bootstrap Show PIM bootstrap routers interfaces Show PIM interfaces join Show PIM join/prune state neighbors Show PIM neighbors rps Show PIM rendezvous points source Show the PIM source RPF state statistics Show PIM statistics wildcard Show PIM (*,*,RP) Join/Prune state This next example shows which interfaces are running PIM on your router, which is very useful when you have a router with a large number of ports: Lab@Chicago> show pim interfaces Name Stat Mode V State Priority DR address Neighbors fe-0/0/0.0 Up Dense 2 DR 1 192.168.254.70 0 fe-0/0/1.0 Up Dense 2 NotDR 1 51.0.0.2 1 fe-0/0/2.0 Up Dense 2 NotDR 1 10.0.0.2 1 The following command output is very useful in determining the status of your PIM neighbors and their address. When trying to determine the flow of the multicast event, this is a great place to start as it's only going to neighbors! Lab@Chicago> show pim neighbors Interface DR priority Neighbor addr V Mode Holdtime Timeout fe-0/0/1.0 1 51.0.0.2 2 Unknown 105 98 fe-0/0/2.0 1 10.0.0.2 2 Unknown 105 79 14.5.2.2 PIM-SMPIM-SM is referred to as protocol-independent, just like PIM-DM. In fact, both are independent of the underlying routing protocol; they just function in different ways. PIM-SM does not flood like a dense-mode protocol, and it has an RP. The RP keeps track of multicast groups by requiring that they register before any traffic gets transmitted. From a host's perspective they register with their directly connected router, which in turn registers them to the RP. The RP then sends a join message towards the source of the multicast transmission. At this point, packets are forwarded on a shared distribution tree. If the multicast traffic from a specific source is sufficient, the receiver's first-hop router may send join messages toward the source to build a source-based distribution tree. A RP has the following characteristics:
Some of the key operational characteristics of PIM-SM are as follows:
PIM-SM is defined in the following documents:
Bootstrap RouterThe Bootstrap router (BSR) mechanism is used for PIM-SM to learn the multicast group mappings to the RP. As we have discussed, the RP serves as a distribution point Sparse mode uses a BSR, an RP, and a shared tree topology to route multicast traffic. Within multicast domains, the RP serves as a distribution point for the router in a specific set of multicast groups. Each RP informs the BSR of the multicast group it serves. The BSR collects the RP to multicast group mappings ( RP-set ) within its domain, builds a database, and dynamically distributes the RP information to the multicast routers within its domain. Configuring PIM-SMThis section will discuss how to configure PIM-SM on a Juniper Networks router. As mentioned earlier, the default mode of operation is dense mode. Instead of rebuilding our PIM configuration, we will specify the mode of operation. Note, however, that we do this on a per-interface basis and not globally. Plus, it is done in interface configuration mode. The following example shows the completions for the set interface all command: [edit protocols pim] Lab@Chicago# set interface all ? Possible completions: <[Enter]> Execute this command + apply-groups Groups from which to inherit configuration data disable Disable PIM on this interface hello-interval Hello interval (0..255 seconds) mode Mode of interface priority Hello option DR priority (0..4294967295) version Force PIM version (1..2) Pipe through a command Lab@Chicago# This example shows the completions for the set interface all mode command: [edit protocols pim] Lab@Chicago# set interface all mode ? Possible completions: dense Dense mode sparse Sparse mode sparse-dense Sparse-dense mode Lab@Chicago# This command sets all interfaces on the router to be in PIM-SM. [edit protocols pim] Lab@Chicago# set interface all mode sparse Lab@Chicago# In this command output we will take a quick look at what we have configured by running a show command, which will show us what our configuration is within that configuration level: [edit protocols pim] Lab@Chicago# show interface all { mode sparse; } [edit protocols pim] Lab@Chicago# There are a couple of configuration tips and JUNOS implementation nuances that you should be aware of with PIM when it is operating in sparse mode:
There is a reduced set of operational and implementation considerations that are relevant if you are running PIM dense mode that we discussed in that section. Verifying a PIM-SM ConfigurationThe verification commands available were discussed in the PIM-DM section and are the same; additional commands reflect the RP and sparse-mode elections . 14.5.3 Interdomain Multicast RoutingUp until this point, this chapter has discussed multicasting solutions and technologies that would easily run within a single routing domain. This solution is straightforward if you are an enterprise network using multicast to provide information only to your employees . However, the providers of multicast content across the Internet are growing every day. A solution was needed to look at the practical realities we are faced with when considering routing between ASs. In most cases, this is routing between ISPs. As a result, they are competitors on one level, but because they must meet the needs of their customers, cooperation is paramount as multicast becomes more prevalent . The current multicast requirements place new challenges on today's providers. Specifically let's address some of them here to help us understand the technologies that we will be discussing. One specific area of concern is that PIM-SM requires only one active RP within a multicast group. Obviously, ISPs do not want to rely upon a third-party RP, so they must have their own RP for each multicast group. Another area of concern revolves around business factors, and there are many of them. Suffice it to say that an ISP and its customers are better served when the RP is within their AS (e.g., under their control). The final point we will mention is that ISPs may want to control traffic within their network to ensure effective utilization. Consider that unicast traffic might have a certain set of policies applied, when a different set of policies is needed for multicast. Yes, there are ways around this issue using the technologies presented so far; however, they have fallen short, and in many cases, the factors behind using them are not strong enough for them to be considered permanent solutions. As a result two technologies have emerged to address this concern: MSDP and MBGP, which are addressed in the Sections 14.5.3.1 and 14.5.3.2, respectively. MBGP creates extensions to the widely used BGP to support this requirement. MBGP adds a multicast-only reachability table to the existing unicast reachability table of BGP. With MBGP, a router can effectively have two BGP tables, one for multicast and one for unicast. Routers can be configured to look first at the multicast reachability table when making RPF checks. If a network is not in the multicast reachability table, it will then use the unicast routing protocol to perform the RPF. Experienced BGP users should have no difficulty learning to configure and maintain the extensions of MBGP. Furthermore, MBGP is backward compatible with BGP. 14.5.3.1 MSDPMSDP is a protocol allowing the connection of multiple PIM-SM domains. If you recall the discussion about mbone at the beginning of the chapter, it is actually composed of multicast islands. Consider for a moment that in the Internet an mbone multicast island is analogous to an AS. Keep this analogy in mind as we discuss the way MSDP can be used as a solution. MSDP allows the multicast sources for a multicast group to be known to all RPs in different multicast domains. Each PIM-SM domain uses its own RPs and need not depend on RPs in other domains. An RP runs MSDP over TCP to discover multicast sources in other domains. An RP in a PIM-SM domain has an MSDP peering relationship with MSDP-enabled routers in another domain. The peering relationship occurs over a TCP connection, where primarily a list of sources sending to multicast groups is exchanged. The TCP connections between RPs are achieved by the underlying routing system (BGP). The receiving RP uses the source lists to establish a source path. Through these peerings, RPs exchange source active (SA) messages, which describe all of the registered sources within their respective domains. In this way, RPs learn all of the active sources from other domains, in addition to the sources from their own domain. Configuring MSDPWhen you set out to configure MSDP on your Juniper Networks routers, you will have a variety of options. As an introduction, this book will discuss the basic MSDP configuration; additional configuration options can be found in the Juniper Networks multicast documentation. Enable MSDP by setting the local-address that the other MSDP router will use to communicate with the router you are configuring, as follows: [edit protocols msdp] Lab@Chicago# set local-address 30.30.30.2 [edit protocols msdp] Lab@Chicago# MSDP also requires the configuration of peers, and there must be at least one peer configured for proper operation. We can see the configuration as shown below: [edit protocols msdp] Lab@Chicago# set peer 30.30.30.1 [edit protocols msdp] Lab@Chicago# JUNOS provides you with a several options that can further expand the capabilities of MSDP. These options reflect the role MSDP plays in providing connections between routing domains. Briefly, the additional configuration options that are possible are route import/export and peer groups. In the next section we will introduce MBGP and how it is configured on a Juniper Networks router. 14.5.3.2 MBGPMBGP is the other technology used to provide connectivity between different multicast domains. Now, many people think MBGP means Multicast BGP, and in fact it does not. The regular BGP that we all know and love was designed for IPv4, which while a great idea, left many protocols unsupported. RFC 2283 defined MBGP and states that the use of MBGP will allow BGP to carry different routing information for multiple network layer protocols (e.g., IPv6, IPX). You would use MBGP when ISP-to-ISP multicast peering was needed or if your network was multihomed to two different providers. For the purposes of multicast, MBGP uses a wide variety of BGP characteristics to provide connectivity for multicast groups between different domains. Some of its characteristics are as follows:
This chapter presents just a few of the more important characteristics to be aware of. MBGP accomplishes the advanced ability of adding several new multiprotocol attributes, specifically the following:
These multiprotocol attributes allow multicast to be carried along with unicast traffic. The actual use of these attributes is reflected in the presence of multicast routes in the inet.2 routing table, as we have already discussed. The presence of an internal multicast routing protocol for internal routing is still needed. Juniper Networks recommends the use of PIM-SM to build the multicast distribution trees and provide the mechanism for forwarding multicast traffic. In Section 14.5.2.2, we discussed the operation and configuration of PIM-SM. If you want to learn more about MBGP and specifics on how it operates within JUNOS, do not look under the multicast section of their documentation. Remember that this is multiprotocol BGP, so consult the BGP section! Configuring MBGPBGP uses NLRI, as was discussed in Chapter 9. When using MBGP for multicast, the challenge is getting BGP to carry NRLI information for the multicast routes. You can configure the router for MBGP by individual BGP peer or for an entire group. In the following configuration example, we can activate MBGP as shown: [edit] Lab@Chicago# edit protocols bgp group MCAST neighbor 30.30.30.1 family inet ? Possible completions: <[Enter]> Execute this command > any Include unicast or multicast NLRI > multicast Include multicast NLRI > unicast Include unicast NLRI Pipe through a command [edit] Lab@Chicago# The default configuration is unicast; if you want to cons a peer for just multicast, you select the multicast option. If, however, you want to run both IP unicast and multicast, then use the any keyword. A configuration for MBGP and unicast would look similar to the following sample: [edit protocols bgp group MCAST] Lab@Chicago# show neighbor 30.30.30.1 { family inet { any; } } [edit protocols bgp group MCAST] Lab@Chicago# As discussed in Part III, JUNOS has multiple routing tables and families of protocols. When you complete the above configuration of MBGP, the multicast routes learned are placed into a separate routing table from the unicast routes, as we discussed. An address family indicator (AFI) and a subaddress family indicator (SAFI) identify each of these routing tables and families of protocols. JUNOS supports the following:
Consider, then, if BGP receives a unicast prefix with SAFI 1, it places this route into the inet.0 routing table, SAFI 2 prefixes go into inet.2 , and SAFI 3 prefixes go into both routing tables. This is important to note as the prefixes present in inet.2 are those sent to MBGP peers. Of course, you can also set a policy to import or export routes between the routing tables if that functionality is needed. |


EAN: 2147483647
Pages: 176