Migrating the DHCP Service
You can export your database from a Windows NT 4.0 “based DHCP server and import the database directly to a Windows Server 2003 “based server by using the procedures in this section. This is a good option if your current hardware does not support Windows Server 2003, or does not support the current or projected needs of your organization. The following procedures allow you to migrate lease, scope, and option information, including reservations and exclusions. If you have changed any registry settings from their defaults on the existing server, you must manually make these changes to the registry on the new Windows Server 2003 “based server for them to take effect.
| Caution | The registry editor bypasses standard safeguards, allowing settings that can damage your system, or even require you to reinstall Windows. If you must edit the registry, back it up first and see the Registry Reference at http://www.microsoft.com/reskit. |
If you have multiple DHCP servers on your network, and have split the scopes for each subnet between servers, you can maintain continuity of service by upgrading one server at a time. Alternatively, you can take all DHCP servers offline during the upgrade. If you have a long lease time, there might not be any interruption in DHCP service, even if you take all the DHCP servers offline for several hours. However, it is best to perform the migration during off-peak hours to reduce any possibility of interruption in DHCP service.
Exporting DHCP Settings
When migrating from an existing DHCP server the first step is to export the current DHCP settings. Use the following procedure to export the DHCP database from an existing Windows NT 4.0 “based server.
| Important | Before you begin the migration, create a backup of your working configuration and test the migration procedures in a lab environment. |
To export the DHCP server settings from a Windows NT 4.0 “based server
-
Run DHCPExim.exe. This opens the DhcpExim dialog box.
To download and install DHCPExim.exe, see the Resource Kit Tools link on the Web Resources page at http://www.microsoft.com/windows/reskits/webresources.
Tip If you get an error when trying to run the DhcpExim setup file, DHCPExim_setup.exe, you might need to first install the Windows Installer software on your Windows NT 4.0 “ based computer. To download and install Windows Installer, see the Windows Installer 2.0 Redistributable for Windows NT 4.0 and Windows 2000 link on the Web Resources page at http://www.microsoft.com/windows/reskits/webresources.
-
In the DhcpExim dialog box, click Export configuration of the local service to a file .
Figure 3.3 shows this page of the DhcpExim tool.
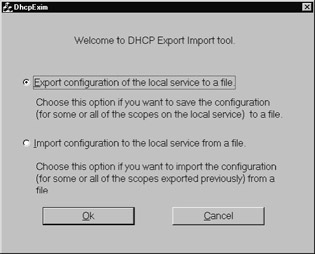
Figure 3.3: The DHCPEXIM Tool -
In the DHCPEXIM Export To File dialog box, type a file name , select a location to save the file, and then click OK .
The location that you use to save the file is shown in the DhcpExim Export To File dialog box.
-
Figure 3.4 shows this page of the DhcpExim tool.
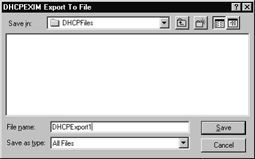
Figure 3.4: Export To File Dialog Box -
In the DhcpExim Export dialog box, select all of the scopes on the list to migrate all settings on the server. Alternatively, if you are not migrating the entire server configuration, you can export specific scopes.
Note These procedures assume that you are migrating all the scopes from a Windows NT 4.0 “based DHCP server to a corresponding Windows Server 2003 “based DHCP server. You can modify the procedures to export and import only selected scopes, or to consolidate multiple DHCP servers. These cases, however, are beyond the scope of this chapter. If you choose to redesign your DHCP implementation, ensure that you have considered all the planning, design, and deployment implications of changing your DHCP infrastructure, such as ensuring that you have sufficient routers or DHCP Relay Agents between subnets. For more information about designing and deploying DHCP, see Deploying DHCP in Deploying Network Services in the Microsoft Windows Server 2003 Deployment Kit .
-
Click to select the Disable the selected scopes on local machine before export check box to disable the scopes on this server before exporting, and then click Export .
-
Figure 3.5 shows this page of the DhcpExim tool.
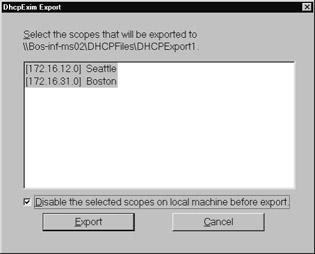
Figure 3.5: DhcpEximExport Dialog BoxTip This step might take several minutes to complete, and there is no dialog box to indicate the progress of the export. You can, however, view the process running on the Processes tab of the Windows Task Manager.
-
Click OK when the message The operation was completed successfully appears.
-
Copy the exported file to a location where you can access it from the new Windows Server 2003 “based server.
Once you have finished exporting your DHCP database, you will import the file to configure your new Windows Server 2003-based DHCP server.
Importing DHCP Settings
After exporting the DHCP settings and moving the exported file to a location where you can access it, you are ready to use the Netsh command-line tool to import the DHCP settings to the new DHCP server running Windows Server 2003.
Use the following procedure to import your DHCP server settings to your new Windows Server 2003-based computer.
To import DHCP server settings to a Windows Server 2003 “based DHCP server
-
Install DHCP on the Windows Server 2003 “based server. DHCP must be installed before you can import the file. To install DHCP, do the following:
-
Open the Windows Components Wizard. To open the Windows Components Wizard, click Start , click Control Panel , double-click Add or Remove Programs , and then click Add/Remove Windows Components .
-
Under Components , scroll to and then click Networking Services .
-
Click Details .
-
Under Subcomponents of Networking Services , click Dynamic Host Configuration Protocol (DHCP) , and then click OK .
-
Click Next . If prompted, type the full path of the Windows Server 2003 distribution files, and then click Next .
The required files are copied to your hard disk. After you have finished installing DHCP, continue with the rest of the procedure to import the DHCP settings.
Important This procedure assumes that you have installed the DHCP service, but have not configured any scopes. Your scopes will be automatically configured by the import process.
-
-
Ensure that the user who will perform the import is a member of the Local Admins group .
-
At the command prompt, type:
netsh DHCP server import path all
This will import the file from the path you specify. This can take more than 30 minutes to complete, depending on the size of the database, and gives you no indication of progress while importing the file. Do not assume that the process has failed until you allow sufficient time, which might be longer than 30 minutes depending on the size of your database. When the import is complete, a message appears that tells you the command has completed successfully.
This imports the configurations of all scopes that you exported from the server running Windows NT 4.0.
-
Once the database has been successfully imported to the new server, test the new server before taking the old server offline.
Important Ensure that you have migrated all the necessary services from the old server before taking it offline. For example, if WINS is on the same server as DHCP, migrate the WINS database before taking the old server offline.
-
Disconnect the old DHCP server from your network.
-
Assign the name and IP address of the old DHCP server to the new DHCP server. By using the IP address of the old DHCP server, you will not need to change the DHCP setting on any other computers that are pointing to the DHCP server.
Tip Consider configuring conflict detection to prevent conflicts among clients when migrating your scopes to a new computer. However, because server-side conflict detection uses Address Resolution Protocol (ARP) and Internet Control Message Protocol (ICMP) messages to detect conflicts, Internet Connection Firewall (ICF) or other firewalls that are installed on clients on your network might interfere with conflict detection.
EAN: 2147483647
Pages: 96