Handling Exceptions
|
Now that you’ve seen how to generate exceptions, let’s move on to handling them.
Using the try and catch Construct
Exceptions are caught and processed using the try and catch construct, which has the following form:
try { // code that may fail } catch(TypeOne* pOne) { // handle this exception } catch(TypeTwo* pTwo) { // handle this exception } Code that you suspect might fail is enclosed in a try block that is followed by one or more handlers in the form of catch blocks. Each catch block looks a little like a function definition, with catch followed by a type in parentheses, which represents the type that will be caught and processed by the catch block. In the preceding code, the first catch block will handle exceptions tagged with a TypeOne* type, while the second block will handle those tagged with a TypeTwo* type.
| Note | Try and catch blocks form a single construct. You can’t have a try block without at least one catch block, you can’t have a catch block without a try block, and you can’t put anything in between them. |
You can chain as many catch blocks together as there are exception types to catch, as long as you have at least one.
The following exercise will show you the basics of handling exceptions, using the example from the previous exercise as a basis.
-
Reopen the project from the previous example if you’ve closed it.
-
Modify the _tmain function so that it looks like this:
Console::WriteLine(S"Throw Test"); try { int n = 3; Console::WriteLine(S"Calling with n=3"); func(n); Console::WriteLine(S"Calling with n=0"); n = 0; func(n); } catch(System::ArgumentException* pex) { Console::WriteLine(S"Exception was {0}", pex); } Console::WriteLine(S"All done");The calls to the function are enclosed in a try block, which is followed by a single catch block. When the second call to the function fails, the exception-handling mechanism takes over. It can’t find a handler in the function where the error originated, so it walks one level up the call stack and comes out in the try block. At this point, the runtime wants to go off looking for a handler. As part of this process, it puts the program stack back to where it was at the start of the try block. In other words, it unwinds the stack, which means that it destroys any variables that have been created on the stack within the try block, so you can’t use them in the catch block. You need to bear this in mind when writing exception handlers and declare any variables you need to use in the catch block outside the corresponding try.
When the stack has been unwound, the code looks at the catch blocks associated with this try block to see whether there is one that has an argument type that matches what was thrown. In this case, we have a match, so the contents of the catch block are executed. If there wasn’t a suitable catch block, the runtime would try to move up another level of the call stack and then would fail and terminate the program.
-
Execute this code. You should see something very similar to the
following figure.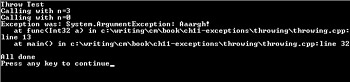
The second function call has generated an exception that has been caught by the catch block, which has printed out “Exception was:” plus the exception details. In contrast to what happened in the previous exercise, the final “All done” message is now printed. This illustrates an important point about exception handling: once a catch block has been executed, program execution continues after the catch block as if nothing had happened. If there are any other catch blocks chained to the one that is executed, they’re ignored.
-
Try changing the second call so that it passes in a positive value. You’ll find that the catch block isn’t executed at all. If a try block finishes without any exception occurring, execution skips all the catch blocks associated with the try block.
Customizing Exception Handling
Just printing out the exception object results in the type-plus-message-plus- stack trace that you saw when the exception was unhandled. You can use properties of the Exception class to control what is printed, as shown in the following table.
| System::Exception Property | Description |
|---|---|
| Message | Returns a string containing the message associated with this exception. |
| StackTrace | Returns a string containing the stack trace details. |
| Source | Returns a string containing the name of the object or application that caused the error. By default, this is the name of the assembly. |
If you altered the WriteLine statement in the catch block to read like this:
catch(System::ArgumentException* pex) { Console::WriteLine(S"Exception was {0}", pex->Message); } you’d expect to see a result like this:
Exception was Aaargh!
In a similar way, you could use StackTrace to retrieve and print the stack trace information.
Using the Exception Hierarchy
The exception classes form a hierarchy based on System::Exception, and you can use this hierarchy to simplify your exception handling. As an example, consider System::ArithmeticException, which inherits from System::Exception and has subclasses that include System::DivideByZeroException and System::OverflowException. Now look at the following code:
try { // do some arithmetic operation } catch(System::ArithmeticException* pex) { // handle this exception } catch(System::DivideByZeroException* pex) { // handle this exception } Suppose a DivideByZeroException is thrown. You might expect it to be caught by the second catch block, but it will, in fact, get caught by the first one. This is because, according to the inheritance hierarchy, a DivideByZeroException is an ArithmeticException, so the type of the first catch block matches. To get the behavior you expect when using more than one catch block, you need to rank the catch blocks from most specific to most general.
| Tip | The compiler will give you warning C4286 if you get the catch blocks in the wrong order. This works for both managed and unmanaged code. |
So, if you just want to catch all arithmetic exceptions, you can simply put in a handler for ArithmeticException, and all exceptions from derived classes will get caught. In the most general case, you can simply add a handler for Exception, and all managed exceptions will be caught.
Using Exceptions with Constructors
I mentioned one of the advantages of exceptions in the “What Are Exceptions?” section earlier in this chapter: they enable you to signal an error where there’s no way to return a value. They’re very useful for reporting errors in constructors, which, as you now know, don’t have a return value.
In the following exercise, you’ll see how to define a simple class that uses an exception to report errors from its constructor, and you’ll also see how to check for exceptions when creating objects of this type.
-
Start Visual Studio .NET, and open a new Visual C++ Console Application (.NET) project named CtorTest.
-
Immediately after the using namespace System; line and immediately before _tmain, add the following class definition:
__gc class Test { String* pv; public: Test(String* pval) { if (pval == 0 || pval == S"") throw new System::ArgumentException( S"Argument null or blank"); else pval = pv; } };The __gc keyword makes this class managed, and this managed class has one simple data member, a pointer to a managed String. At construction time, this pointer must not be null or point to a blank string, so the constructor checks the pointer and throws an exception if the test fails. If the pointer passes the test, construction continues.
-
Try creating an object in the _tmain function, like this:
int _tmain() { Console::WriteLine(S"Exceptions in Constructors"); // Create a null pointer to test the exception handling String* ps = 0; Test* pt = 0; // Try creating an object try { pt = new Test(ps); } catch(System::ArgumentException* pex) { Console::WriteLine(S"Exception: {0}", pex->Message); } Console::WriteLine(S"Object construction finished"); return 0; }Notice that the call to new is enclosed in a try block. If something is wrong with the String pointer (as it is here), the Test constructor will throw an exception that will be caught by the catch block. Try modifying the declaration of the ps string so that it points to a blank string (initialize it with S""), and then try a non-blank string, to check that the exception is thrown correctly.
Nesting and Rethrowing Exceptions
Now that you’ve seen how to use the try and catch construct, let’s move on to cover some more advanced uses. The first of these are nesting and rethrowing exceptions.
As the name implies, nesting exceptions means including one try and catch construct inside another, which can provide a useful way to handle error conditions. It works as you might expect:
try // outer try block { try // inner try block { // Do something } catch(SomeException* pex) { Console::WriteLine(S"Exception: {0}", pex->Message); } } catch(OtherException* pex) { Console::WriteLine(S"Exception: {0}", pex->Message); } If an exception occurs within the inner try block that is of type SomeException*, it will be handled by the inner catch block and execution will continue after the end of the inner catch block as usual. The outer catch block will not be executed in this case because the error has already been adequately handled.
If an exception occurs within the inner try block that is of type OtherException*, it won’t be handled by the inner catch block, so it will be passed to the outer try and catch construct, where it is processed by the outer catch block.
| Note | You can nest try and catch constructs to several levels, but it’s unusual to go more than two levels deep because it can complicate the structure of the code. |
Rethrowing an exception means just that—handling an exception in a catch block and then throwing it again so that it can be handled somewhere else. The following exercise shows how to catch an exception and rethrow it.
-
Start Visual Studio .NET, open a new Visual C++ Console Application (.NET) project named Rethrow.
-
Immediately after the using namespace System; line and immediately before _tmain, add the following function definition:
void func(int a) { try { if (a <= 0) throw new System::ArgumentException(S"Aaargh!"); } catch(System::ArgumentException* pex) { Console::WriteLine(S"Exception caught in func()"); } }This function is basically the same simple function you met at the start of the chapter, which throws a System::ArgumentException when it has passed a negative argument. The difference here is that the exception is being caught within the function.
-
Modify the _tmain function so that it looks like this:
Console::WriteLine(S"Throw Test"); try { int n = 0; Console::WriteLine(S"Calling with n=0"); func(n); } catch(System::ArgumentException* pex) { Console::WriteLine(S"Exception caught in _tmain()"); } Console::WriteLine(S"All done");If you run this code, you’ll find that the exception is caught locally in func and the catch block in _tmain doesn’t execute.
-
Modify the definition of func so that it rethrows the exception after handling it.
void func(int a) { try { if (a <= 0) throw new System::ArgumentException(S"Aargh!"); } catch(System::ArgumentException* pex) { Console::WriteLine(S"Exception caught in func()"); throw; // rethrow the exception } }Using throw without an argument rethrows the current exception, and it can be used in this way only within a catch block. At this point, the runtime goes off looking for another handler, which means moving up the call stack to the _tmain function, where the exception gets caught a second time. If you run this code, you should see the “Exception caught in func()” and “Exception caught in _tmain()” messages printed.
Note that you don’t have to rethrow the same exception; it’s quite usual to catch one type of exception, handle it, and then rethrow an exception of another type. You’ll see an example of this in the section on creating your own exception types later in this chapter.
The __finally Block
Managed C++ adds a new construct to traditional C++ exception handling, the __finally block. The purpose of this block is to let you clean up after an exception has occurred, and the following short exercise shows how it works.
-
Reopen the project from the previous example if you closed it.
-
Modify the _tmain function so that it looks like this, adding a __finally block after the catch block:
Console::WriteLine(S"Throw Test"); try { int n = 3; Console::WriteLine(S"Calling with n=3"); func(n); Console::WriteLine(S"Calling with n=0"); n = 0; func(n); } catch(System::ArgumentException* pex) { Console::WriteLine(S"Exception was {0}", pex); } __finally { Console::WriteLine(S"This is the __finally block"); } Console::WriteLine(S"All done");If you try executing the code, you’ll find that the __finally block gets executed after the catch block.
-
Modify the _tmain function so that the second call doesn’t cause an exception, either by changing the value or by commenting it out. When you run the program again, you’ll see that the __finally block still gets executed, even though there was no error.
-
The purpose of this block is to ensure that if you do something in the try block—such as opening a file or allocating some memory—you’ll be able to tidy up whether an exception occurs or not because the __finally block is always executed when execution leaves a try block. This construct gives you a way to clean up what might otherwise require complex coding.
The catch(...) Block
C++ has a construct that is sometimes seen in traditional code and is used to catch any exception that goes past. Here’s how it works:
try { // do some arithmetic operation } catch(System::ArithmeticException* pex) { // handle this exception } catch(...) { // handle any exception } If an exception doesn’t match the first catch block, it will get caught by the second one no matter what type it is. The problem is that you lose any information about the exception, because the catch(...) block doesn’t have an argument.
If you want this functionality when using managed exceptions, use a catch block that has an Exception* as its argument, which will catch any managed exception object.
|
EAN: N/A
Pages: 208