Creating the MSMQ Client Application
| |
In many cases, youll need to employ MSMQ as part of a larger COM+ application scenario. Consider an order entry system where the user will make the majority of the entries while on the road. In some cases, the user wont have access to a telephone connection, so using a live connection wont always be possible. In short, the application must work the same whether the user is at home or on the road. This scenario is perfect for a combination of COM+ and MSMQ because the application can store the orders in a local queue until the user makes a connection. Once the user does establish a connection, such as at the end of the day, MSMQ will automatically upload the orders to the server. Well discuss this application scenario later in this section.
Unlike other examples in this chapter, you really need a two-machine setup to see this one work. At one point in the chapter, youll disconnect one machine from the other to see how the application continues to store updates in the local queue. The only way to see this information is by having two machines so that you can physically disconnect one machine from the other.
This example also takes one shortcut by using the Event Log, rather than a database, for data storage. Generally, the order entry component would require a connection to the database. The component would send the information received in the message to the database. Because this example is concentrating on disconnected application development techniques, using the Event Log is just as useful as creating the connection to the database. The simplified example will clearly show the COM+ development techniques rather than focusing on database application development.
| Note | This section of the chapter doesnt discuss a few application elements you would need to consider for a complete implementation. For example, the user would probably need a list of client information and the pending orders for those clients . A developer can address this need by downloading client information to the remote machine based on the client visits scheduled for the next day. The information on the client machine would be read-only because the user would need it only for reference. |
Designing the Data Encapsulation Component
As part of creating the COM+ application, you need to define a data encapsulation method. Essentially, youre defining a new data type that contains all the information you want to transfer from one machine to another using the message. Listing 9-4 shows the data encapsulation component. Youll find a complete source listing in the Chapter 09\MyDataType folder of the books companion content.
| |
namespaceMyDataType { ///<summary> ///ThisinterfaceenablesaccesstotheOrderEntry ///datamembers. ///</summary> [Guid("6B4BF1B5-C7FF-48ee-8D5A-DFA5004E6CF3"), InterfaceType(ComInterfaceType.InterfaceIsDual)] publicinterfaceIOrderEntry { } ///<summary> ///Thisclassactsasadatatypeusedtoorganize ///theinformationfortransferbetweenclientand ///server. ///</summary> [Guid("BDB66C95-28D6-4fa0-9AD6-4FD540BC6073"), ClassInterface(ClassInterfaceType.None)] publicclassOrderEntry:IOrderEntry { publicStringClientName; publicStringClientID; publicStringItemID; publicStringItemName; publicInt32ItemQty; publicDecimalItemPrice; } } | |
As you can see, this is just a fancy way to create a data structure you can use to transfer the data from one machine to another. Interestingly enough, you dont need to register this component on the server. You will have to register it on any machine that uses an unmanaged client to ensure the unmanaged client sends the data in the proper format. Of course, this component must appear in the Global Assembly Cache (GAC) or within the same folder as any managed components or managed applications that use it.
Designing the Message Queue Component
The message queue component builds upon the same principles weve used in other areas of the chapter. However, it adds a few new twists that make it possible to transfer formatted data from one machine to another. Listing 9-5 shows the code for this portion of the example. Youll find a complete source listing in the Chapter 09\OrderEntry folder of the books companion content.
| |
[Guid("F6B0D315-DD16-4659-BE4E-FEF5ED7664B7"), ClassInterface(ClassInterfaceType.None)] publicclassOrderProcess:ServicedComponent,IOrderProcess { publicOrderProcess() { } #regionIOrderProcessMembers publicvoidProcessMessage() { MessageQueueTempMQ;//Messagequeue. MessageMsg;//Messagetoreceive. EventLogEV;//Messagedatastorage. OrderEntryOE;//OrderEntrydata. //Createandinitializethemessagequeue. TempMQ=newSystem.Messaging.MessageQueue(); TempMQ.Path= ".\OrderEntryApp"; //Setthequeueformatter. TempMQ.Formatter=newXmlMessageFormatter(newType[]{typeof(OrderEntry)}); //Createandinitializetheeventlog. EV=newEventLog("Application", ".", "MyPlayerComponent"); //InitializetheOrderEntryobject. OE=newOrderEntry(); //Getthemessage. try { Msg=TempMQ.Receive(newTimeSpan(5)); } //Ifthetimespanelapsesbeforethemessagearrives, //MSMQwillthrowanexception. catch(MessageQueueExceptionMQE) { EV.WriteEntry("NoMessagestoRetrieve\r\n" + MQE.Message, EventLogEntryType.Error, 1001, 100); return; } //Obtainthedata. OE=(OrderEntry)Msg.Body; //Writethemessage. EV.WriteEntry("ClientID: " +OE.ClientID+ "\r\nClientName: " +OE.ClientName+ "\r\nItemID: " +OE.ItemID+ "\r\nItemName: " +OE.ItemName+ "\r\nItemPrice: " +OE.ItemPrice.ToString("C2")+ "\r\nItemQuantity: " +OE.ItemQty.ToString(), EventLogEntryType.Information, 1002, 100); } #endregion } | |
As you can see, much of the queue interaction is the same. However, the data manipulation is different. Notice that we begin by creating an OrderEntry object, OE . The code converts the Msg.Body property and places the data within OE . Once the data is within OE , you can access the individual members, as shown in the code. In this case, the code places the data in an Event Log entry, but you could just as easily send the information to a database by placing the entries in a record.
Installing the Message Queue Component
As with all other COM+ applications well create, youll begin this installation by registering the component, creating the COM+ application, and importing the component. For this application, use the name OrderEntryApp . The name of the application is important. After youve performed these preliminaries , youll need to set up the application to use queuing. The following steps show you how.
-
In the COM+ Applications folder in the Component Services console, right-click the OrderEntryApp entry, and select Properties from the context menu. Select the Queuing tab. Youll see an OrderEntryApp Properties dialog box like the one shown in Figure 9-15. Notice that this dialog box is already set up for use.
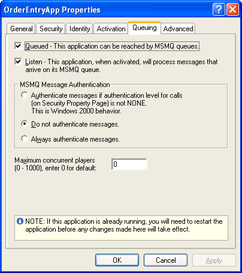
Figure 9-15: The OrderEntryApp Properties dialog box helps you created a queued environment for the application. -
Click Queued to set up the application for queuing. Click Listen so that the application will listen for new messages in the queue. Select the Do Not Authenticate Messages optionwe wont be using security in this example. Your dialog box should look like the one shown in Figure 9-15.
-
Click OK. COM+ will create a new queue for the application. Look in the Message Queuing snap-in and youll see this new public queue. It has the same name as the COM+ application, which is why the application name is so important. The queue isnt ready to use yet because you need to assign an interface to handle the incoming messages.
-
In Component Services, open the Interfaces folder associated with OrderEntryComp.OrderProcess . Right-click IOrderProcess , and choose Properties from the context menu. Youll see an IOrderProcess Properties dialog box.
-
Select the Queuing tab, and check the Queued entry. Click OK. The queue is set up now, so you can export the application and install it on the client.
-
Export the application as usual and then right-click the OrderEntryApp entry, and select Start from the context menu. This action starts the application so that it can receive messages from the client.
Designing a Managed Client
This example could use a managed client or an unmanaged client with equal ease. In this case, well use a managed client. Listing 9-6 shows the functional client code. Youll find a complete source listing in the Chapter 09\ManagedClient folder of the books companion content.
| |
privatevoidbtnSend_Click(objectsender,System.EventArgse) { System.Messaging.MessageMsg;//Messagetosend. OrderEntryOE;//OrderEntrydata. //CreatetheOrderEntryobject. OE=newOrderEntry(); OE.ClientID=txtClientID.Text; OE.ClientName=txtClientName.Text; OE.ItemID=txtItemID.Text; OE.ItemName=txtItemName.Text; OE.ItemPrice=Convert.ToDecimal(txtItemPrice.Text); OE.ItemQty=Convert.ToInt32(txtItemQty.Text); //Createthemessagecontent. Msg=newSystem.Messaging.Message(); Msg.Body=OE; //Sendthemessage. OrderEntryMQ.Send(Msg, "OrderEntry"); } | |
As you can see, this example looks similar to the Send function of the Recorder application we discussed earlier. However, in this case, the code first creates the data object, OE . The Msg.Body property can accept any object, even custom objects, as input, so sending OE is easy. Notice that the code includes a label entry this time because we arent defining it as part of the message. Either technique will work.
Testing the Application
At this point, you should have the component installed and configured on the server. The client machine should have the proxy application loaded. Weve also created a client application to send messages to the server. To test the application, start the client, click Send, and look for the results in the Event Log of the server. You should see the data transferred to the server without any problem.
To better understand this application, youll want to look at a few other areas. First, look at the Outgoing Queues folder on the client. The first time you run the application, MSMQ creates an outgoing queue for the message traffic that the client generates. This queue includes the name of the server and the server queue, as shown in Figure 9-16. This queue holds the application data until MSMQ can create a connection to the server. Consequently, the client will be unaware that theres no server connection if all it does is send data without waiting for a response.
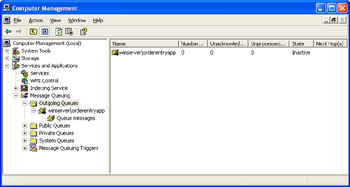
Figure 9-16: The data for a disconnected application resides in the Outgoing Queues folder until MSMQ can send it to the server
Another area to look at is the actual message sent with this application. Unlike the message shown in Figure 9-7, this entry wont contain simple String entries. Youll notice that the XML includes a data type entry. Each of the data values is encapsulated within an element with the name of the data elements in the class. In short, the XML reflects the packaging we set up earlier rather than the actual data type.
| |
EAN: 2147483647
Pages: 140
- Chapter I e-Search: A Conceptual Framework of Online Consumer Behavior
- Chapter IV How Consumers Think About Interactive Aspects of Web Advertising
- Chapter IX Extrinsic Plus Intrinsic Human Factors Influencing the Web Usage
- Chapter X Converting Browsers to Buyers: Key Considerations in Designing Business-to-Consumer Web Sites
- Chapter XI User Satisfaction with Web Portals: An Empirical Study