Creating a Simple COM ListenerPlayer
| |
Creating a Simple COM+ Listener/Player
The example in the Creating a Simple Recorder/Player section demonstrates the basic principles of MSMQ, but its not very realistic. While some users might create messages using something similar to the Recorder application, normally an application thats always listening to the queue will receive the messages. Part of the advantage of using a listener is that message processing occurs automaticallyno one has to monitor the queue for input.
As with many other aspects of the applications presented in this chapter, you can create a listener in a number of ways. For example, when you create a COM+ application and mark it as queued, the COM+ environment automatically creates a queue and sets up everything for you. Well look at an example of this listener type later in the chapter. A second type of listener is the one that relies on a trigger. Well create that type of listener in this section. Youll use the recorder example we created earlier to put messages in the queue, but now this application will automatically remove them.
Creating the Listener/Player Component
The Listener/Player component is similar to the player provided as part of the Recorder application. However, there are important differences. The first difference is that COM+ components normally dont display data on screen. Consequently, the component version will store data in the Event Log. Of course, you could have just as easily sent the data to a database or even to a text file. The second difference is that you dont have a means to create the MessageQueue object using the IDE, so the component will have to create this portion of code. Listing 9-3 shows the code well use for this example. Youll find the complete source code in the Chapter 09\ListenerPlayer folder of the books companion content.
| |
namespaceListenerPlayer { ///<summary> ///Thisinterfaceprovidesaccesstothemethodsinthe ///MyPlayerclass. ///</summary> [Guid("140E024D-4145-4cb4-BB3D-E44AA7AF4556"), InterfaceType(ComInterfaceType.InterfaceIsDual)] publicinterfaceIMyPlayer { voidProcessMessage(); } ///<summary> ///TheMyPlayerclassrecivesmessagesfromtheTemp ///messagequeueusingMSMQandprocessesthem. ///</summary> [Guid("77510036-E9F5-4536-BA27-925A4FDFA621"), ClassInterface(ClassInterfaceType.None)] publicclassMyPlayer:ServicedComponent,IMyPlayer { publicMyPlayer() { } #regionIMyPlayerMembers publicvoidProcessMessage() { MessageQueueTempMQ;//Messagequeue. MessageMsg;//Messagetoreceive. EventLogEV;//Messagedatastorage. //Createandinitializethemessagequeue. TempMQ=newSystem.Messaging.MessageQueue(); TempMQ.Path= "main\Temp"; //Setthequeueformatter. TempMQ.Formatter=newXmlMessageFormatter(newType[]{typeof(String)}); //Setthequeuepriorityfilter. TempMQ.MessageReadPropertyFilter.Priority=true; //Createandinitializetheeventlog. EV=newEventLog("Application", "Main", "MyPlayerComponent"); //Getthemessage. try { Msg=TempMQ.Receive(newTimeSpan(5)); } //Ifthetimespanelapsesbeforethemessagearrives, //MSMQwillthrowanexception. catch(MessageQueueExceptionMQE) { EV.WriteEntry("NoMessagestoRetrieve\r\n" + MQE.Message, EventLogEntryType.Error, 1001, 100); return; } //Displaythemessage. EV.WriteEntry("Label: " +Msg.Label+ "\r\nBody: " +Msg.Body+ "\r\nPriority: " +Msg.Priority.ToString(), EventLogEntryType.Information, 1002, 100); } #endregion } } | |
As you can see, this component, like all other COM+ components weve created, includes an interface description. As usual, make sure you define both a [Guid] and an [InterfaceType] attribute for the interface. This interface includes a single method, ProcessMessage() . Notice that the method doesnt return any value (because there is no client) and accepts no input data (because the message should contain everything the method needs).
The ProcessMessage() method begins by creating the MessageQueue object, TempMQ . The process of creating TempMQ is simple. All you need to do is instantiate the object and assign a value to the Path property. The path information contains the name of the machine on which the queue is found and the name of the queue. As with the player in the Record application, you also need to define values for the Formatter and MessageReadPropertyFilter.Priority properties.
| Note | Notice that TempMQ.Path points to the Temp queue on the main machine. You must change the machine name to match the name of your server. For example, if your servers name is WinServer, you would change the TempMQ.Path property to winserver\\Temp . |
Creating the EventLog object is next . This task consists of defining a log name, the machine on which the log is stored, and the source of the Event Log entry. In this case, the source is the MyPlayer Component.
| Note | The code places the EventLog object output on a machine named Main . Youll need to change this entry to the name of your server. If your server is the local machine, you can also use the . operator. The . operator always points to the local machine, rather than to another machine on the network. |
Once the code has access to the objects it needs, it attempts to access a message in the queue. Theoretically, its impossible for the code to throw an exception in this case because the component will never become active unless theres a message to process. However, youll still want to include the error- trapping code.
Adding an entry to the Event Log requires use of the WriteEntry() method. This method accepts the message, an EventLogEntryType enumeration value, an event ID, and a category. Well discuss how these entries work and appear in the Event Log in the Testing the Listener/Player Application section of the chapter. For now, youll need to compile the component.
| Note | While the name of the component and the method it contains are essential to the remaining portions of the example, the COM+ application name isnt as important. Youll see that the queue triggering (listening) mechanism employed for this example relies on the component program ID and the method name rather than the COM+ application name. However, the example well create later in the chapter does rely on the COM+ application name to create the message queue. In this case, youll want to be careful about how you put the application together and ensure the COM+ application name you create doesnt interfere with any existing queue on the system. |
After you compile the component, register it on the server using the Register.bat file found in the Debug folder for the application. Create a COM+ application named TriggerApp, and add this component to it. If youre using a two-machine setup to test the COM+ applications in this book, youll need to export the application and install it on the client machine. We discussed the mechanics of performing all these tasks in the A Simple Component Example section of Chapter 8.
Defining the MSMQ Rule and Trigger
Once you create the ListenerPlayer component, register it, and create a COM+ application for it, you need to create linkage between it and the Temp queue. For this example, well use a rule and a trigger to accomplish the task. A rule specifies when to call an application and which application to call. The trigger associates the rule with the queue. Whenever a message arrives in the queue that meets the requirements of the rule, the trigger sends the message to the application. Lets begin by creating the rule.
-
Right-click the Rules folder found within the Message Queuing Triggers folder of Computer Management. Select New and then Rule from the context menu. Youll see a New Rule dialog box.
-
Type a name for the rule. The example uses Simple Listener/ Player . Type a rule description. The example uses This is the listener/player used for test purposes .
-
Click Next. The wizard will show you a blank condition list, as shown in Figure 9-9. The condition list defines when the rule is true. If you dont define any conditions, the rule is always true. To define a new condition, simply select one of the statements from the drop- down list box, type a condition, and then click Add. The example doesnt use any conditions, so the rule is always true.
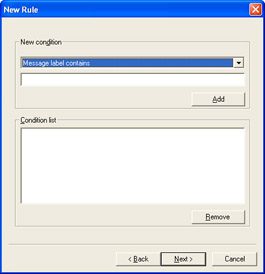
Figure 9-9: Rules rely on conditions to determine when they become true. -
Define zero or more conditions as necessary. Click Next. The wizard will ask you to define the application or COM component to invoke when the rule is true, as shown in Figure 9-10. A COM component can include a COM+ application proxy installed on your machine, which is the method well use for the example. Figure 9-10 shows the information youll need to type for the example. In this case, type ListenerPlayer.MyPlayer for the Component ProgID, and ProcessMessage for the Method Name. Notice that you must include a specific method name as part of the entry.
-
Click Finish. The new rule will appear in the list of rules in Computer Management. (Use Refresh to display it if necessary.)
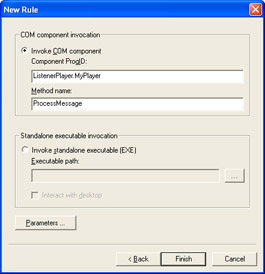
Figure 9-10: Define the application or COM component you want to invoke when the rule is true.
You can use a single rule with any number of triggers. The association allows one COM+ component to service any number of queues. However, you must create the trigger before anything will happen. The following steps show you how to create a trigger.
-
Right-click the Triggers folder in the queue you want to manage. (Dont use the general Triggers folder found in the Message Queuing Triggers folder.) Select New and then click Trigger in the context menu. Youll see the New Trigger dialog box shown in Figure 9-11.
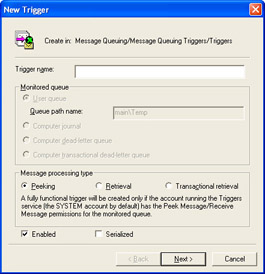
Figure 9-11: Use this dialog box to create a new trigger for a queue. -
Type a name for the trigger. The example uses Get All Messages . Select a Message Processing Type. The example uses Retrieval because the component will retrieve and process messages found in the queue. Finally, select the Enabled option (so that the trigger will begin processing messages), but leave the Serialized option clear (so that the trigger can continue to process messages, even if it hasnt evaluated all the rules for a particular message).
-
Click Next. The wizard will ask you to associate one or more rules with the trigger by moving the rule from the list on the left (Existing Rules) to the list on the right (Attached Rules). Figure 9-12 shows a typical dialog box for this example.
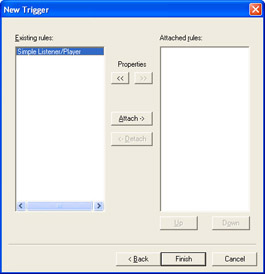
Figure 9-12: Activate the trigger by associating one or more rules with it. -
Select one or more rules for the trigger. For this example, select the Simple Listener/Player rule.
-
Click Finish. The new trigger will appear in the Triggers folder. (Use Refresh to display it if necessary.) The trigger is set up and ready to use.
Testing the Listener/Player Application
Testing the listener/player application is easy. Begin by creating a new message in the queue using the Recorder application. If you look in Component Services, youll notice that the TriggerApp application is active. In fact, you might be able to track the activity of the interface and method as well. However, the real test is whether the message ended up in the Event Log.
Open the Event Viewer console, and select the Application log. You should see at least one entry in the list similar to the one shown in Figure 9-13. Notice that the entry includes the Source, Category, and Event information we defined in the component. The entry type is also correct. The entry also includes the usual time and date information.
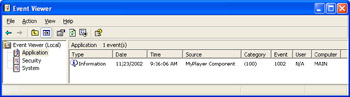
Figure 9-13: The example application creates an Event Log entry similar to the one shown here.
Double-click the Event Log entry so that you can see the associated message. Figure 9-14 shows a typical example for this application. Notice that the Description field contains the message Label, Body, and Priority entries. As you can see, this example demonstrates how easy it is to make manual connections to a queue when needed.
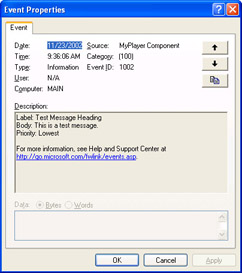
Figure 9-14: Make sure you check the message for proper Label, Body, and Priority entries.
| |
EAN: 2147483647
Pages: 140