Using the .NET Framework Configuration MMC Console
| |
Working effectively with .NET means knowing how to configure the .NET Framework for optimal use. This section of the chapter focuses on the .NET Framework Configuration MMC console. This console helps you manage your .NET components and controls, work with Remoting Services, create a secure environment, and manage configured applications. Each major section of the .NET Framework Configuration console includes a Help screen and at least one link that leads to a task-oriented configuration option, as shown in Figure 2-14. The following sections provide an overview of some of the essential tasks well perform in this book.
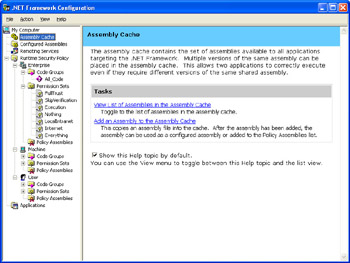
Figure 2-14: Each snap-in for the .NET Framework Configuration console provides a help screen as the starting point.
| Note | Once you select a link on the Help screen for a particular snap- in, that link remains displayed each time you select the snap-in. To return to the Help screen so that you can select another link, right-click the snap-in entry in the Scope pane and choose View and then Help Topic from the context menu. |
Managing Components and Controls
The Assembly Cache snap-in help screen displays two links. The first, View List Of Assemblies In The Assembly Cache, displays a list of assemblies in the GAC, as shown in Figure 2-15. Notice that this list includes the version number and locale information for each assembly. This information is important because sometimes an application requires a specific assembly version or locale. The public key token shows how the assembly is signed. Assemblies with the same public key token are signed by the same individual or company. You can also use this list to copy or delete assemblies in the GAC. Simply right-click the assembly in question and choose the appropriate option from the context menu.
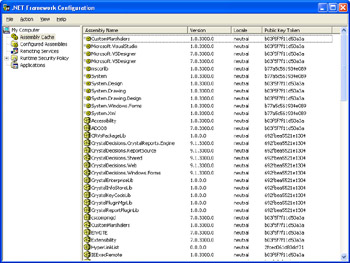
Figure 2-15: Use this list of assemblies to learn more about the content of the GAC.
The Add An Assembly To The Assembly Cache link on the help screen will display an Add An Assembly dialog box. Select the assembly you want to add, and then click Open. If the assembly has a strong name , the snap-in will add it to the GAC for you. Otherwise, youll see an error message.
The Configured Assemblies snap-in manages the binding policy and codebase of the assemblies in the GAC. You wont see any assemblies in this list for a default .NET Framework installation (at least not as of this writing). However, you can click Configure An Assembly to add an assembly to the list. The following steps show how to configure an assembly.
-
Click Configure An Assembly in the Configured Assemblies Help screen. Youll see the Configure An Assembly wizard. This is where youll select the assembly to configure. For the purposes of this procedure, Ill use the MyMath asssembly added to the GAC earlier in the chapter.
-
Select an assembly to configure. You can manually type the information or click Choose Assembly. When you click Choose Assembly, the snap-in displays the Choose Assembly From Assembly Cache dialog box. Scroll through the list of available assemblies, highlight the one you want to configure, and then click Select. In either case, the Assembly Name and Public Key Token fields will contain the information needed to identify the assembly.
-
Click Finish. The snap-in will add the assembly to the list of configured assemblies. It will then display a Properties dialog box for the assembly.
-
Click the Binding Policy tab to assign a version number binding policy to the assembly if necessary. When an application requests an assembly with a version number within the range you select, the GAC will automatically supply the assembly with the version number you provide.
-
Click the Codebases tab to assign a URI to the assembly if necessary. Whenever an application requests an assembly with a specific version number, the GAC will provide the supplied codebase.
-
Click OK. The assembly is configured.
Whenever you want to view a list of configured assemblies, click the View List Of Configured Assemblies in the Configured Assemblies snap-in. This option displays a list similar to the one shown in Figure 2-15. In this case, however, the list will contain the name of the assembly, the public key token, and the words yes or no to reflect the status of the binding policy and codebases configuration.
Remoting Services Configuration
The Remoting Services snap-in help screen provides access to just one link, View Remoting Services Properties. Click this link, and youll see the Remoting Services Properties dialog box. To use this dialog box, select the channel you want to configure. Once you select the channel, adjust the attributes displayed in the attribute list as needed.
Defining a Runtime Security Policy
Well discuss the issue of security several times throughout the book. However, you need to know a few things about the Runtime Security Policy snap-in at this point. First, these policies affect the common language runtimenot the policies of the system as a whole. This means that using this snap-in helps you modify .NET security without affecting the security of the rest of your machine. Second, notice in Figure 2-14 that this snap-in works at three levels:
-
Enterprise
-
Machine
-
User
The Enterprise level is the most encompassing because it affects everyone who connects to the network. The Machine level affects only the current machine, while the User level affects only a specific user.
Each of these levels includes three folders. The Code Groups folder contains policies that affect the execution of code. For example, if you look at the Machine level, youll find code groups for each of the zones found in Internet Explorer. Each of these zones will include one or more subzones that also have policies and so on. You can get quite specific about how code runs on a machine using these settings. To modify one of these settings, click the Edit Code Group Properties link.
The Permission Sets folder contains a list of permissions that affect local resources such as files, the network, or hardware. This folder contains entries that group the permissions by area, or you can select the Everything entry to see all the permissions. To see the settings for one of the permissions, right- click its entry and choose Properties from the context menu.
The Policy Assemblies folder contains a list of assemblies that directly affect .NET security. When viewing the contents of this folder, youll see the assembly name, the version number, and its public key token. There arent any configuration settings in this folder. You can, however, add or remove assemblies as needed to meet your security needs.
| |
EAN: 2147483647
Pages: 140