Using the IDE to Access Components
| |
Using the IDE to Access Components
Visual Studio .NET provides tools to help you access COM components and integrate them into .NET projects. This section will show you how to locate components and use them in .NET code.
| Note | C# is used in the sample code in this section, but the same techniques can also be used with Visual Basic .NET and managed C++. |
Locating the Component You Need
Although just about every COM component meets the definition of an ActiveX control, Visual Studio .NET treats non-UI components differently from ActiveX controls that have a UI. Non-UI components can be used in both console and Windows Forms applications, but ActiveX controls that have a UI are used in Windows Forms projects and accessed through the Toolbox.
| Note | Ill use the term COM component to mean components without a UI, and ActiveX control to mean traditional ActiveX controls, which have a UI. |
Locating COM Components
The References folder in a Visual Studio .NET project tree contains details of references to other .NET assemblies used by the project. It is also used to hold references to COM components you want to use in a project.
Right-clicking on the References folder and selecting Add Reference from the context menu will display the Add Reference dialog box, and selecting the COM tab will display details of the COM components currently registered on the machine, as shown in Figure 1-4.
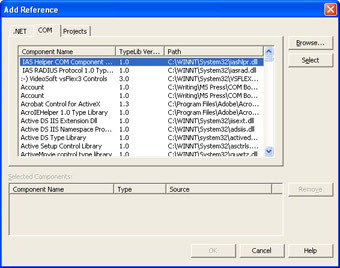
Figure 1-4: Adding a reference to a COM component in Visual Studio .NET
Select the components you want to use from the list, and click Select to add them to the Selected Components list. You can also use the Browse button, which will let you search type libraries for unregistered components. Once youve selected the components, click OK, and the Add Reference wizard will generate the RCW code. The Simple COM Access Examples section will show you how to locate and use COM components in code.
Locating UI Components
COM components that have a UIreferred to as traditional ActiveX controlsare accessed through the Toolbox of the Visual Studio .NET Windows Forms designer. Display the Toolbox, and make sure the Windows Forms controls are displayed. Right-click anywhere on the Toolbox, and choose Add/ Remove Items from the context menu. This will display the Customize Toolbox dialog box, as shown in Figure 1-5.
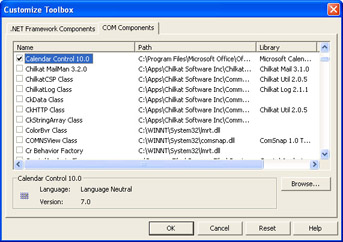
Figure 1-5: Adding a reference to an ActiveX control in Visual Studio .NET
Check the boxes next to the controls you want to add, and then click OK. As with COM components, RCWs are generated for the controls. In addition, an icon for the control is added to the Windows Forms section of the Toolbox, and all properties and methods of the ActiveX control are exposed in exactly the same way as a standard Windows Forms control.
Simple COM Access Examples
To show you how simple it is to use COM components in .NET code, this section will walk you through two examples: using a COM component, and adding an ActiveX control to the Toolbox.
Using a COM Component
Ive created a simple in-process ATL component for this example, called Convert, which converts temperatures between Celsius and Fahrenheit. You can find the code in the Chapter01\Convert folder in the books companion content. Before trying this example, make sure the component is installed and registered.
| Note | You can open the project in Visual Studio .NET and build it, which will register the control. Alternatively, you can run RegSvr32 from the command line to register Convert.dll from the Convert\Debug directory. |
Start by creating a Visual C# Console Application project; Ive called my example ConsoleTest . Now open Solution Explorer, and right-click the References folder. Select the Add Reference command from the context menu, as shown in Figure 1-6.
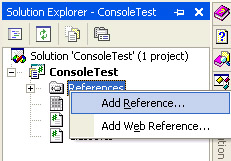
Figure 1-6: Displaying the Add Reference dialog box in Visual Studio .NET
This will display the Add Reference dialog box, which you saw in Figure 1-4. Select the COM tab on the dialog box. If youve installed and registered the Convert component, you should find an entry in the list, as shown in Figure 1-7.
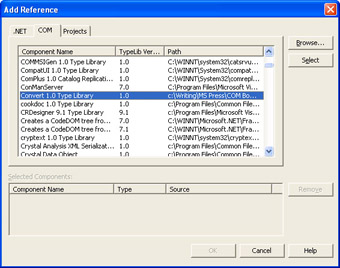
Figure 1-7: An entry for the Convert component appears in the list.
Click Select to add it to the list of selected components, and then press OK to cause the RCW to be generated. After a few seconds, an entry for Convert will be added to the References folder in Solution Explorer. Right-click the new reference, and select Properties; the property display shows the details of which component is wrapped by this reference, including the path to the DLL and the components CLSID.
You can immediately see the methods and properties exposed by the coclass by bringing up the Object Browser (by pressing Ctrl+Alt+J or selecting Object Browser from the View menu). The browser is shown in Figure 1-8.
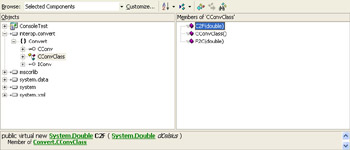
Figure 1-8: The RCW for the Convert component in the Object Browser
The display shows an assembly called interop.convert that contains a Convert namespace, which in turn contains the CConvClass ATL implementation class.
To use the COM component from code, add the following code to the Main method in ConsoleTest :
try { //Createawrapperobject Convert.CConvClasscc=newConvert.CConvClass(); //Callamember doublef=cc.C2F(100.0); Console.WriteLine("100Cis{0}F",f); } catch(Exceptione) { Console.WriteLine(e.Message); } Note how the wrapper object is created and used to call methods on the underlying COM object.
Build and run the application. You should see the following result in the console window:
100Cis212F
Using an ActiveX Control
The procedure for using an ActiveX control is slightly different, and Ill use the standard Microsoft Calendar control that is installed as part of Microsoft Office to show how it is done.
Create a new Windows Forms application: Ive called mine FormTest , and Im using C#. Remember that this example will work in managed C++ and Visual Basic .NET as well. Open the Toolbox, make sure the Windows Forms tab is selected, and then right-click the Toolbox, as shown in Figure 1-9.
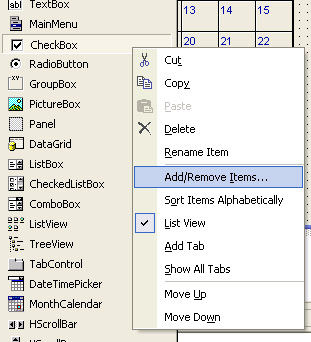
Figure 1-9: Adding an ActiveX control to the Visual Studio .NET Toolbox
Select Add/Remove Items to bring up the Customize Toolbox dialog, which you saw in Figure 1-5. Choose the COM Components tab, and scroll down the list until you come to the Calendar Control 10.0 entry. Select the check box next to the name , and then click OK. You can now scroll to the bottom of the Windows Forms controls in the Toolbox, where youll see an entry for the Calendar control, as shown in Figure 1-10.
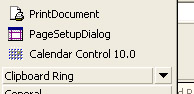
Figure 1-10: The Microsoft Calendar ActiveX control installed in the Visual Studio .NET Toolbox
If you look in the Object Browser, youll see that two assemblies have been generated to represent this control, called interop.msacal and axinterop.msacal . The first, interop.msacal , is the basic wrapper that allows you to interact with the COM types defined in the ActiveX control; the second, axinterop.msacal , adds the functionality to let the control be used as a Windows Forms control.
You can use this control like any other Windows Forms control, placing it on forms and interacting with its methods and properties.
Figure 1-11 shows a Calendar control on a form, together with two Windows Forms button controls that can be used to change the month displayed by the calendar.
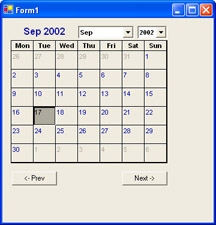
Figure 1-11: A Microsoft Calendar ActiveX control in use in a Windows Forms application
| |
EAN: 2147483647
Pages: 140