Data Entry Methods
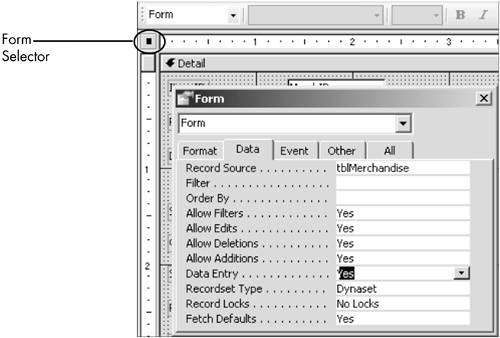
| Most of us think of data entry as unmitigated drudgery. Like most work, though, data entry has its pleasures and rewardsnot least of which is knowing that, when done with care, the information you retrieve from your database will be complete and correct. Even data-entry enthusiasts welcome any techniques that make the task more efficient. For any individual record, the time saved by any one procedure is minuscule. Incrementally, though, better data-entry methods can save you much time and energy. Data Entry ModeOne of the primary purposes of forms is to enter data, so it's only fitting that there be a special view dedicated to that purpose. Open any form and choose Records, Data Entry. You're greeted with a blank record. Note that among the navigation buttons at the bottom of the form, the Specific Record box displays 1, regardless of how many records are in the form. No other records are in view. Each time you add a record, the Specific Record box increases by one; when using the navigation buttons, you have access to only the records you've added during that session. This works nicely when you want to view only those records you just added rather than the entire set. To view all your records again, choose Records, Remove Filter/Sort. You can set the form to be in Data Entry mode whenever you open it. In Design view, double-click the form selector (see Figure 6.7) to open the Form property sheet. On the Data tab, edit Data Entry to Yes. Figure 6.7. The Form Selector opens the Form property sheet.
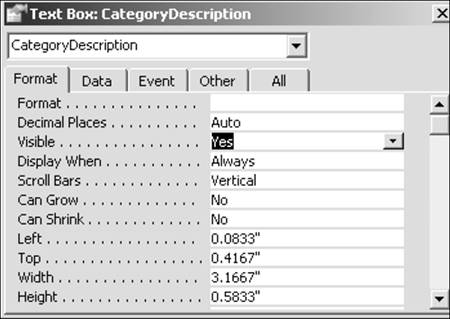
TIP If there's a form with which you always begin your work, you can have Access open it when you open the database. In the Database window, choose Tools, Startup. In Display Form/Page, choose the form. Visible Property and Tab StopOften when you're entering data, you have values for most fields, but perhaps not for one or two. The vacant fields almost demand to be filled; each time you see them, their emptiness reinforces a sense of failure. More pertinently, you waste time tabbing through empty fields. You can temporarily hide such a field. Right-click its text box; choose Properties, Format tab; and change the Visible property (see Figure 6.8) to No. Hiding the text box also hides its label; editing the Visible property of the label to No hides just the label. Figure 6.8. The property sheet of a text box.
A different solution is provided by setting the Tab Stop property on the Other tab of the control to No. When you press Tab, Access jumps right by it and moves to the next field. TIP If you hide the control using the Visible property, you don't see it when you print the record. Let's say that you occasionally print records for customers, but you have one or two controls for in-house use only. For that purpose, it's better to hide the field by using the Display When property, which is directly below the Visible property (see Figure 6.8). You can set it at Always (visible), Print Only, and Screen Only. Get Special Instructions for a FieldYou have two ways to give users special instructions on how to enter data in a particular field. One is to use the ControlTip Text property, found on the Other tab of the control's property sheet. The text that you enter for the property is displayed whenever you hover the mouse over the control (see Figure 6.9). Figure 6.9. When you hover the mouse over the supplier stock number, the text entered in the ControlTip Text property is displayed.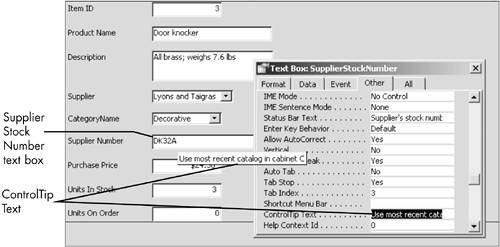 As either an alternative or an additive, you could enter instructions in the Status Bar Text property on the Other tab. (You might find that the property currently has the field's Description from the underlying table. Because the Description itself is optional, replacing it shouldn't cause any problems.) The Status Bar Text will appear in the status bar whenever the control has the focus. TIP Even though a Memo text box has exponentially more space than a table cell, you might need more room to read all (or at least more of) what's in there. Use Zoom (Shift+F2) to get the big picture. You might even want to include this hint in Status Bar Text as a reminder. Enter the Same ValueYou can take advantage of some useful keyboard shortcuts for inputting values:
Interestingly, you can store both the current date and time in a Date/Time field using the second and third shortcuts together. The Format property controls how much of this data is displayed. Tabbing Through FieldsNothing is wrong with moving field controls around in Design view after designing a form. But more often than not, this will throw your tab order out of sync. When you press Tab to move from field to field, you usually want the focus to travel in an orderly left-to-right, top-to-bottom path. Instead, the focus might dizzily move in every direction. To reset the tab order, choose View, Tab Order in the Design view of the form (see Figure 6.10). Most of the time, your fields will be in the Detail section. The Custom Order schematic works like the top pane of Table Design view. Move your pointer to the field selector for the field you want to move. (Ignore the Auto Order button because the controls have to be lined up just so for it to work.) When the pointer changes to an arrow, click to select the field. Drag it to its new position on the tab order (see Figure 6.10). Click OK and close the Tab Order dialog box. Figure 6.10. The tab order in the Merchandise form is out of sequence. You can have the tab move directly from MerchDescription to Supplier by moving Supplier up in the Tab Order dialog box.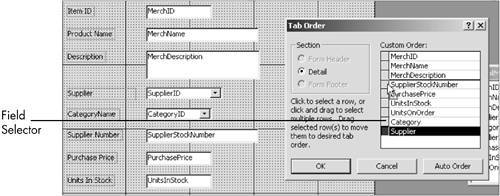 TIP In Design view of a form you work mainly in property sheets, where your changes take effect without clicking an OK button. Thus there is a tendency to just close the Tab Order dialog after you've made a change and assume you're finished. Make sure you click OK or your changes won't take effect. Understanding the Undo CommandMaking a to-do about Undo might seem oddwhat is there to say about a command that simply undoes what has been done? Access Undo might not be idiosyncratic or illogical, but it is, well, distinctive. Undo is available in both Form and Design views, but I postpone discussion of the latter until Chapter 11. If you choose Edit on the menu and look for an Undo command, you'll see three choices (four, if you count the self-explanatory Can't Undo):
TIP This tip is almost too obvious to mention, but it's much too important not to. It's the single most important un-doer I know of. When you find yourself in one of those inevitable Access loops in which you are trapped by unceasing error messages, press Esc a couple times, and usually you're set free. Also note that there is an Undo button on the Form View toolbar. Unlike some other Undo buttons in Microsoft Office, however, you can undo only one action. I prefer to issue Undo from the Edit menu, where I can readily see just which of the Undo commands I am executing. Using Two-Digit Years for Entering DatesAccess gives you wide latitude in entering dates. Assuming English (United States) as the location in your Windows regional options, the fourth day of the seventh month of 2005 can be entered as 7/4/05 or July 4, 2005 or 7-4-05. One issue, however, is how Access records entries of two-digit years, which is actually determined in the Windows control panel. Under the default settings in Windows 2000 and XP, if you enter dates between 1/1/00 and 12/31/29, Access assumes it's for 21st-century dates, those between January 1, 2000, and December 31, 2029. If you enter dates between 1/1/30 and 12/31/99, the assumption is that they are for 20th-century dates between 1930 and 1999. If you are entering dates before 1930 or beyond 2030, enter the full four-digit year to make sure you're entering the correct date. NOTE Here's how to change these defaults: In the Windows 2000 control panel, choose Regional Options, Date tab and edit the calendar settings. In Windows XP, choose the Regional Options tab in Regional and Language Options. Click Customize, click the Date tab, and edit the calendar settings. If you want to see four-year dates displayed for time formats that ordinarily have just two years (such as 19-Jul-05), choose Tools, Options, General tab and set the Use Four-Digit Year formatting option. |
EAN: 2147483647
Pages: 169