| The Label Wizard and snaked column reports are two Access report features that are worth spending some time on. Let's look at how they work. Label Wizard The Label Wizard is a handy device for quickly creating mailing labels. It's easy to use, and I'm not going to drag you through the many options in its dialog boxes; either they are self-explanatory or their mysteries can be unraveled with some trial and error. But one dialog box might cause you some problems, at least initially. This is the "construction" dialog box where you actually create the label (see Figure 12.42). Figure 12.42. In this dialog box, you build a prototype label that uses your contact data. 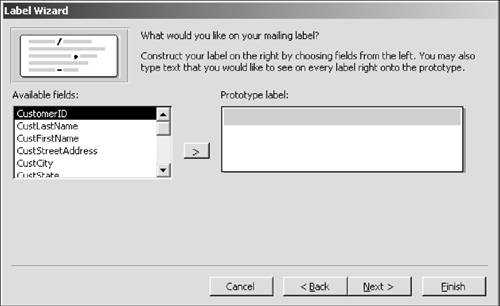
Besides the fields (first name, street address, and so on) that you include in the label, you'll almost always need to include some spaces or a little punctuation, such as a comma. Here's what you need to remember: Access assumes nothing. If you want a space between first and last names, you have to put it in thereyou need to press the spacebar. If you want a comma, you must press the comma key. Access won't do it for you. You can also include in the label a text stringsay, Attention:by typing it in on your own. Out of context, that probably doesn't make much sense. The following example should make things clearer: 1. | In the Database window, select tblCustomers. Choose Insert, Report.
| 2. | In the New Report dialog box, select Label Wizard and click OK.
| 3. | Keeping the default selections in the first two dialog boxes, click Next twice to reach the dialog box asking "What would you like on your mailing label?" (refer to Figure 12.42).
| 4. | Double-click CustFirstName to include it in the Prototype label. Tap the spacebar once to leave a space. Double-click CustLastName. Press Enter.
| 5. | Double-click CustStreetAddress and press Enter.
| 6. | Double-click CustCity. Type a comma and press the spacebar once.
Actually, the U.S. Postal Service doesn't require or even recommend a comma after the city in postal addresses. I've included it simply to show you how you can include characters in the label.
| 7. | Double-click CustState. Press Enter.
| 8. | Double-click CustZIP. Click Next.
| 9. | In this window, you can choose a field to sort by. Click Next without adding any fields to the sort by pane.
| 10. | Name your report rptCustomerLabels and click Finish.
| 11. | Click OK in the "Some data may be lost" error message.
If you click the Show Help button in this message, it says "This error message is commonly encountered when printing to label pages where there are three or more labels per row. Usually this message can be ignored." Let's do what Access suggests.
| 12. | Review your labels. Note that the punctuation you entered and the spaces you left are included in the label (see Figure 12.43).
Figure 12.43. The labels include the data from the fields in the underlying table, as well as any text you entered yourself. 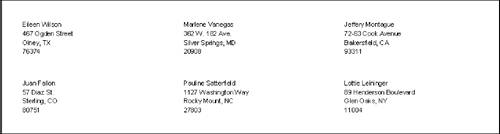
| 13. | Close the report.
|
Snaked Column Reports The columnar report that Access produces when you select AutoReport has just one column at the left of the page. That's fine if you want extra room for writing notes or scribbling doodles. But often the empty space is left unused, which leaves your report with a lopsided look. It also wastes paper. You can often add one or more columns to the page for greater symmetry and efficiency. These multicolumn reports are called "snaked" (for reasons that will soon become obvious, if they are not so already). Snaked column reports require a little know-how and some patience for the trial and error necessary to get the columns in the right proportions. But after you gain some experience, you shouldn't have much trouble creating or editing them. First, let's create a report whose data you can snake: 1. | In the NiftyLionsChap12.mdb Database window, click Reports and click New.
| 2. | With Design view selected at the top, open the drop-down list and select tblCustomers. Click OK.
| 3. | Maximize the Report Design window.
| 4. | Choose View, Page Header/Footer to eliminate these two sections.
| 5. | Select CustLastName in the field list. While holding down the Shift key, click CustZip to select these two fields and all in between.
| 6. | Drag and drop the six selected fields 1 inch from the left and two rows of dots from the top.
| 7. | Choose View, Properties. In the Multiple Selection property sheet, click the Format tab. Edit the Left property to 1". Edit Width to 1.5". Close the property sheet.
I had you widen all the text boxes a bit because the Street Address and (perhaps) Last Name fields were a little narrow.
| 8. | Choose Format, Vertical Spacing, Increase. Choose Format, Vertical Spacing, Increase again.
| 9. | Click outside the controls to deselect them.
| 10. | Select all the accompanying labels.
Try using the "pointer in the ruler" method you learned in this chapter for selecting controls in a column. (Alternatively, just click each label while holding down the Shift key.)
| 11. | Press F4 to open the Multiple Selection property sheet. Edit the Left property to .04". Close the property sheet.
| 12. | Choose File, Save. Name your report rptSnakedColumn and click OK.
Your design window should look like Figure 12.44.
Figure 12.44. You can use a variety of methods to add and align controls. 
Click View to see your records.
|
Now you'll snake the report: 1. | Choose File, Page Setup, Margins tab. All the settings should be 1 inch.
| 2. | Click the Columns tab.
The settings don't require much explanation. Let me just emphasize that Row Spacing is the amount of space between rows, and Column Spacing is the amount of spacing between columns. The Column Spacing setting is not available unless the number of columns is greater than one.
| 3. | Edit the number of columns to 2, the row spacing to 0.3" and the column spacing to 2".
| 4. | In the Column Size section, deselect Same as Detail. Edit the width to 2"; the height should be 2".
| 5. | You can "snake" the records either across or down, or down and across. Let's use the Across, then down selection.
| 6. | Click OK. The report now has two columns (see Figure 12.45).
Figure 12.45. You can save space and often create a more handsome report by using snaked columns. 
Note that only the contents of the Detail section of the report are snaked. Page Headers and Footers are not.
If you want, print a page of the report to test your work. Close the report and save your changes.
|
With a little more work, and if you were willing to let a few values be truncated slightly, you could get three columns on the page. (Another possibility would be to decrease the font size of the controls so you could reduce the width of the columns.) To fit more columns, you reduce the sizes of Column Spacing and Width. TIP Actually, the best strategy for fitting in more columns would be to get rid of the labels. The contents of most or all of the fields are obvious, so labels are unnecessary.
|