| There is value in an organization having a standard image to be applied to Linux devices, both servers and workstations. This often can be most valuable when it comes to diagnostics and repair of a device with problems. The administrator may work to repair a user's workstation, for example, and if after a specified time a repair cannot be completed, it is often most effective to just reimage the device. ZENworks Linux Management enables you to take and apply images onto devices. Before you can take an image using PXE, you must have the novell-proxydhcp running on the ZENworks server. If you want to take an image from booting a CD or from booting a ZENworks partition on the device, you just need to make sure that the imaging server (pbserv) and the novell-zmgprebootproxy server is running. This can be set to run though the YAST tool modifying runlevels for each individual service. The taking of an image can be done either automatically through ZENworks Control Center or manually from the device. The following sections describe how this can be accomplished. Taking an Image from ZENworks Control Center An image can be taken from a device after it has been registered with the ZENworks Zone. Execute the following to take an image of a registered device: 1. | Launch ZENworks Control Center.
| 2. | Log in as an administrator.
| 3. | Browse to the device with the image you want to take.
| 4. | Click the Take Image quick task. You are presented with a File Information screen (see Figure 11.4).
Figure 11.4. File Information page for taking an image. 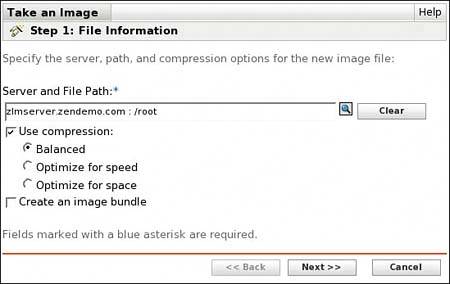
| 5. | Enter the Server address or DNS name and the file path to a directory in the Server and File Path field. You can do so by pressing the browse button next to the field and entering the information. Press Next.
| 6. | Review the summary page and press Finish.
| 7. | A work order now has been created in the system to take an image of the device the next time the device is booted. Rebooting the device can be done via Remote Control or manually on the device.
| 8. | Boot the device to the network, using PXE or another ZENworks imaging boot method. This causes the system to connect to the ZENworks Linux Management imaging system installed with the product. The system knows the device and recognizes that a work order has been created to take an image of the device.
| 9. | The system then brings down a Linux kernel used for imaging and takes an image of the device, placing the resulting file at the path specified.
|
Taking an Image Manually You can take an image of a device manually at any time. You can do so by booting from a CD/DVD or from the network, using the components previously described. If you are going to take a manual image via CD/DVD, you must first create the CD/DVD. This can be accomplished by burning the .iso image (/opt/novell/zenworks/zdm/imaging/winutils/bootcd.iso) from the ZENworks server onto a CD or DVD. Configuration options can be manipulated via a settings.txt file on the CD. To manually take an image of a device, do the following: 1. | Boot from the network. When the device gets its DHCP address, press and hold the Ctrl-Alt keys until the ZENworks menu comes up. Choose ZENworks Maintenance Mode Imaging from the menu.
or
Insert the CD you created in the earlier steps and boot from the CD. When the menu comes up, choose the Manual Mode option.
NOTE You can control the menu choices that are available on the ZENworks menu through zone settings administered on the Configurations page. See Chapter 9, "Policies," for more information. | 2. | After the Linux system has booted, you come to a standard bash# prompt. At this point you can run the local interface by typing img.
| 3. | Follow the options to create an image and have it placed on a server or on a local partition.
|
|