Chapter 8: Building Presentations and Forms
PDF documents are most commonly used as a medium for transferring a document, such as a page layout or word processing document, into a readily viewable and transferable format. This is usually done without much thought given to how the PDF format can be used to enhance the presentation and/or expand the content and usefulness of the original document. The Acrobat application and PDF document format can be used in almost limitless ways.
In this chapter we will explore two common and very useful variations of PDF documents: as presentations and to deliver editable forms documents. Once you see and master the capabilities and tools in this chapter, not only will you know some very useful PDF techniques, but knowing these PDF variations will likely send you off to develop your own special uses for PDFs.
Creating and Using PDF Presentations
The ability to create PDF presentations in Acrobat solves a number of common problems. First, using PDF as a common document format makes it easy to combine information and elements from many different kinds of otherwise incompatible documents and applications. Second, once you have created a PDF presentation, it is typically much smaller than most presentation files, and due to PDF s cross-platform and application-independent nature, PDF presentations are easy to transport across the Internet and/or use on other computers. And to top it off, PDF presentations are easy to create and use!
Creating Presentations from a Single Application or Document
Any PDF file you create can be quickly and easily converted into a slide-show type of PDF presentation complete with transitions. Often you may want to adjust borders and background colors, as well as transitions, all of which are built directly into Acrobat. We will start with the simplest case, a single file source for the presentation, and then discuss multiple-source presentations. Here is how to create a presentation from any PDF file:
-
Open any single-source file from a presentation, page layout, drawing, word processing, or other document. Here I am using an old Adobe Persuasion presentation file, which I would like to keep using, but I am about to run into the end of Persuasion s life span. (Persuasion is no longer made and does not operate in Mac OS X or Windows XP.)

Advantages of PDF Presentations There are numerous benefits of using PDFs as presentation documents. One is that PDF presentations are often much smaller than the original files. For example, the file size of the original Persuasion document used in this first exercise is 62.6MB, while the file size of the PDF created from this is only 1.9MB, a file size reduction of 97 percent! PDFs are also eminently more transferable from one computer or platform to another. All the recipient needs to have is Adobe/Acrobat Reader. You can even, as I have done in our first exercise in this chapter, convert to PDF to salvage and resecure older presentation files created in now- defunct applications.
-
Print this document as a PostScript file to a watched folder in order to create a PDF document. I typically use a watched folder configured for viewing and low-resolution printing, such as the Standard Distiller setting. This provides me with plenty of on-screen viewing quality and enough resolution and image quality to print decent handouts on a desktop printer, while minimizing the file size of the final PDF document (Figure 8.1). (
 Chapter 4, Creating the PDF You Want, for more information on distilling and on watched folders.)
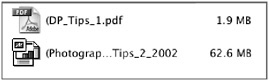
Figure 8.1: Original vs. PDF file sizeNote If the Standard setting does not provide you with enough resolution and/or image quality for the printing you need, you can always modify the resolution and/or compression settings to suit your needs.
-
Open the PDF you created in Step 2. Each page or slide, if you printed the PDF from another presentation file, will have its own page on the new PDF document. These new PDF pages will often need to be tweaked a bit to prepare them for presentation. For instance, as you can see in Figure 8.2, your PDF pages may have borders or other unwanted page elements surrounding them that you would like to remove.
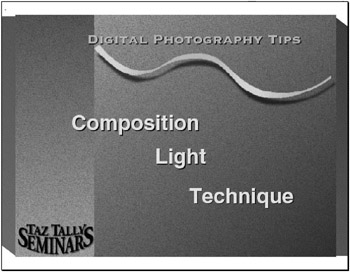
Figure 8.2: PDF page with unwanted border -
To remove unwanted borders, select the Crop tool
 by choosing Crop Pages from either the Document menu or the Pages pane s Options menu (Figure 8.3) or by double-clicking the Crop tool in the Tool palette. Then either double-click the Document pane or click and drag to create an initial crop area. The Crop Pages dialog appears (Figure 8.4). Configure this window as follows :
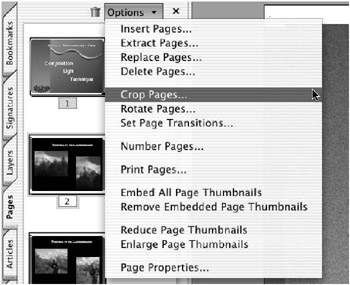
Figure 8.3: Pages pane, Options menu, Crop Pages command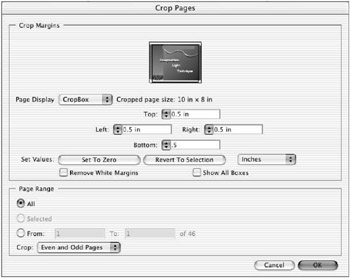
Figure 8.4: Crop Pages dialogPreview You can view a thumbnail of the Document pane at the top of the window. Any border alteration will show up there.
Note Any border alterations will also show up as dotted lines in the real Document pane, so position your Crop Pages window so that you can see the crop marks on at least one corner.
Page Display Set this to show the CropBox. You can view the BleedBox if you want to see what would print on a commercial print device, the TrimBox to view what will be seen after commercial trimming, or the ArtBox to see the entire image without cropping.
Margins Adjust the border values to crop off the areas you want to remove. If you have initialized the crop window by dragging with the Crop tool, the initial crop area created with the Crop tool will appear in the crop value fields. Check the actual Document pane, as well as the Crop Pages window thumbnail, for the placement of the crop lines, because it is likely to be easier to see and show the crop more accurately.
Set Values To start all over or remove the crop entirely, click Set To Zero. If you have tried several crop values and want to return to the last preview of values, click Return To Selection.
Remove White Margins If all you have around your page is a white border, check this box to remove it. Sometimes this works okay, but sometimes it does not.
Show All Boxes Uncheck this option so that only the CropBox will show in the preview window. This will be less confusing and facilitate viewing the crop area.
Page Range Select the pages to which you would like to apply the crop. Here I have selected All and Even And Odd Pages.
Note While you can define a crop setting for the entire document, if you have created a PDF document out of documents with various dimensions, orientations, and/or margins, you may want to be aware that your crop settings will likely be different for each type of document page. As such, it is always a good idea to review the crop results on all the pages, which can be done quickly by expanding the page pane.
When you have finished setting up the Crop Pages window, click the OK button to see the results (Figure 8.5).
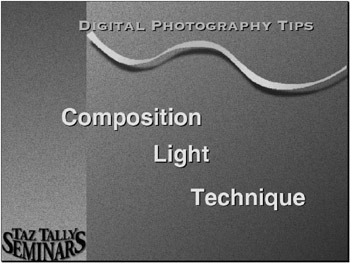
Figure 8.5: Crop resultsNote Any crop adjustment made can be undone or redone at any time. All of the original document content remains in the PDF if you ever want to reuse it.
-
Using the rotation tool (Page pane > Options > Rotate), rotate any necessary pages, such as Landscape-oriented charts , graphs, or images in an otherwise Portrait-oriented document, so that all pages will read right side up.
-
Once you have the PDF document pages oriented and cropped, it is time to configure the presentation characteristics. Open the Acrobat Preferences (choose Acrobat > Preferences on the Mac, File > Preferences in Windows, or press
 /Ctrl+K). Select Full Screen from the list of preferences at the left (Figure 8.6). Configure the options to suit your presentation preferences, and click OK when you re satisfied:
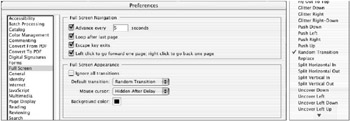
Figure 8.6: Full Screen Preferences, including the list of available Default TransitionsAdvance Every If you intend to have your presentation run automatically, set the transition time. Make the times longer if you have text for viewers to read. Try 5 seconds for images and 10 seconds for text as starting points.
Loop After Last Page If you want your presentation to start back at the beginning after the last page, check this box.
Escape Key Exits Check this to give the Escape (Esc) key the ability to stop the Presentation mode and return to regular PDF viewing.
Note /Ctrl+L will work to both start and stop your presentation. Left Click To Go Forward If you have a two-button mouse, check this box to allow you to move forward and backward by clicking.
Note I use the Right and Left arrow keys to move forward and backward manually through a PDF presentation.
Full Screen Appearance Assign your transitions. As you can see, the list is long. I typically use Random Transitions to allow Acrobat to randomly show a transition and to add some variety to my presentations.
Mouse Cursor Tell Acrobat what to do with the visibility of your cursor after the presentation has begun: Always Visible, Always Hidden, or Hidden After Delay. I typically hide the mouse to remove any on-screen distraction and use a laser pointer if I want to call attention to something.
Background Color Click the swatch to set a color. The default is black.
-
Preview your presentation. To start the presentation (in Full Screen mode), simply press
/Ctrl+L or choose Window > Full Screen View. To stop the presentation, press the Escape (Esc) key or press /Ctrl+L again.
Creating Presentations from Multiple Applications or Documents
One of the great benefits of the world of Acrobat and PDF is that the once-arduous task of combining information or pages from multiple documents created in different applications is now pretty much a snap. This has been a godsend for me, because I often want to take QuarkXPress pages and combine them with information I have organized in PowerPoint presentations, graphs from Illustrator, spreadsheets from Excel, and images from Photoshop. Or I may have pages from two different page layout applications that I would like to include in one document. PDF to the rescue ” here s the workflow:
-
Set up watched folders with the proper settings to create the type of PDF pages needed for your final output device (
Chapter 4). -
Open all the applications and documents you would like to use in your combined final PDF.
-
Print all these documents to the watched folder to convert them to properly configured PDF documents. (Be sure to pay attention to page number issues;
Chapter 7, PDF Document Management. )
Next, you could combine all the PDFs using the Adding Pages techniques discussed in Chapter 7. But if you have many PDF documents to combine, consider using the Create PDF From Multiple Files capability. It s a real time-saver, and here s how it works:
-
Do one of the following:
-
Open all the PDFs you would like to combine.
-
Place all the PDFs you want to combine into a single folder.
-
-
Select File > Create PDF > From Multiple Files. The Create PDF From Multiple Documents dialog appears (Figure 8.7; yes, the dialog name is different from the menu command).
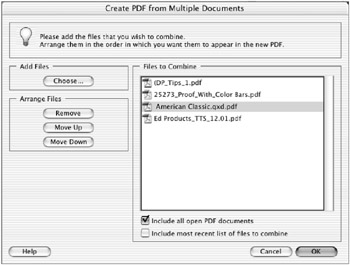
Figure 8.7: Creating one PDF from multiple PDF documents -
Arrange the list of PDFs to combine, in the desired order:
-
If you have already opened some or all of the documents you want to include in the combined PDF, check the Include All Open PDF Documents box.
-
If you want to add other documents to the list of PDFs to combine, click the Choose button to locate and select more PDFs.
-
Reorder the files in the list using the Move Up and Move Down buttons .
Note The order in which the documents appear in the Files To Combine list is the order in which they will appear in the final PDF.
-
-
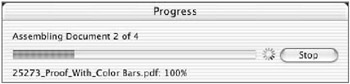
When you have all the documents you want to combine arranged in the order in which you would like to combine them, click OK to begin the combination process. A progress bar will appear on screen to show you how the combination process is progressing.
When the document combination process is complete, a new PDF with the name Binder1.pdf will be created on screen. Save this PDF. A Save As window will appear asking you to name and save this new file.
| |
Many times PDF presentations are used in multimedia productions for kiosks and/or distributed CD-ROMs. These applications often require the development of on-screen interface buttons for controlling navigation, printing, initiating searches, or launching other files or applications. The use of forms buttons duplicated across multiple pages meets these needs. (See the sections on creating interactive forms later in this chapter.)
| |
Converting PowerPoint Files to PDFs with Animations
As we discussed in Chapter 4, you can easily convert any Microsoft Office document ” including Word, Excel, Outlook, and PowerPoint document files ”to PDFs with the use of the one-button, built-in PDFMaker. You can even preserve the transitions you create in your PowerPoint presentations so that they appear in Acrobat ”but this is best accomplished through the Print dialog box rather than the one-button PDF method. Here s how:
-
Open a complete PowerPoint presentation.
-
Choose File > Print to activate the Print dialog box. Choose Microsoft Power-Point from the drop-down list of option categories (Figure 8.8).
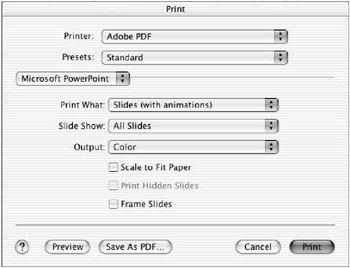
Figure 8.8: PowerPoint Print dialogNote Your Print window may appear somewhat different than this one, depending upon your operating system, printer driver, and application version, but all the essential elements will still be there, even if they are organized somewhat differently.
-
Configure this window as follows:
-
Select Adobe PDF as your Printer driver.
-
From the Print What drop-down, choose Slides (With Animations).
-
Choose the slides you want to print (All Slides selected here).
Note If you want to print handouts, notes, or your outline in PDF format, the Print What drop-down is also where you would choose to do that.
-
-
Before clicking the Print button, you may want to check your PDF Distiller settings. Working in the same Print dialog, choose PDF Options from the drop-down list of options categories (Figure 8.9), and then from the Presets menu select the Distiller setting you would like to be used during the PDF creation process. (See Chapter 4 for more information on Distiller settings.)
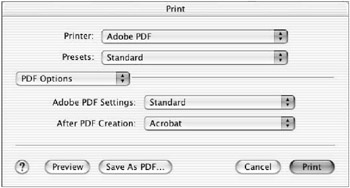
Figure 8.9: PDF Print Options -
Click the Print button to initiate the final process of printing to PDF. You will be asked to select a location where your PDF file will be created.
-
Open your newly created PDF in Acrobat. You will notice that each transition ” in this case, both lines of text and slides ”has become a separate PDF document page (Figure 8.10). See the following sections on editing your PDF presentations for tips on how to order pages and control transitions between them.
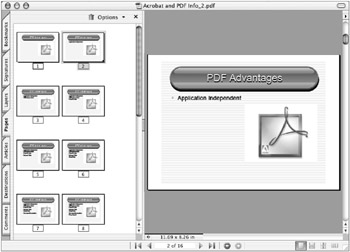
Figure 8.10: PowerPoint transitions in PDF
Editing Slide Order in PDF Presentations
Adding, deleting, or changing the order of your presentation pages is a snap:
-
Open the PDF presentation document in Acrobat.
Note Prior to editing any presentation,I think it s a good idea to make a backup copy and work on that just in case!
-
Click the Pages tab to view the pages in the Navigation pane.
-
Drag the divider between the Pages tab and the Document pane to enlarge the Pages tab until you can see all of the PDF pages you want to edit.
-
Edit the slides as follows:
-
Click any page that you want to remove from the document; then either click the trashcan or hit the Delete key.
-
To change the order in which your PDF pages will appear in a presentation, simply drag the page(s) you want to move beside the page in front of which you would like to move them.
Note The standard Shift+click (for sequential page selection) and
/Ctrl+Shift+click (for nonsequential selection) works just fine here.
-
-
When you have finished editing your presentation, save your changes. I usually save my edited presentations with sequential numbers , such as Presentation_1 , Presentation_2 , etc., so that I can easily pick out my most recent version without having to look at creation dates.
Setting Page Transitions
Once you have completed the creation and editing of your presentation contents, you can control the transitions that will occur between the pages when the presentation is played back in Full Screen mode. Earlier in this chapter we discussed controlling transitions for the entire presentation through the Full Screen Preferences (Acrobat/File > Preferences > Full Screen > Transitions). But if you don t want all the transitions to be the same throughout your presentation, and you would like to have a bit more control than just selecting Random, here s how it s done:
-
Open your PDF presentation document.
-
Click the Pages tab and enlarge it so that you can see all of the presentation pages.
-
Select the pages for which you would like to set transitions (1 “3 are selected in Figure 8.11).
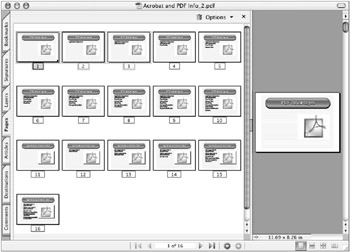
Figure 8.11: Pages 1 “3 selected in the Navigation pane -
Choose Document > Pages > Set Page Transitions or choose the same command from the Pages tab s Options menu; the Set Transitions dialog appears (Figure 8.12).
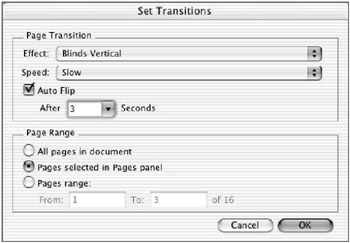
Figure 8.12: Set Transitions dialog -
Start at the bottom of this dialog box: Define the pages to which you will apply a certain transition. If you have already selected a page or pages in the Pages tab, those will automatically be selected, and the Pages Selected In Pages Panel button will be activated.
Note If you would like to choose pages from Pages Range fields in this window, you can, but I usually find that making page selections in the Pages tab is easier and much more convenient .
-
Set up the transition for the Page Range you ve defined:
-
Select a transition type from the Effect menu (Blinds Vertical is selected here).
-
Choose a Speed at which you would like that transition to occur.
-
Check the Auto Flip check box if you want the pages in this selection to automatically transition from one to the other. Then select the time delay between the transitions.
-
-
When you have completed defining this set of transitions, click OK.
-
Repeat Steps 3 “7 for as many sets of PDF pages as you would like.
-
When you are through assigning transitions, save your document with the new transitions.
-
Test your new presentation and enjoy your transitions by using
/Ctrl+L or Window > Full Screen View.
Controlling Presentations When You Send Them Out
Often after you have created your PDF presentation, you may well move it to another computer by sending it across the Internet or possibly copy it to a laptop to take to a conference. Here is how you can make sure that your presentation will always open up and behave like a presentation when you send it or take it somewhere else.
-
Choose File > Document Properties (or press
/Ctrl+D). The Document Properties dialog appears. -
Select Initial View from the list of Document Properties on the left side of the window (Figure 8.13).
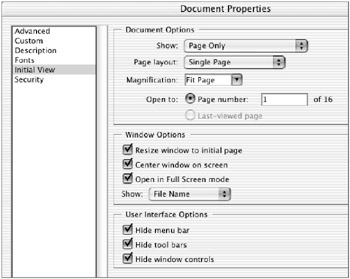
Figure 8.13: The Initial View properties -
Configure the window as follows:
Open In Full Screen Mode Select this check box (in the middle of the dialog, under Window Options); it is the most important setting to make sure that your PDF will open and display in Presentation mode. In fact, if you just click this button, your presentation display should be okay. However, I go ahead and configure the remainder of the window as follows, just in case the Full Screen mode doesn t work.
Other Window Options Select both Resize Window To Initial Page and Center Window On Screen.
Document Options Select Show: Page Only; Page Layout: Single Page; and Magnification: Fit Page. If you want the presentation to start on something other than the first page, set that page number here. However, typically if I am sending out a presentation, I remove any pages that I do not want displayed.
User Interface Options Check all of these boxes to disable these elements, because they are not important in Full Screen Presentation mode.
Note By default, the User Interface Options don t show when the Full Screen mode is properly activated. However, I disable them anyway just to make sure.
-
Set the Security Options: If you want to control who has access to your presentation and/or you want to make sure that your PDF can only be viewed and not altered in any way and/or no content can be printed or extracted from it, set the Security Options (Document > Security > Restrict Opening and Editing ) on your file prior to distributing it. (See Chapter 5, Controlling Acrobat and Access to Your PDFs, for complete details on how to control the security of your PDFs.)
-
Save the changes you have made and close the file.
-
Open the file to make sure that it launches in Full Screen Presentation mode.
| |
Acrobat Preferences control the way in which a particular copy of Acrobat behaves. PDF Document Properties affect specific PDF files. PDF Document Priorities take precedence over ”that is they overrule (at least initially) ”any Acrobat Preferences that may be set. For instance, if your Full Screen mode presentation PDF is opened with a copy of Acrobat whose preferences are set to Continuous Facing Pages, your document property will take precedence, forcing your presentation to open, as you want it to, in Full Screen mode. And if you have set the PDF security so that the properties on your PDF cannot be altered, it will always start in Full Screen mode.
| |
EAN: 2147483647
Pages: 102