Chapter 6: Using Acrobat and Navigating PDFs
Acrobat 6 provides a wide variety of tools and methods for managing the program itself and for navigating your PDFs (although I favor keyboard shortcuts for speed). If you are visually or hearing impaired, Acrobat has tools to help you get around in PDF documents.
Customizing Tools, Palettes, Menus , and Tabs
There are several ways to navigate around a PDF document and through multiple PDF files and the Acrobat tools.
For speed reasons, I usually prefer to use keyboard shortcut methods to navigate around and through Acrobat tools and PDF documents. However, there are some tools and controls that you can access only through the mouse. Some users prefer to mouse around, and in fact there are times when the manual controls are convenient , such as when your hand is already on the mouse and the pointer is near the page control. So, in this section I look at both the mouse-manual and keyboard-shortcut methods.
Customizing Acrobat Tools and Palettes
Let s start with the default Acrobat tools and see how we might use and modify them to good advantage.
The File, Task, Basic, Zoom, Rotate, and How To toolbars appear by default and are organized as they appear in Figure 6.1. Note that each tool set is separated from the other tool sets by a double-line divider. The Task toolbar contains common tasks , and they have menu choices associated with them.

Figure 6.1: Default Acrobat toolbar
Using tools You can access any tool by simply clicking that tool.
Adding tools You can add other tools to the default tool set by using the View menu. Let s add the navigation tools to the toolbar: Choose View > Toolbars > Navigation (Figure 6.2). This addition expands the Acrobat tool set to include the navigation tools, which I recommend. You can add other tools on the tool list in a similar fashion.
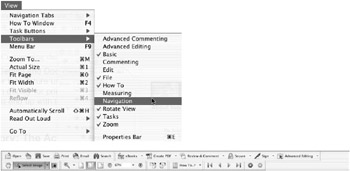
Figure 6.2: Adding navigation tools through the View menu
Floating tools Any tool palette can be floated from the main tool palette (aka dock) by simply clicking that tool s side of the divider and dropping it down into the Document pane. This will allow the tool set to float freely in its own window (see Figure 6.3). Then you can move that tool palette anywhere on the screen you like.
Figure 6.3: Drag a tool set to float it.
Docking tools Any floating tool palette can be returned to the main dock by dragging the title portion of the floating tool palette. Or, if you have a whole slew of floating palettes and you want to clean up your mess, you can return them all by choosing View > Toolbars > Dock All Toolbars.
Locking tools On the other hand, if you would like to lock your tool palettes in place rather than dock them, select Lock Toolbars from the same menu: View > Toolbars > Lock Toolbars.
Customizing and Using Acrobat Menus and Tabs
Acrobat, like most applications, has a main set of menus at the top of the screen. But there are other menus as well, such as tab menus, which will allow you to access controls faster than main menus, and tool menus, which can be altered to appear as floating palettes. Here is how:
Quicker Access to Main Menu Controls
The controls for managing pages, which we will be doing later in this chapter, can be accessed in three main ways (Figure 6.4):
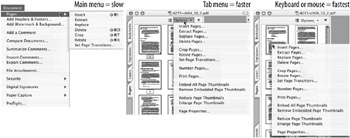
Figure 6.4: Quicker access to main menu controls
Slow Main menu: Choose Document > Pages > Control List.
Faster Tab menu: Click the Options menu in the Pages tab.
Fastest Keyboard/mouse shortcut: Right-click (Windows) or Control+click (Mac) in the Pages tab.
This same three-way access to information and controls ”main menu, tool or tab menu, and keyboard shortcut access ”is available throughout Acrobat. Whenever possible, I encourage you to use the keyboard shortcut access, because it will typically be faster.
Creating Floating Palettes from Menus
Many of the tools in the tool palette offer multiple options. If a tool, such as the Selection tool, has multiple options, a small down-arrow appears to the right of the tool. Click the down-arrow next to the Selection tool to see its options. If you want to have all these tool options visible, select the last menu choice, Show Selection Toolbar. This will create a floating palette, which can be placed anywhere on the screen with all the selection tool options visible (Figure 6.5).
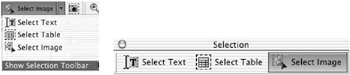
Figure 6.5: Converting menus to tool palettes
Converting Floating Tabs to Stationary Tabs and Back
In addition to menus and palettes, Acrobat makes use of tabs, known as navigation tabs, to provide you access to document information and controls. The primary access to navigation tabs is through the main menu. Let s start there:
-
Activate the Articles navigation tab by choosing View > Navigation Tabs > Articles. The Articles and Destinations tabs will appear as a floating set (Figure 6.6).
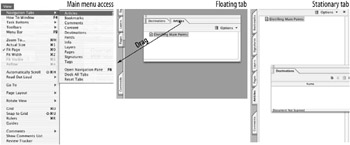
Figure 6.6: Converting floating tabs to stationary tabs -
Click the Articles tab and drag the tab to the Tabs pane on the left side of the window. The Articles tab will now become a stationary tab, and the Destinations tab will remain floating by itself.
-
To float any of the navigation tabs, simply click the tabs and drag them into the Document pane.
EAN: 2147483647
Pages: 102
- ERP System Acquisition: A Process Model and Results From an Austrian Survey
- The Second Wave ERP Market: An Australian Viewpoint
- Context Management of ERP Processes in Virtual Communities
- A Hybrid Clustering Technique to Improve Patient Data Quality
- Relevance and Micro-Relevance for the Professional as Determinants of IT-Diffusion and IT-Use in Healthcare