| To explore socket communications, we're going to write PocketChat, an application that revolves around the WinSock control. By the end of the chapter, PocketChat will provide you with a good understanding of not just socket communications, but also a plethora of ideas on what else you can use sockets for. You'll have a small chat application that works over a TCP/IP connection or through the IrDA port and also allows us to send files to a remote user . PocketChat is meant to be a springboard to bigger, better applications and utilities. The lessons learned here will be the foundation for almost any application you might develop that requires communication. PocketChat is designed to talk specifically with another copy of PocketChat on another device. Because socket communications require a physical device, and because many developers don't have two devices, you need another client to talk to. At the end of this chapter (see Listings 5.17 and 5.18), I've included the code listing and form header for a Visual Basic 6 project called PCChat, which you can use as a substitute for a second device. Simply run PCChat on your ActiveSync host PC, with ActiveSync running and connected to your device. Running PCChat from the VB 6 IDE will actually give you the opportunity to see both sides of the socket communication at the same time by placing break points in both the VB and eVB projects. PCChat uses a large amount of code copied directly or slightly modified from PocketChat. There are inline comments, so I haven't included any explanation text for the project. Project Setup PocketChat uses only one form, frmMain, and one module, modMain. Listing 5.1 contains heading information for frmMain. For clarity, I have only included listings for properties that I modified from their defaults. You will also need to add the Picturebox, MenuBar, and WinSock controls to the project through the Project Components dialog. Listing 5.1 Heading Information from frmMain.ebf Begin VB.Form frmMain Caption = "PocketChat" ClientHeight = 4005 ClientLeft = 90 ClientTop = 840 ClientWidth = 3630 ShowOK = -1 'True Begin PictureBoxCtl.PictureBox picProgress Height = 195 Left = 60 Top = 3780 Width = 3495 End Begin MenuBarLib.MenuBar mnuMain Left = 1560 Top = 120 NewButton = 0 'False End Begin WinSockCtl.WinSock wskMain Left = 2460 Top = 120 End Begin VBCE.Label lblConnect Height = 255 Left = 2370 Top = 1020 Width = 1215 Caption = "Disconnected" ForeColor = 16777215 Alignment = 2 End Begin VBCE.Label lblStatus Height = 255 Left = 30 Top = 1020 Width = 2175 BackColor = -2147483643 BackStyle = 1 Caption = "Waiting..." ForeColor = 8388608 End Begin VBCE.TextBox txtRecv Height = 2415 Left = 30 Top = 1320 Width = 3555 BackColor = 14737632 Text = "" Alignment = 0 Locked = -1 'True MultiLine = -1 'True ScrollBars = 2 End Begin VBCE.TextBox txtSend Height = 915 Left = 30 Top = 60 Width = 3555 BackColor = -2147483643 Enabled = 0 'False ForeColor = 16711680 Text = "" MultiLine = -1 'True End End Figure 5.3 shows what my project looks like in the IDE. Figure 5.3. The final project layout, as seen in the eVB integrated development environment (IDE). 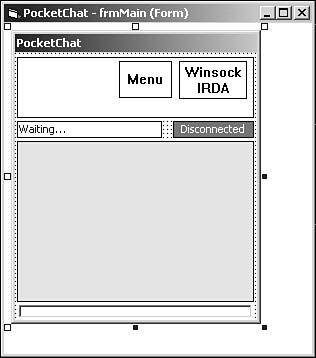 Project Flow Before you begin, let's take a look at what you are trying to accomplish and the general strategies you can take to get there. First, because you know that you'll be connecting to another PocketChat application, you know that one of the instances will have to request a connection and the other will have to receive and accept that request. It makes good sense, then, to start the application and begin listening for a request immediately, stopping only when you try to make a connection, when a connection request comes in, or when the application is shut down. It's also going to be useful to display not only the chat text, but also a label or tag for who said it, and you'll be implementing your own properties (or, more correctly, your property workaround) for storing and retrieving this information. The next step will be making a connection. For the request, you'll prompt users for an IP or host name to connect to, but hard code the port to 5000. You can set this to any valid port that you want, and if you're on a network behind a firewall, your network administrator might want you to use something else. After you make the connection, you'll need to transfer the chat text to either the remote client or a file. To keep user interaction to a minimum (you don't really want users to have to tell the application after every line comes in what kind of data it is), the receiver will have to be able to distinguish chat text from file text itself. For this, use XML-like tags to bracket the data, and then parse it out on the receiving end. Of course, this makes the transmitted data a bit longer, but makes for a friendlier application. That's the general plan. Of course, there's a bit more to it, but the specifics will be covered as we come to them, so let's begin. Initializing the Application Most projects use global settings and variables that need to be set up right away and persist throughout the application. PocketChat is no exception. Application startup is usually the best time to perform those tasks, and my preference is usually to do these tasks either in Sub Main or in a procedure called from it. The problem with doing initialization in a Form_Load event is that the form itself isn't fully instantiated during the event and modifying the form in its own Load event handler doesn't always work. As we've already discussed, you want to start up in a listening state. With the WinSock control, this is handled by calling the Listen method, but before you can begin listening in your application, you want to do a couple of other tasks. First, you need to tell the socket what protocol to listen with: TCP/IP or IrDA. You also need to load the main form so you can inform the user that you are listening. Startup is also a good time to get the local user's name, because it probably won't be changing during a session, and you might as well begin by writing the methods to store this "property." While you're at it, create a similar pair of methods to store the name of the remote user you are connected to as well. In modMain's General Declarations section, create two member variables to store the information: Private m_LocalHostName As String Private m_RemoteHostName As String And then add the implementation procedures directly below the declarations: ' the LocalHostName "Property" Public Function GetLocalHostName() As String GetLocalHostName = m_LocalHostName End Function Public Sub SetLocalHostName(NewName As String) m_LocalHostName = NewName End Sub ' the RemoteHostName "Property" Public Function GetRemoteHostName() As String GetRemoteHostName = m_RemoteHostName End Function Public Sub SetRemoteHostName(NewName As String) m_RemoteHostName = NewName End Sub We can also set our port as a global constant, allowing users to easily change it in one place. Add the following to the General Declarations section: Public Const SOCKET_PORT = SOCKET_PORT Lastly in the General Declarations section, define a variable as the incoming data buffer, the use of which is covered later. Add the following line to general declarations: Public m_strRecv As String Now look at the application's entry point. Listing 5.2 shows Sub Main. Listing 5.2 Initializing the WinSock Control Public Sub Main() ' Set our protocol to TCP/IP frmMain.wskMain.Protocol = sckTCPProtocol ' Get our local host name and set the property SetLocalHostName frmMain.wskMain.LocalHostName ' Show frmMain frmMain.Show ' We'll assume we're a socket server to begin with ' So we put the socket into listen mode frmMain.wskMain.Listen ' Set up the MenuBar frmMain.MenuBarInit End Sub Notice that we're simply calling SetLocalHostName with the LocalHostName property of the WinSock control. This seems a bit pointless. Wouldn't it be easier to just use the WinSock control's native property? Well, yes, but only if you intend to use the name of the local device to identify the user. If you want to allow users to enter their names in the future, you'll have to go back and modify every place that you call frmMain.wskMain.LocalHostName. By adding and using your own property, it will make any future modifications much simpler. Lastly call MenuBarInit, which you still need to write. Not surprisingly, you will use this method to initialize your application's MenuBar control. Adding the Application's MenuBar PocketChat's feature set is pretty small, so your MenuBar can be simple and still meet your needs. You'll need a button to connect and disconnect, a button to send a file, and two buttons for the current protocol, only one of which can be selected at a time. To make it a more aesthetically pleasing, Listing 5.3 shows a couple of added separators as well. Listing 5.3 Initializing the MenuBar in a Single Location Public Sub MenuBarInit() Dim btnTemp As MenuBarLib.MenuBarButton Dim mnuTemp As MenuBarLib.MenuBarMenu ' ----- Set up menu buttons ----- ' Add the send button to the menubar Set btnTemp = mnuMain.Controls.AddButton("Send") ' Set the button's properties btnTemp.Caption = "Send" btnTemp.Enabled = False btnTemp.Width = 800 ' Add the connect button to the menubar Set btnTemp = mnuMain.Controls.AddButton("Connect") ' Set the button's properties btnTemp.Caption = "Conn..." btnTemp.Width = 750 Set btnTemp = mnuMain.Controls.AddButton("Xfer") ' Set the button's properties btnTemp.Caption = "Xfer..." btnTemp.Enabled = False btnTemp.Width = 700 ' Add the button to the menubar Set btnTemp = mnuMain.Controls.AddButton("Sep1") ' Set the button's properties btnTemp.Caption = "" btnTemp.Style = mbrSeparator ' Add the button to the menubar Set btnTemp = mnuMain.Controls.AddButton("TCP") ' Set the button's properties btnTemp.Caption = "TCP" btnTemp.Width = 450 btnTemp.Style = mbrButtonGroup btnTemp.Value = mbrPressed ' Add the button to the menubar Set btnTemp = mnuMain.Controls.AddButton("IrDA") ' Set the button's properties btnTemp.Caption = "IR" btnTemp.Width = 350 btnTemp.Style = mbrButtonGroup ' Add the button to the menubar Set btnTemp = mnuMain.Controls.AddButton("Sep2") ' Set the button's properties btnTemp.Caption = "" btnTemp.Style = mbrSeparator ' Clean up Set btnTemp = Nothing End Sub We've already covered the MenuBar very thoroughly, and PocketChat's use of the control is pretty basic, so I won't spend a whole lot of time explaining how things work here. If you need some clarification or would like to make the MenuBar a little nicer, refer to Chapter 4, "Working with Menu Controls for Pocket PC." Because all the MenuBar controls are buttons, you can handle all stylus taps in a single event handler, mnuMain_ButtonClick(). Use a Select...Case control handler block to determine the key of which button was clicked, and therefore take appropriate action. The skeleton for the event handler is shown in the following code and you can add implementation code to it as you go. Private Sub mnuMain_ButtonClick(ByVal Button As MenuBarLib.MenuBarButton) ' Determine which button was clicked and take action Select Case Button.Key Case "Send" Case "Connect" Case "Xfer" Case "TCP" Case "IrDA" End Select End Sub Figure 5.4 shows what the final MenuBar looks like. Figure 5.4. The application MenuBar when the application is in "listen" state. 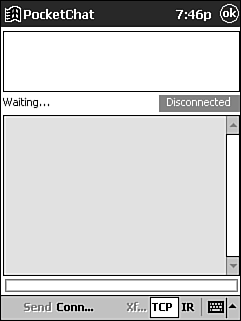 Changing the Connection Protocol When PocketChat is in its listening state, the simplest action that users can take is to change the connection protocol by tapping either the TCP or IR buttons on the MenuBar. To change the protocol, the socket must be closed, so when the user taps either button, close the socket, change the protocol, and start listening again. These tasks are simple enough that they can be handled right in the MenuBar's Click event handler. The last two cases in mnuMain_ButtonClick now look like this: Case "TCP" ' Close the socket wskMain.Close ' Change connection protocol to TCP/IP wskMain.ServiceName = "" wskMain.Protocol = sckTCPProtocol ' Set the socket to listen again wskMain.Listen Case "IrDA" ' Close the socket wskMain.Close ' Change connection protocol to IrDA wskMain.Protocol = sckIRDAProtocol wskMain.ServiceName = "PocketChat" ' Set the socket to listen again wskMain.Listen The ServiceName property is used only for IrDA mode. ServiceName acts somewhat like the IP address in TCP/IP mode, helping to keep communications straight in the presence of multiple IR signals. Connecting to a Remote Device The next task is to make a connection with another device, and this can be initiated in two ways: In the first case, when the user requests a connection by tapping Connect, the first thing to do is to handle the MenuBar button tap. This will be another Case in the mnuMain_ButtonClick event handler: Case "Connect" If wskMain.State = sckListening Then ' User click "Connect" If Not ConnectToPeer() Then Exit Sub ' Show the SIP SIPVisible = True 'Set focus to txtSend txtSend.SetFocus End If You know that you want to call Connect only if you aren't currently connected, so check the current state of the WinSock control. If you are not connected, first call ConnectToPeer, which I will discuss momentarily. Next, to make this application as user friendly as possible, assume that if users are connecting, the next thing they will probably want to do is send some chat text. To decrease the potential number of screen taps users will need to perform, ensure the built-in keyboard is shown by setting SIPVisible to True and setting the application focus to txtSend where they can begin typing their message. Next, you need to know a few details. You need to know the host to which users want to connect (either the IP address or the host name), the port through which the connection should be made, and the protocol to use when connecting. You have already handled the protocol with the protocol buttons, and you have set the port to our global constant (5000), so the only thing left to get is the remote host name or IP. The simplest way to get this is to prompt the user for the information with the InputBox function, which you can see in the ConnectToPeer function in Listing 5.4. Listing 5.4 Using the WinSock Control to Connect to a Peer Private Function ConnectToPeer() As Boolean Dim Peer As String ' Set our return value ConnectToPeer = True ' Get name of peer to connect to - This can be an IP or a host name ' With a serial or USB connection, _any_ IP (not host name though) ' will connect to the ActiveSync host Peer = InputBox("Enter host to connect to:", "Remote Host", "ctacke") If Peer = "" Then ConnectToPeer = False Exit Function End If ' Set the remote host properties wskMain.RemoteHost = Peer ' Take the socket out of Listen state wskMain.Close ' Set the socket remote port wskMain.RemotePort = SOCKET_PORT ' Update the status label. ' Since the Connect call blocks, we must do it now and refresh lblStatus.Caption = "Connecting..." ' Refresh to get rid of the InputBox and draw the label frmMain.Refresh ' Make a connection wskMain.Connect End Function Let's look more closely at what's happening in ConnectToPeer. First, because it is a function, it will return a value, and it is set in the first line. I like to set the default, or most likely, return value at the outset, so that I don't have to remember to set it at exit. In this case, the return value is a Boolean indicating whether we've made a successful call to connect. This doesn't necessarily mean the connection is successful, however. That information is handled with the WinSock control's events, which are covered shortly. Next call the InputBox function: Peer = InputBox("Enter host to connect to:", "Remote Host", "ctacke") For a default, I'm using "ctacke" so I don't have to type in my own computer name every time I run the application, which is especially useful during debugging. You might want to change this to your computer name, IP, or leave it out completely. Figure 5.5 shows what the InputBox looks like. Figure 5.5. Prompting users for a remote host name or IP. 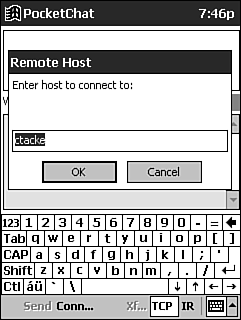 Next, check to be sure the user has actually entered a name. If the user taps Cancel or taps OK with nothing in the TextBox, you get the same result: a return value of an empty string. If that's the case, set the return value to False and exit the function: If Peer = "" Then ConnectToPeer = False Exit Function End If The rest of the function is really the "nuts and bolts" of initiating a connection. You must set the RemoteHost property of the WinSock control, because the control uses this when it tries to make the connection. Next take the control out of the "listen" state by calling Close. Calling Connect with a socket already in the listen state results in an error. Next, set the RemotePort you want to connect to, update the status label, and call the Refresh method for the form. Refreshing here will not only ensure that the label gets drawn properly, but it will also get rid of the "ghost" that the InputBox will likely place over your form. Finally, make a call to the Connect method. As you can see, Connect takes no parameters. Instead, it depends on the programmer to have previously set the Port, RemoteHost, and Protocol properties. Note If you are using a serial or USB connection, any IP or host name will connect to the ActiveSync host.
Accepting a Connection Request If everything works as planned, we have a valid RemoteHost, Port, and Protocol and there is actually a socket server out there listening, the server's socket will fire a notification event: ConnectionRequest. At this point, all you need to do is call the WinSock control's Accept method to complete the connection process. Because you're designing PocketChat to essentially connect with itselfalbeit another copy running on another deviceyou need to add the code to handle this event in your project: Private Sub wskMain_ConnectionRequest() ' Accept the request wskMain.Accept ' Set the GUI to show we're connected DisplayConnected End Sub I've also added a call to DisplayConnected, which you can see in Listing 5.5. DisplayConnected simply makes some changes to the GUI to let the user know that we've made the connection. It also changes the state of some of the MenuBar buttons. Listing 5.5 Letting Users Know They're Connected Private Sub DisplayConnected() ' Adjust the connect label lblConnect.Caption = "Connected" lblConnect.BackColor = vbGreen lblConnect.ForeColor = vbBlack ' Change the "connect" button's caption mnuMain.Controls("Connect").Caption = "Bye" ' Set the status label to the remote host lblStatus.Caption = wskMain.RemoteHost ' Enable "Send" and "Xfer" buttons mnuMain.Controls("Send").Enabled = True mnuMain.Controls("Xfer").Enabled = True ' Enable txtSend txtSend.Enabled = True ' Disable protocol buttons mnuMain.Controls("TCP").Enabled = False mnuMain.Controls("IrDA").Enabled = False ' Show we're connected txtRecv.Text = txtRecv.Text & "<Connected>" & vbCrLf End Sub Because we're connected, the user can now send information, so we enable both the Send and Xfer buttons. We change the Connect button's caption to Bye so we can reuse the button for disconnecting. This saves us some real estate onscreen by eliminating the need for separate buttons for connecting and disconnecting. As a nicety for users, we display the name of the RemoteHost in the lblStatus filed and lastly, because we can't change protocols while connected, we disable both Protocol buttons. Receiving the Connection Notification Back on the client, where you initially tapped the Connect button and entered the RemoteHost name, you still have some work to do. You've sent out a request for a connection by calling Connect and the server has accepted the connection by calling Accept. However you still need to let the user know that the connection was accepted. When the remote socket host accepts the connection, you receive a notification event: Connect. This event fires to let the caller know when and if the connection has been accepted. Because you have already written a function that changes the GUI to indicate a connected state (DisplayConnected), you might as well make use of it by calling it from your event handler like so: Private Sub wskMain_Connect() ' Called when the remote machine accepts a connection ' Set the GUI to show we're connected DisplayConnected End Sub After you make the connection, both devices should resemble Figure 5.6. Figure 5.6. The device display when you are successfully connected to another device. 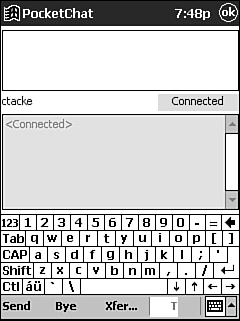 Disconnecting After you make a successful connection, it's important to allow a graceful disconnection without requiring the user to disconnect their LAN, USB, or serial cable in the case of a TCP/IP connection or move out of range in the case of an IR connection. You've already changed the text of the Connect button to Bye, so let's look at the implementation. First, on the device where the user taps Bye, you handle this in the now-familiar mnuMain_ButtonClick event handler. You've already added code for the Case "Connect" for when you are connected; you now need to add an Else clause to the If statement, making the entire Case look like this: Case "Connect" If wskMain.State = sckListening Then ' User click "Connect" If Not ConnectToPeer() Then Exit Sub ' Show the SIP SIPVisible = True 'Set focus to txtSend txtSend.SetFocus Else ' User clicked "bye" ' Disconnect wskMain.Close ' Inform the user txtRecv.Text = txtRecv.Text & "<Disconnected>" & vbCrLf ' Set socket back to listen state SetListenState End If As you can see, it's rather straightforward. You simply close the socket by calling the WinSock control's Close method. Again, to keep the user informed, we not only display <Disconnected> in txtRecv, we also make a call to SetListenState. SetListenState in Listing 5.6 is essentially the inverse of the DisplayConnected subroutine as far as the GUI goes. The only other function it performs is to call the WinSock control's Listen function to set it back into listen state. Figure 5.7 shows the GUI after the user disconnects. Figure 5.7. PocketChat after a disconnect. 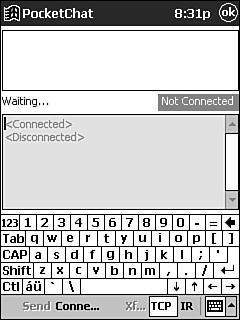 Listing 5.6 Encapsulating the "Listen" Code in a Single Method Private Sub SetListenState() On Error Resume Next ' Set socket back to listen state wskMain.Listen ' Set the status label lblStatus.Caption = "Waiting..." ' Set connection label lblConnect.Caption = "Not Connected" lblConnect.BackColor = vbRed lblConnect.ForeColor = vbWhite ' Disable "Send" and "Xfer" buttons mnuMain.Controls("Send").Enabled = False mnuMain.Controls("Xfer").Enabled = False ' Disable txtSend txtSend.Enabled = False ' Set "Connect" button caption mnuMain.Controls("Connect").Caption = "Connect..." ' Enable protocol buttons mnuMain.Controls("TCP").Enabled = True mnuMain.Controls("IrDA").Enabled = True ' This is a good general error handling method for debugging If Err.number <> 0 Then MsgBox "SetListenState:" & vbCrLf & Err.description, _ vbCritical, "Error" Err.Clear End If End Sub This is a good opportunity to show another example of how you can approach error handling in eVB. eVB doesn't always act as you would expect when it encounters an error. Sometimes, even without calling On Error Resume Next, an error might not get thrown immediately, but might "linger" until the end of another procedure. Sometimes after it throws the error it won't show you the offending line of code or even the offending procedure. One way around this is to add a general error handler like the one I've added to SetListenState. At the end of the procedure, check to see if the Err object's number is zero. If it isn't, display the procedure name and the error description, and then clear the error object. Although this doesn't gracefully handle the error, it's a useful tool while debugging and developing to give you an idea of where a more robust error-handling routine should be used. As with most of the WinSock methods, the other end of the connection fires a notification event when Close is called and you need to handle it. If we don't, our socket will remain in a undesired state and the remote user might not be aware that the connection was closed. In the case of the Close event being called, the remote device's WinSock control will fire the Close event. This doesn't actually cause the remote socket to close; it just notifies it that its partner has closed, so we must do the cleanup ourselves . Again, it's important to let users know what's going on through the GUI. Private Sub wskMain_Close() ' A request to close was sent, we still must call Close wskMain.Close ' Inform the user txtRecv.Text = txtRecv.Text & "<Disconnected>" & vbCrLf ' Go back to a Listen state SetListenState End Sub Sending Chat Text Sending and receiving text through the WinSock control is a pretty simple, straightforward task. The challenge lies in being able to handle the text efficiently . PocketChat will allow users to send and receive not only chat text, but text files. It's important that the application be able to distinguish between the two so it knows what to do with the data. It would be very user-unfriendly if after every line of text was received you asked the user what to do with it. Users expect an application to be at least somewhat smart and these are the details that help make an application successful. One of the easiest ways to make data distinguishable , especially text data, is to attach metadata to it. Metadata is simply "data about data," or a descriptor of the data within itself. XML is probably the best example of this, and because it works well and there's no point in reinventing the wheel, let's use XML-like tags to identify our data. By tagging the data, we not only know what the data is, we also know where it begins and ends. This is vital with larger data sets because the WinSock control will start breaking the data into packets. Rather than send 10,000 bytes of text at one time, it will break the data into smaller chunks and send them one at a time for you to reassemble on the other side. Although this sounds somewhat complicated, the WinSock control actually handles most of it for you. We will examine this more in depth when we cover sending and receiving files. In PocketChat, the user simply enters text into a textbox, txtSend, and taps the Send button and the remote user sees the text appear in txtRecv. Let's start at the beginning of the process. Again, turn to the mnuMain_ButtonClick event handler. When the user taps Send, you simply step into Case Send and call out to a procedure in modMain called SendText: Case "Send" ' Send chat text SendText txtSend.Text SendText takes the text being sent as an input parameter (see Listing 5.7). It then prefixes the text with your hostname, wraps your tags<PocketChat Text> and </PocketChat Text>around it, and sends it through the WinSock control. Listing 5.7 Sending Text Through an Active Connection with a Call to SendText Public Sub SendText(strSend As String) Dim ilength As Integer ' Append our local name strSend = GetLocalHostName & ": " & strSend ' Send the data with our custom tags frmMain.wskMain.SendData "<PocketChat Text>" & strSend & "</PocketChat Text>" ' Move it to the "recv" textbox frmMain.txtRecv.Text = frmMain.txtRecv.Text & strSend & vbCrLf ' Clear the "Send" textbox frmMain.txtSend.Text = "" ' Set focus back to the send textbox frmMain.txtSend.SetFocus End Sub Again, to make the application more user-friendly, it copies the text you sent, without tags, to txtRecv, clears txtSend, and sets the focus back to txtSend from the MenuBar. Figure 5.8 shows the screen when sending text. Figure 5.8. Sending text to a remote PocketChat user. 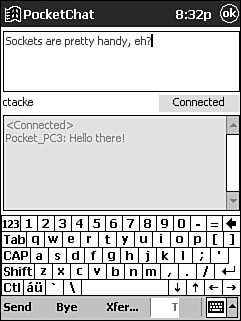 To make the application even more user-friendly, you can make it behave like most other IM applications and automatically send when the user taps the Return key. Private Sub txtSend_KeyPress(ByVal KeyAscii As Integer) ' If the user presses the Return key, send the text If KeyAscii = 13 And wskMain.State = sckConnected Then ' Setting KeyAscii to 0 will NOT prevent the key. ' We must use a workaround ' Send the text SendText txtSend.Text End If End Sub Of course when you send the text, you don't want to send the final Return key as text; you just want to use it to call SendText. This is a great opportunity to look at another known bug in eVB. Typically in Visual Basic 6, if you had a similar problem, you would just set the KeyAscii value back to 0 in the KeyPress event, and the Return keypress would be ignored. Not so in eVB. In fact, modifying KeyAscii in the KeyPress event in eVB has no effect at all. What you do know is that when eVB enters this event handler, the TextBox's text hasn't yet appended the KeyAscii value, so in this case, txtSend.Text doesn't have the return (KeyAscii = 13) appended. This means that if you send txtSend.Text directly to SendText from here, the final Return key won't be transferred to the remote device. The keystroke doesn't disappear though. If you just use this event handler, you will get a Return in txtSend after you send the text, essentially leaving the user on the second line of txtSend. If they don't delete it, it will get sent as the first character of their next line of chat text. The easy way around the problem in this case is to check to see if txtSend contains only a Return, and the easiest time to check is when txtSend's Text property changes. By checking in the txtSend_Change event handler, if you find that the text is just a return (vbCrLf), you can clear the text. Private Sub txtSend_Change() ' Part of the Keypress(13) workaround If txtSend.Text = vbCrLf Then txtSend.Text = "" End If End Sub Receiving Chat Text After the text has been sent, you get a notification event at the receiving end, DataArrival, and with it you get the number of bytes of data that have arrived. Because the data might come in packets, rather than the entire message at once, the number of bytes received might not be all the bytes being sent. If you are receiving packets, you will receive a DataArrival event for each packet, so you have to be cognizant of this when you code the event handler. Data coming into the WinSock control is placed in a buffer. You can read the buffer at any time by calling the WinSock control's GetData method. GetData returns a string of the entire contents of the buffer, and it's important to know that DataArrival will only fire after the first time if you have retrieved the data from the WinSock's data buffer with GetData. This means that it's good practice to immediately call GetData in the DataArrival event, even if it is to put the data into another application buffer. You will follow this model in PocketChat. As data comes in, you will append it to a member variable and then scan the variable for one of our terminating XML tags. Listing 5.8 shows what the event handler looks like. Listing 5.8 Firing the DataArrival Event When Data Is Received Through the WinSock Control Private Sub wskMain_DataArrival(ByVal bytesTotal As Long) Dim InBuffer As String ' Get the data in the Winsock's buffer wskMain.GetData InBuffer ' Append the received data to our app buffer m_strRecv = m_strRecv & InBuffer Do While Len(m_strRecv) > 0 ' If no end tag has been received, we'll keep appending If InStr(m_strRecv, "</PocketChat Text>") Then ' We've received a Chat message DisplayText m_strRecv ' Remove handled data from buffer m_strRecv = Mid(m_strRecv, InStr(m_strRecv, __ "</PocketChat Text>") + _ Len("</PocketChat Text>")) ElseIf InStr(m_strRecv, "</PocketChat File>") Then ' We've received a file WriteFile m_strRecv ' Remove handled data from buffer m_strRecv = Mid(m_strRecv, InStr(m_strRecv, __ "</PocketChat File>") + _ Len("</PocketChat File>")) End If Loop End Sub As the data comes in, we append it to our member variable buffer, m_strRecv. We then look for either </PocketChat Text> or </PocketChat File>. Either tag indicates that this is the end of the data being sent, and so you can handle the data appropriately by calling either DisplayText for chat text or WriteFile for file text. We also wrap the search for </PocketChat Text> or </PocketChat File> in a Do...While loop to handle the possibility of either multiple messages or data coming in after the closing tag. DisplayText, which follows , simply strips the XML tags from the data because you don't want to display them, and appends it to txtRecv. Private Sub DisplayText(TextToDisplay As String) ' First strip the tags TextToDisplay = Replace(TextToDisplay, "</PocketChat Text>", "") TextToDisplay = Replace(TextToDisplay, "<PocketChat Text>", "") 'Display the text txtRecv.Text = txtRecv.Text & TextToDisplay & vbCrLf End Sub Figure 5.9 shows the GUI output for DisplayText. WriteFile is a bit more complex, and we will cover it in the next section. Figure 5.9. PocketChat, after sending and receiving text. Notice the usernames prefix each line to make the dialog more readable. 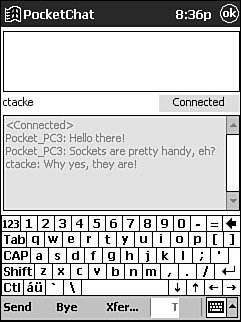 Sending a Text File The final primary task that PocketChat performs is sending a text file through the WinSock control. This is initiated by the user by tapping the Xfer button on the MenuBar. This is also the final MenuBar function you need to write, so it's a good time to look at the full implementation for mnuMain_ButtonClick in one place (see Listing 5.9). Listing 5.9 Handling the ButtonClick Event for PocketChat's Application Menu Private Sub mnuMain_ButtonClick(ByVal Button As MenuBarLib.MenuBarButton) ' Determine which button was clicked and take action Select Case Button.Key Case "Send" ' Send chat text SendText txtSend.Text Case "Connect" If wskMain.State = sckListening Then ' User click "Connect" If Not ConnectToPeer() Then Exit Sub ' Show the SIP SIPVisible = True 'Set focus to txtSend txtSend.SetFocus Else ' User clicked "bye" ' Disconnect wskMain.Close ' Inform the user txtRecv.Text = txtRecv.Text & "<Disconnected>" & vbCrLf ' Set socket back to listen state SetListenState End If Case "Xfer" ' Send a text file SendFile Case "TCP" ' Close the socket wskMain.Close ' Change connection protocol to TCP/IP wskMain.ServiceName = "" wskMain.Protocol = sckTCPProtocol ' Set the socket to listen again wskMain.Listen Case "IrDA" ' Close the socket wskMain.Close ' Change connection protocol to IrDA wskMain.Protocol = sckIRDAProtocol wskMain.ServiceName = "PocketChat" ' Set the socket to listen again wskMain.Listen End Select End Sub Notice that the newest additionCase "Xfer"is simply a call to the SendFile function. SendFile is similar to the SendText function in Listing 5.7 in that it creates a full "image" of what you need to send, including XML tags, and pushes it through the WinSock control. Of course, it isn't quite as simple as sending chat text because you need to ask the user what file they want to send and you need to attach a bit more information, namely the filename, to the file text itself. Let's take a look at the function in Listing 5.10. Listing 5.10 Getting a Text File's Contents and Sending It Through the WinSock Control Public Sub SendFile() Dim strPath As String Dim strFileName As String Dim strContents As String Dim iStartPos As Integer strPath = InputBox("Enter name of file to send (include full path)", _ "Send File") ' if the user hit Cancel of OK with a blank input, exit If strPath = "" Then Exit Sub ' Refresh frmMain to get rid of InputBox "ghost" frmMain.Refresh ' Get the file's contents If GetFileTextContents(strPath, strContents) = True Then ' Bracket file contents in tags ' Add filename tags iStartPos = InStrRev(strPath, "\") If iStartPos <= 0 Then iStartPos = 1 strFileName = Mid(strPath, iStartPos) ' Inform the user we're beginning and hide the SIP frmMain.txtRecv = frmMain.txtRecv & "Sending file: " _ & strFileName & vbCrLf frmMain.Refresh ' Start building data stream strContents = "<Filename>" & strFileName & "</Filename>" & strContents ' Add PocketChat tags strContents = "<PocketChat File>" & strContents & "</PocketChat File>" ' Send the file frmMain.wskMain.SendData strContents ' Inform the user we've sent the file frmMain.txtRecv.Text = frmMain.txtRecv.Text & "Sent File: " _ & strFileName & vbCrLf Else ' failed to get contents. Likely file doesn't exist MsgBox "Cannot locate file to send", vbCritical, "Error sending" End If End Sub First, ask the user for the path and name of the file you want to send (see Figure 5.10). It would be friendlier to add a File Explorer type interface to allow them to navigate to the file. However, you've already covered how to write this type of interface in Chapter 3, "Manipulating Files," and it would add a lot of extraneous code to this project. Figure 5.10. Sending a file to a remote PocketChat user. 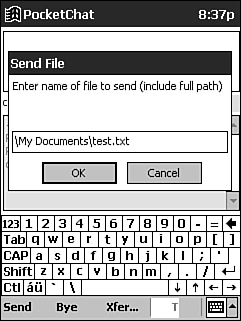 After getting the filename, refresh frmMain. Any time you display either a MsgBox or InputBox, it's good practice to call Refresh on the underlying form. If you don't, and the application must do a little work before it automatically refreshes the form, you'll get a "ghost" that whites out part of your form. Although it won't affect the application itself, it's a bit unsightly and could cause the user to think your application has locked up. Next get the file's contents by calling GetFileContents (see Listing 5.11). Listing 5.11 Extracting the Contents of a File Given the File's Full Path Public Function GetFileTextContents(Path As String, _ ByRef Contents As String) As Boolean Dim filFile As FILECTLCtl.File On Error Resume Next ' Set our return value GetFileTextContents = True ' Get our application File object Set filFile = GetFileObject() ' Open the File filFile.Open Path, fsModeInput, fsAccessRead ' Make sure the call to Open was successful If Err.number <> 0 Then GetFileTextContents = False Exit Function End If ' Loop through file, filling our input buffer Do While Not filFile.EOF Contents = Contents & filFile.Input(1) Loop ' Close the file filFile.Close ' Release the File Object Set filFile = Nothing End Function You might recognize this function, and rightfully soit's almost identical to the GetFileContents function we used in Chapter 3. The only difference is that in Chapter 3, the function returned the contents of the file; here, you pass a variable ByRef (although ByRef is the default for function parameters, I've added it explicitly here for clarity) that the function populates with the file contents. Then it returns a Boolean to signify success or failure. Otherwise, the function is the same as the one used previously. If you need further clarification, feel free to refer to Chapter 3. Note that the function still calls GetFileObject, which again is from Chapter 3 and this function is identical. Listing 5.12 Minimizing the CreateObject Memory Leak by Wrapping a Global File Object with an Accessor Function Public Function GetFileObject() As FILECTLCtl.File On Error Resume Next ' If we haven't created the File object yet, do so If IsEmpty(m_FileObject) Then ' Create a File control Set m_FileObject = CreateObject("FILECTL.File") ' Ensure the object was created successfully If Err.number <> 0 Then MsgBox "Failed to create File object." & vbCrLf & _ "Ensure MSCEFile.dll has been installed and registered.", _ vbCritical, "Error" Exit Function End If End If ' Return our global File object Set GetFileObject = m_FileObject End Function Looking back at the SendFile function in Listing 5.10, the next thing you do is inform the user you are about to send the file. Because this could be a lengthy operation, it's nice to let the user know you've begun. Next, add your XML tags and metadata. Prefix the file data with the filename in its own <Filename> tag set. You'll use this on the receiving end. Lastly, inform the user that you are finished with a message box (see Figure 5.11). This helps prevent users from assuming the device has either locked up or failed to perform the transfer. Figure 5.11. Informing users before you send a file and after you're done sending lets them know what the application is up to. 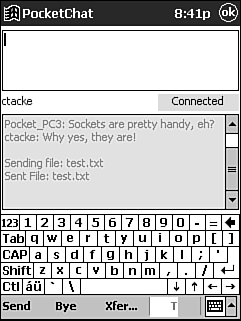 A ProgressBar Workaround Because sending files can take some time, especially over IR, it would be nice to provide the user with a little more than just a Sending file notice, and the WinSock control can help us. Whenever you send texteven short amounts that aren't broken into packetsthe WinSock control fires two events: SendProgress and SendComplete. SendProgress provides the number of bytes sent so far and the number of bytes remaining to be sent. This can easily be turned into a percentage representing overall progress. Displaying this progress to the user as a ProgressBar would be nice, but unfortunately there isn't one in the eVB toolkit. There is a native ProgressBar in the Pocket PC's API. Why Microsoft chose not to expose it through eVB, I'm not sure, but because they didn't, we need a workaround. Fortunately, this is a simple one, easier than writing API calls to get the native ProgressBar to appear. First, drop a PictureBox onto your form, giving it the height, width, and positioning of the desired ProgressBar. Now "draw" a colored box in the PictureBox, starting at the left side, a certain distance across the PictureBox using the DrawLine function. The entire procedure looks like Listing 5.13. Listing 5.13 Adding ProgressBar Functionality by Filling a PictureBox with a Color Public Sub DrawProgress(picProgress As PictureBoxCtl.PictureBox, _ PercentDone As Integer, DrawColor As Long) Dim sngPercentWidth As Single Dim sngDrawWidth As Single ' Check for valid input If PercentDone < 0 Then PercentDone = 0 If PercentDone > 100 Then PercentDone = 100 ' Allow for decimal representation of percent If PercentDone < 1 Then PercentDone = PercentDone * 100 ' Determine the width of one percent sngPercentWidth = picProgress.Width / 100 ' Determine the width to draw sngDrawWidth = PercentDone * sngPercentWidth ' Fill the picturebox in White If PercentDone = 0 Then picProgress.DrawLine 0, 0, picProgress.Width, _ picProgress.Height, RGB(255, 255, 255), True, True End If ' Draw the progress bar - essentially a filled rectangle picProgress.DrawLine 0, 0, sngDrawWidth, _ picProgress.Height, DrawColor, True, True ' Without Refresh, the progress is not displayed until done picProgress.Parent.Refresh End Sub I've even added a few features to make it more robust by allowing you to tell the function with what color to draw the bar (using an RBG integer or eVB constant) as well as making it semi- intelligent by allowing either whole number percentages (0100) or decimal percentages (01). The only drawback occurs when drawing a progress of 1. Does that mean 1% or 100%? I've opted to assume it means 1%. Now that you have a ProgressBar, let's see it in action. You know that SendProgress gives you enough information to calculate a percentage, so call DrawProgress from there: Private Sub wskMain_SendProgress(ByVal bytesSent As Long, _ ByVal bytesRemaining As Long) Dim iProgress As Integer ' Determine progress iProgress = CInt((bytesSent / (bytesSent + bytesRemaining)) * 100) ' Update the progress bar DrawProgress picProgress, iProgress, vbBlue End Sub And once the data has been fully sent, SendComplete fires, so you can reset the ProgressBar by calling DrawProgress with a progress of 0: Private Sub wskMain_SendComplete() ' Reset the progress bar DrawProgress picProgress, 0, vbBlue End Sub If you send small amounts of data, especially through a USB or LAN connection, the transfer could happen too fast for you to notice any ProgressBar at all. In fact, if the data doesn't get broken into packets, you'll likely see nothing. If you want a really quick test to see it working without having to find or create a large text file, just write a simple loop in Sub Main, something like this: Dim pct As Integer For pct = 100 to 10000 DrawProgress pct/100 next pct Receiving a Text File Again, you have to handle to receiving end of your feature, this time the reception of a text file. Remember in our DataArrival event handler you checked for the existence of the </PocketChat File> tag? From there you call Writefile, which handles all the file data (see Listing 5.14). Listing 5.14 Extracting the File Text from the Incoming Data Buffer and Writing It to Your Local Machine Public Sub WriteFile(FileString As String) Dim filFile As FILECTL.File Dim strFileName As String Dim iEndPos As Integer Set filFile = GetFileObject() ' First strip the tags FileString = Replace(FileString, "</PocketChat File>", "") FileString = Replace(FileString, "<PocketChat File>", "") ' Next get the filename FileString = Replace(FileString, "<Filename>", "") iEndPos = InStr(FileString, "</Filename>") strFileName = Left(FileString, iEndPos - 1) ' Strip the filename and tags from the file contents FileString = Mid(FileString, iEndPos + Len("</Filename>")) ' Open the file filFile.Open App.Path & "\" & strFileName, fsModeOutput ' Write the data filFile.LinePrint FileString ' Close the file filFile.Close End Sub Once again you call GetFileObject to retrieve a File object with which you'll write the file. Then you strip off the <PocketChat File> tag set. Next you extract the filename from the beginning of the data and save the file to the application directory using the same filename. Handling WinSock Errors You have covered everything for normal socket operation. Unfortunately, there will always be instances where things won't be quite "normal." What if a user tries to connect to a host that doesn't exist, or his device isn't connected to a network? What if the remote user shuts down his PocketChat application without closing the socket? What if his device crashes? A whole host of things can go wrong with socket communications, and fortunately handling them isn't difficult. When any error occurs, the WinSock control will fire its Error event. There are a lot of potential errors (check out the object model in the appendix for a full listing), but with a bit of testing you can determine which ones will most likely occur in your application. From there you can determine which specific errors you want to handle and which ones you'll pass through a generic error handler. In PocketChat we'll look for a timeout error, an address not available error, and the host not found error. All others will fall into Case Else. Interestingly, the WinSock control adds the error number to the error description, so I've provided some code in Case Else that will extract just the description (see Listing 5.15). Listing 5.15 Firing the Error Event Private Sub wskMain_Error(ByVal number As Long, ByVal description As String) Dim strMsg As String Dim iPos As Integer Dim iProgress As Integer Select Case number Case sckTimedout MsgBox "Timed out.", _ vbExclamation, "Error Connecting" Case sckAddressNotAvailable MsgBox "Could not contact remote IP or Host name.", _ vbExclamation, "Error Connecting" Case sckHostNotFoundTryAgain ' Likely tried to connect to a device in TCP protocol MsgBox "Couldn't get a response from remote device. " _ & "Ensure remote device is set to IrDA", vbExclamation, _ "Error Connecting" Case Else ' Separate the error number from description iPos = InStr(description, vbLf) strMsg = Right(description, Len(description) - iPos) MsgBox strMsg, vbExclamation, "WinSock Error" End Select ' Make sure the socket is closed wskMain.Close ' We should wait for the socket to finish closing iProgress = 0 Do While True ' Increment our progress bar iProgress = iProgress + 5 If iProgress > 100 Then iProgress = 0 DrawProgress picProgress, iProgress, vbBlue ' Check the winsock state If wskMain.State = sckClosed Then ' Reset the progress bar DrawProgress picProgress, 0, vbBlue ' Exit the loop Exit Do End If Loop ' Set socket back to listen state SetListenState End Sub If the control raises an error for any reason, such as a failed IR connection, you can display a MessageBox like the one shown in Figure 5.12. Figure 5.12. When an error occurs, the Error event fires. This provides you the opportunity to give the user helpful feedback. 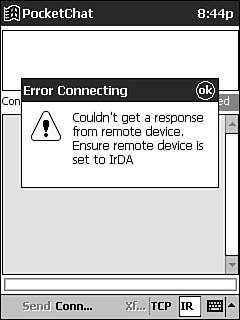 Regardless of the error, the socket connection either is broken or is in an unstable state, so you should gracefully close out the local socket by calling the Close method. Depending on what happened , the WinSock control might take a little while to fully close the socket, and you should always wait for it to complete. Here you sit in a polling loop waiting for it to close, updating the ProgressBar as you wait. Caution Sitting in a continuous loop, or polling, is often undesirable. It can cause the active thread to consume large amounts of the processor time and essentially lock your device, especially if you expect the loop to take more than a very short period of time. If you must poll, it's a good idea to allow system events to occur by using the DoEventsCE workaround found in Chapter 9.
Adding Final Touches As with most applications, there are niceties that you can add to make the user's experience a little better. In PocketChat we've already done some of this type of work, showing the SIP (Soft Input Panel, the onscreen keyboard) when the user connects, for example. When the SIP is shown, though, it overlaps txtRecv, and if the user has done much chatting, the area where data is getting appended will be beneath the SIP. Of course the user can always hide the SIP to see it, but it's far friendlier to simply prevent the SIP from overlapping the textbox. This is achieved by changing the height of txtRecv whenever the SIP is shown or hidden, and nicely enough eVB exposes an event for the form called SIPChange that fires whenever the SIP state changes. By adding the code in Listing 5.16, you can avoid the SIP ever overlapping txtRecv. Listing 5.16 Making Sure the SIP Doesn't Overlap Input or Display Fields Private Sub Form_SIPChange(bSIPVisible As Boolean) If bSIPVisible Then ' If the SIP is visible, we need to shrink txtRecv txtRecv.Height = 1450 ' It also means they're probably about to type If txtSend.Enabled Then txtSend.SetFocus End If Else ' If the SIP is hidden, we need to expand txtRecv txtRecv.Height = 2415 End If End Sub Notice that when the SIP becomes visible, we make the assumption that the user will likely want to begin typing, so set the application focus to txtSend for them. You also need to do some clean up of the File object if it has been created. Just as you did in Chapter 3, you handle this by calling ReleaseFileObject from frmMain's OKClick event just before ending the application: Private Sub Form_OKClick() ' Clean up our File object ReleaseFileObject ' End app App.End End Sub ReleaseFileObject simply sets the File member variable to Nothing: Public Sub ReleaseFileObject() Set m_FileObject = Nothing End Sub  | 


