18.1 Paper Dolls: The Group Command
|
| < Day Day Up > |
|
Have you ever done a furniture layout for an office or an equipment layout for a shop or plant? You may know then that the easiest way to accomplish the layout (in such a fashion that the equipment can be moved around as the plan develops) is to use the "paper dolls" approach. That is, you create a scaled drawing of the room or work area, make a blue line of it, and then move scaled representations (paper dolls) of the equipment around the blue line until you're satisfied with the locations. Once you're satisfied, you tape the dolls to the blue line for reference and draw the objects in your layout.
It's easy work if you keep the windows closed and nobody slams a door. A slight breeze, however, sends people scrambling for the paper dolls and mumbling things that might make a sailor blush. Of course, this is only after the hours spent reminiscing about kindergarten while cutting paper dolls out of construction paper.
Once again, AutoCAD has created tools that provide the benefits of construction paper and tape (combined with a few new benefits) while removing the hassles. Enter Groups.
What is a group? Simply put, a group is a collection of objects treated as a single unit.
Let's take a look.
Do This: 18.1.1 Working with Groups
-
Open the groups.dwg file the C:\Steps\Lesson18 folder. The drawing looks like Figure 18.1.1a.
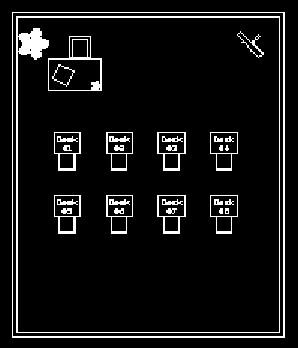
Figure 18.1.1a -
Follow these steps.
TOOLS
COMMAND SEQUENCE
STEPS

Command: m
1. We'll switch the tree (in the upper left corner of the screen) with the easel pad (in the upper right corner). Enter the Move command.
Select objects: 80 found, 1 group
Select objects: [enter]
2. Select anywhere in the tree as shown in Figure 18.1.1.2a. Complete the selection.
(Notice how easy it's to select these 80 objects!)
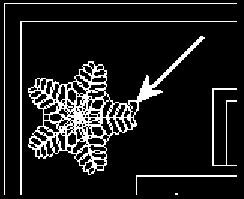
Figure 18.1.1.2aSpecify base point or displacement: 21',0
Specify second point of displacement or <use first point as displacement>: [enter]
3. Use the displacement method to move the tree 21 feet to the right.

Command: m
4. Repeat Steps 1 through 3 to move the easel pad 21 feet to the left. Your drawing looks like Figure 18.1.1.4a.
Notice that, in each instance, you selected the objects with a single pick and AutoCAD indicated the number of objects and the number of groups found.
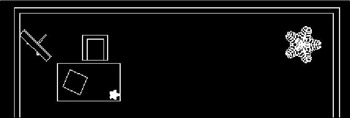
Figure 18.1.1.4a
Command: ro
Current positive angle in UCS: ANGDIR=counterclockwise ANGBASE=0
Select objects: 14 found, 1 group
Select objects: [enter]
Specify base point:
Specify rotation angle or [Reference]: 90
5. Now rotate the easel pad to face the correct direction. This part of your drawing now looks like Figure 18.1.1.5a.
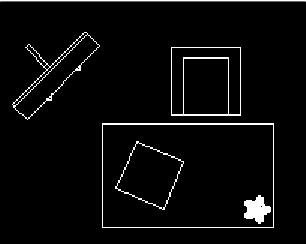
Figure 18.1.1.5a
Command: qsave
6. Save the drawing but don't exit.
You can see how easy it's to manipulate grouped objects. And before you ask, yes, you can manipulate individual objects within a group (but not within a block – well, at least not easily).
Let's take a look at how you can create groups yourself and at how you can work with individual parts of the group.
When you enter the Group command, AutoCAD provides the Object Grouping dialog box to assist you (Figure 18.1a).
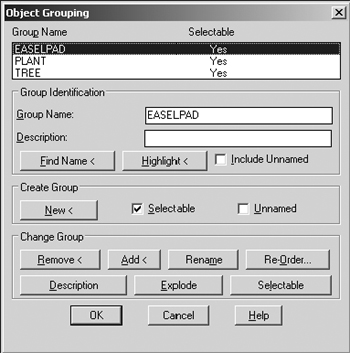
Figure 18.1a
-
The upper list box shows the names of existing groups (under Group Name) and whether or not the group is currently Selectable (Yes or No). Selectable simply means that the group can be manipulated as a single object. You'll want the group to be selectable to do what we did in the last exercise; but you won't want it selectable if you need to modify something within the group (like pruning the branches of the tree we moved). You can't change the Selectable setting in the list box. We'll see how to do that shortly.
-
The Group Identification frame holds several useful items.
-
Appearing in the appropriate text box, you'll find the name and description (if any) of the group highlighted in the list box at the top of the dialog box. You'll begin to create a new group by typing a new Group Name and Description (if desired) into these boxes. (We'll create some new groups in our next exercise.)
-
To find the name of an existing group, begin by picking the Find Name < button. AutoCAD returns to the graphics screen and prompts you to Pick a member of a group. It then displays the Group Member List Dialog box (Figure 18.1b) showing a list of all the groups to which that object belongs.
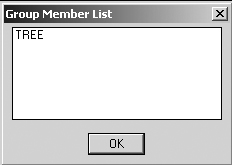
Figure 18.1b -
To find which objects belong to a certain group, begin by selecting the name of the group in the upper list box, and then pick the Highlight < button. AutoCAD returns to the graphics screen, highlights all the objects belonging to that group, and presents a Continue button to return to the Object Grouping dialog box.
-
Sitting inconspicuously in the lower right corner of the frame, you'll find a check box next to the words Include Unnamed. When a group is copied, the copy is also a group. You haven't named the copy, but AutoCAD has assigned a temporary name to it. Placing a check in this box tells AutoCAD to display the temporary names as well as the user-assigned names. You can then rename the copies to something more appropriate.
-
-
You'll use items in the Create Group frame to create a new group. After typing a name for your new group in the Group Name text box (or placing a check in the Unnamed check box if you want AutoCAD to assign the name), pick the New < button. AutoCAD will return to the graphics screen and prompt Select objects for grouping. When you've finished selecting the objects, hit enter to return to the Object Grouping dialog box. Be sure there's a check in the Selectable check box if you want to manipulate the selected objects as a group.
-
Use the seven buttons in the Change Group frame to modify a group. First, select the group to be modified in the list box. Then pick one of the buttons in the Change Group frame.
-
Add or remove objects from a group with the Remove < and Add < buttons.
-
Use the Rename button to change the name of a group. For example, to change the temporary name assigned by AutoCAD to a more recognizable name, highlight the temporary name in the list box, type the new name in the Group Name text box, and then pick the Rename button.
Note You'll rarely (if ever) need the Order options of the Group command. In the few brief years since AutoCAD included this tool, I haven't found a need or even a use for reordering objects in a group. However, this doesn't mean that you won't find a need or use. A corollary to AutoCAD's Redundancy Rule might be the Overkill Rule. Both rules simply and correctly state that More is Better. In other words, if it might be useful, make it possible!
-
Type some text into the Description text box, and then pick the Description button to update the description of the highlighted group.
-
The Explode button will remove the definition of the group from the drawing's database. All objects in the group will then behave as individual objects (not as part of a group).
-
The Selectable button is a toggle for treating a group as a group or for suspending the group definition so you can modify one or more of the objects within the group. When Selectable is toggled off, the word No appears in the Selectable column of the list box, and all the objects within a group behave as individual objects. To manipulate the objects as part of the group, simply toggle Selectable back on.
-
The Re-Order… button presents the Order Group dialog box (Figure 18.1c). Here you can change the order in which AutoCAD reads the objects in a group. Type the number of the object you wish the change in the Remove from position text box. Type the position to which you wish to move the object in the new position number for the object text box. Type the number or range of objects to reorder in the Number of objects text box.
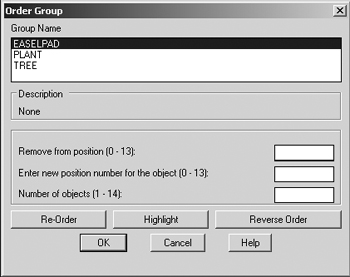
Figure 18.1cPick the Reverse Order button to simply reverse the order of the objects within the group.
If you're unsure of the position of the object you wish to reorder, pick the Highlight button. AutoCAD will present the Object Grouping counter shown in Figure 18.1d. Pick the Next/Previous buttons to scroll through the objects making up the group. The number of the object will be indicated at the bottom of the dialog box.
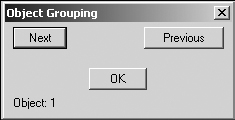
Figure 18.1d
-
Let's play with the Group command!
Do This: 18.1.2 Creating and Manipulating Groups
-
Be sure you're still in the groups.dwg file the C:\Steps\Lesson18 folder. If not, please open it now.
-
Follow these steps.
TOOLS
COMMAND SEQUENCE
STEPS
No Button Available
Command: g
1. Enter the Group command by typing group or g at the command prompt. AutoCAD presents the Object Grouping dialog box (Figure 18.1a).
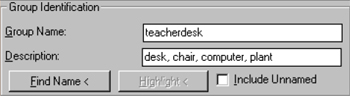
2. We'll group the teacher's desk, chair, computer, and the plant on the desk. Enter the name and description as shown.

3. Pick the New < button.
Select objects for grouping:
Select objects: 86 found, 1 group
Select objects: [enter]
4. Use a window to select the teacher's desk and the other objects (Figure 18.1.2.4a). Hit enter (or right-click) to return to the dialog box.

5. AutoCAD now lists the TEACHERDESK in the list box as shown in Figure 18.1.2.5a.
Pick the OK button to complete the command.

Figure 18.1.2.5a
Command: m
Select objects: 86 found, 1 group
Select objects: [enter]
Specify base point or displacement: 13',0
Specify second point of displacement or <use first point as displacement>: [enter]
6. Move the Teacherdesk group next to the tree as indicated. Your drawing looks like Figure 18.1.2.6a.

Figure 18.1.2.6aCommand: g
7. Return to the Object Grouping dialog box.

8. Now we'll list all the groups to which an object belongs. Pick the Find Name < button.
Pick a member of a group.
9. AutoCAD returns to the graphics screen and prompts to Pick a member of a group. Pick the plant on the teacher's desk.

10. AutoCAD presents the Group Member List dialog box (Figure 18.1.2.10a) showing that the object selected belongs to the Plant and Teacherdesk groups. You see now that groups can be nested – that is, one group can contain another group. Objects can also be shared by more than one group.
Pick the OK button to return to the Object Grouping dialog box.
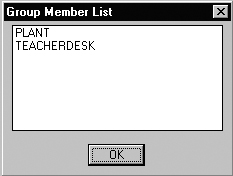
Figure 18.1.2.10a11. Let's see which objects are in the Plant group. Pick PLANT in the list box. Notice that the name appears in the Group Name text box (Figure 18.1.2.11a).
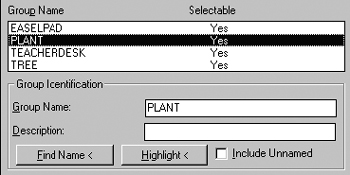
Figure 18.1.2.11a
12. Pick the Highlight button. AutoCAD returns to the graphics screen and highlights the plant on the teacher's desk.

13. Pick the Continue button to return to the Object Grouping dialog box.

14. Pick the OK button to complete the command.

Command: co
15. Let's give the teacher two new plants. Try to copy the Plant group. Notice that the entire desk highlights when you select the plant. We must first make the desk unselectable.

16. Hit the Escape key to cancel the command.
Command: g
17. Return to the Object Grouping dialog box.
18. Pick TEACHERDESK in the list box and then pick the Selectable button in the Change Group frame. Notice that the word No appears in the Selectable column of the list box (Figure 18.1.2.18a).

Figure 18.1.2.18a
19. Pick the OK button to complete the command.

Command: co
20. Now make two copies of the plant on the teacher's desk. Your drawing now looks something like Figure 18.1.2.20a.
Figure 18.1.2.20aCommand: g
21. Return to the Object Grouping dialog box.
22. Place a check in the Include Unnamed check box in the Group Identification frame. Notice that two new groups appear in the list box – *A1 and *A2.

23. Select *A1.
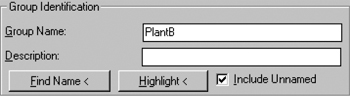
24. Type the name PlantB into the Group Name text box.

25. Now pick the Rename button. AutoCAD renames the group.
26. Repeat Steps 22 through 25 to rename *A2 to PlantC.
27. Now let's add these new plants to the Teacherdesk group. Select the Teacherdesk group in the list box (you may have to scroll down a bit to find it).

28. Pick the Add < button in the Change Group frame.
Select objects to add to group...
Select objects: 80 found, 1 group
Select objects: 80 found, 1 group, 246 total
Select objects: [enter]
29. AutoCAD returns to the graphics screen and prompts you to Select objects to add to group. Select the two new plants, and then hit enter to return to the Object Grouping dialog box.

30. Pick the Selectable button to make the Teacherdesk group selectable again. Notice that the word Yes appears in the Selectable column of the list box.

31. Pick the OK button to return to the graphics screen.

Command: qsave
32. Save the drawing but don't exit.
We've seen how groups can benefit our work by simplifying object selection and manipulation. We've also seen how to manage our groups through some of the buttons in the Change Group frame of the Object Grouping dialog box. Now let's remove a group definition from a drawing.
Do This: 18.1.3 Removing a Group Definition
-
Be sure you're still in the groups.dwg file the C:\Steps\Lesson18 folder. If not, please open it now.
-
Follow these steps.
TOOLS
COMMAND SEQUENCE
STEPS
Command: g
1. Enter the Group command.

2. Select the Easelpad group in the list box.

3. Pick the Explode button in the Change Group frame. Notice that Easelpad disappears from the list box.

4. Pick the OK button to complete the command. AutoCAD returns to the graphics screen.

Command: m
5. Try to move the easel pad now. Notice that you can't select the entire pad with a single pick. The pad is no longer a group.

Command: qsave
6. Save the drawing and exit.
I've frequently used groups in my capacity as a piping designer to manipulate (particularly moving and copying) items such as control stations and pipe configurations. Architects and interior designers can also use groups as we've done in these exercises. Other disciplines can make use of groups when dealing with layouts, circuitry, boltholes, windows, and many other items.
The only limitations to groups are simple – their use is limited to a single drawing (you can't share groups between drawings), the group definition is permanently lost once the group is exploded or erased from a drawing, and you can't attach information to a group. To overcome these limitations, use blocks instead of groups.
|
| < Day Day Up > |
|
EAN: 2147483647
Pages: 96