4.1 Getting Closer: The Zoom Command
One of the allowances I have had to make as I amassed all this "experience" has been the acquisition of a pair of reading glasses . At first I wore them down on my nose “ a look more professorial. Now, however, I wear them closer to my eyes to get a wider field of vision. Ah, age!
For this reason, I really appreciate AutoCAD's Zoom command. Wish this, I can enlarge all or part of my drawing as much as I like, without having to search for my "eyes."
To appreciate the demonstrations of the Zoom command, we'll need to open the PID drawing in the C:\Steps\Lesson04 folder. The drawing is shown in Figure 4.1a. Note that the PID drawing was created for a D-size sheet of paper, so viewing it on the screen (or on our book- size sheet of paper) makes it difficult to read.
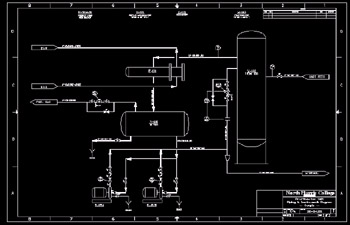
Figure 4.1a:
The command sequence for the Zoom command follows :
Command: zoom (or z )
Specify corner of window, enter a scale factor (nX or nXP), or
[All/Center/Dynamic/Extents/Previous/Scale /Window] <real time>: [select a corner of the window]
Specify opposite corner: [select the opposite corner of the window]
Z (the hotkey) will work as well as zoom , or you can pick the Zoom Window button from the Standard toolbar (Figure 4.1b).
Figure 4.1b:
Let's look at the various Zoom options. Notice that each option has an equivalent button on the Zoom Window flyout toolbar.
| Note | A flyout toolbar button is indicated by a small triangle in the lower right corner of the button. The triangle indicates that there are more buttons below the one shown. To see the other available buttons , pick on the flyout button and hold down the mouse button. A flyout toolbar will appear. To identify what a button will do, rest your cursor on it for a moment. A cheater box will appear telling you the use of the button. To select the button, simply move your cursor to it and release the mouse button. |
| Zoom Option | Alternate Toolbar Button |
|---|---|
| Figure 4.1c: |
| Figure 4.1d: |
| Figure 4.1e: |
| Figure 4.1f: |
| Figure 4.1g: |
| Figure 4.1h: |
| Figure 4.1i: |
| Figure 4.1j: Figure 4.1k: |
| Note | In addition to the command line and toolbar, all the Zoom options can be found in the Zoom selection of the View pull-down menu and on the (right-click) cursor menu once the Zoom command has been entered. |
Let's try some of these now.
Do This: 4.1.1 Practice Zooming
-
If pid.dwg isn't already open, please open it now. It's in the C:\Steps\Lesson04 folder.
-
Follow these steps.
Tools
Command Sequence
Steps

Zoom Window Button
Command: z
1. We'll begin with the Window option of the Zoom command.
Enter the Zoom command or pick the Zoom Window button on the Standard toolbar.
Specify corner of window, enter a scale factor (nX or nXP), or
[All/Center/Dynamic/Extents/Previous/ Scale/Window] <real time>: [select first window corner]
Specify opposite corner: [select other corner]
2. Select the corners of the window as shown in Figure 4.1.1.2a.
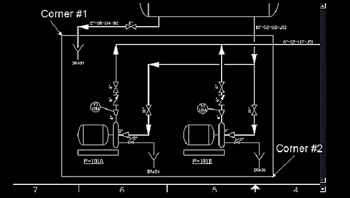
Figure 4.1.1.2a:
Zoom Previous Button
Command: z
Specify corner of window, enter a scale factor (nX or nXP), or
[All/Center/Dynamic/Extents/Previous/ Scale/Window] <real time>: p
3. Now let's zoom back to where we started by using the Previous option or the Zoom Previous button on the Standard toolbar.

Zoom In Button
4. Zoom to a .5X scale using the Zoom In button on the Zoom flyout toolbar.

Zoom All Button
Command: z
Specify corner of window, enter a scale factor (nX or nXP), or
[All/Center/Dynamic/Extents/ Previous/ Scale/Window] <real time>: a
5. Now zoom All using either keyboard commands or the Zoom All button on the Zoom flyout toolbar.
Notice the location of and the spacing around the drawing on the screen. Let's compare that to the Extents option.

Zoom Extents Button
Command: z
Specify corner of window, enter a scale factor (nX or nXP), or
[All/Center/Dynamic/Extents/ Previous/ Scale/Window] <real time>: e
6. Zoom Extents using keyboard or button. Notice the location of and spacing around the drawing on the screen now. How does it compare with the results of the zoom All option?
Command: z
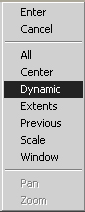
7. Now let's play with the Dynamics option. We'll select this one from the cursor menu “ enter the Zoom command and select Dynamics from the cursor menu. (Remember, right-click to get to the menu.)
Notice the change in the display. There is now a box over the display with an "X" in the middle. This is the location box (Figure 4.1.1.7a).

Figure 4.1.1.7a:8. Pick with the left mouse button and notice how the box changes. Instead of an "X" in the middle, there is now an arrow pointing toward the right side of the box. This is the sizing box (Figure 4.1.1.8a).
As you move the mouse back and forth, notice how the size of the selection box changes. When it's just large enough to enclose the exchanger (see Figure 5.1.1.9a), pick again with the left mouse button.

Figure 4.1.1.8a:9. Now place the selection box over the exchanger and right-click. Your display now looks like Figure 4.1.1.9a.
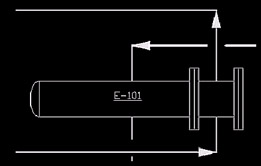
Figure 4.1.1.9a:
Zoom Center Button
Command: z
Specify corner of window, enter a scale factor (nX or nXP), or
[All/Center/Dynamic/Extents/Previous/ Scale/Window] <real time>: c
10. Now let's center our exchanger. Repeat the Zoom command and enter the Center option. Alternately, you can pick the Zoom Center button on the Zoom flyout toolbar.
Specify center point:
11. Select a point roughly in the center of the exchanger.
Enter magnification or height <X.XXXX>: [enter]
12. And hit enter to complete the command.
Before we proceed, there are two other aspects of display manipulation we should discuss “ Realtime Zoom and Pan (or Realtime Pan ).
Realtime is just a fancy way to say, "Do it while I watch." In other words, you can judge how far you want to zoom by watching the display change as you move your mouse.
The Zoom Realtime button looks like Figure 4.1m. You can find it on the Standard toolbar, next to the Zoom flyout buttons we've been using. When you pick this button, you'll notice the crosshairs change to a cursor that resembles the button image (Figure 4.1n). To use Realtime Zoom, pick anywhere in the graphics area of the screen with the left mouse button. While holding the button down (dragging), move the cursor up and down. Notice how the display changes. When you are happy with the display, release the left mouse button, click the right button, and pick Exit on the cursor menu that appears.
Figure 4.1m:
Figure 4.1n:
You can also access Realtime Zoom by entering the Zoom command and then hitting enter at the first prompt.
Another of AutoCAD's realtime features, Pan behaves as though you are panning a camera across your display. Located next to the Zoom Realtime button on the Standard toolbar, the Pan Realtime button (Figure 4.1o) will also change the crosshairs to a cursor that resembles the button image (Figure 4.1p). Realtime Pan works in much the same way as Realtime Zoom . Pick and drag with the left mouse button. It's like putting your hand down on your paper and sliding the paper across the drawing table.
Figure 4.1o:
Figure 4.1p:
| Note | AutoCAD will also make use of the wheel located between the two buttons on an IntelliMouse pointing device. Rotating the wheel forward or backward works like a Realtime Zoom . If you don't have an IntelliMouse, the timesavings will more than justify the expense! |
| Note | A trick to remember when using the Realtime Zoom command is to do a zoom Center first. You may have noticed that Realtime Zoom doesn't allow you to change position during a zoom. In fact, it maintains the same center point on the display, zooming in or out about that point. |
| Note | Here again AutoCAD makes use of the IntelliMouse. Depressing the wheel between the mouse buttons and dragging the cursor across the screen appears as though you are in the Realtime Pan command. But no command line or toolbar entries are needed! |
The hotkey for accessing the Pan command is P . Exit Realtime Pan just as you did Realtime Zoom .
One of the really neat aspects of the realtime features is the cursor menu (Figure 4.1q “ next page) that displays with a right-click. I strongly suggest getting comfortable with this menu (if you don't have an IntelliMouse). Expertise with it will enable you to position yourself exactly where you want to be in a drawing, while saving the time you might otherwise spend keyboarding or toolbar-clicking.
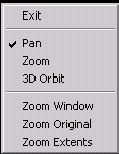
Figure 4.1q:
Before continuing, take a few minutes to play with these last few features in the PID drawing. Note the increased speed using the realtime features as opposed to the time spent in display manipulation using the methods we learned previously.
| Note | The Aerial View Toy Autodesk could have saved itself a lot of time and money by not putting so many redundant routines in its software. But if it hadn't, it wouldn't have become the user -friendly benchmark of CAD systems on the market today. One of the redundancies AutoCAD provides, the Aerial View allows yet another method of display manipulation. The DSViewer command (or AV hotkey) presents the Aerial View window (Figure 4.1r) atop the AutoCAD window. The buttons and methods of display control within the window are just like the ones found in the AutoCAD window. So what is the big difference? Well, the aerial view (AV) permits you to adjust the magnification and position of the view before actually changing the display. There are, however, some unfortunate drawbacks to using the AV. These include: 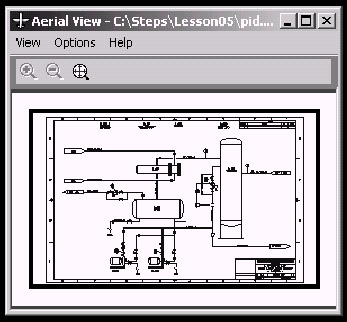 Figure 4.1r:
In all honesty, I have worked with CAD for many years and have never seen anyone make constructive use of the AV or its predecessors. It's a nifty toy and might have been a good idea at one time, but we've seen more efficient approaches for manipulating the display screen. Still, this might be just the ticket for you. So take a few minutes to experiment. |
- Chapter IV How Consumers Think About Interactive Aspects of Web Advertising
- Chapter IX Extrinsic Plus Intrinsic Human Factors Influencing the Web Usage
- Chapter X Converting Browsers to Buyers: Key Considerations in Designing Business-to-Consumer Web Sites
- Chapter XII Web Design and E-Commerce
- Chapter XVI Turning Web Surfers into Loyal Customers: Cognitive Lock-In Through Interface Design and Web Site Usability