Section 8.2. WEB PAGES AND FLASH
8.1. SOUND8.1.1. Hide the Sound IconTHE ANNOYANCE: I hate that stupid sound icon on my slide. How do I get rid of it? I tried shrinking it and recoloring it, but I can't make it completely disappear. THE FIX: Just drag the icon off the edge of the slide. The sound will still play, but the speaker icon won't show during the presentation. If your slide background is white, you can right-click the sound icon, choose Format Picture, and change the Brightness and Contrast settings to 100% on the Picture tab (see Figure 8-1). If your background is black, change the Brightness and Contrast to 0%. Figure 8-1. If your background is white or black, you can change the Brightness and Contrast settings to hide the sound icon. Of course, you can also just drag the icon off the edge of the slide.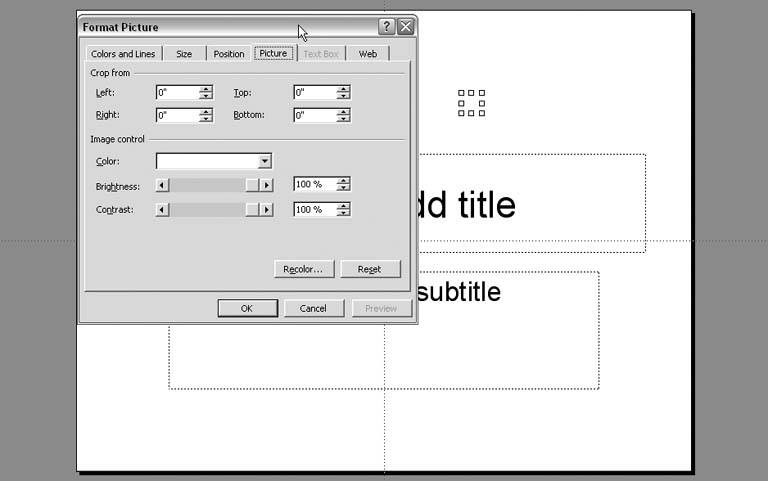 In PowerPoint 2002 and 2003, you can also right-click the sound icon, select Edit Sound Object, and check the "Hide sound icon during slide show" box. 8.1.2. CD Track Doesn't PlayTHE ANNOYANCE: I put a CD in the drive, selected Insert THE FIX: You probably have a second CD drive or DVD drive. If you have more than one drive, PowerPoint inserts tracks from the lowest CD drive letter, even if it's really a DVD drive. (For example, if you have two CD/DVD drives named D and E, PowerPoint will look for the audio CD in the D drive.) Put the CD in the other CD/DVD drive and reinsert the track into the presentation. 8.1.3. CD Track No Longer PlaysTHE ANNOYANCE: Yesterday I inserted a song from a CD track and it played fine in my presentation. Today, however, the song refuses to play. What happened? THE FIX: CD audio tracks are linked to your presentation. You need to put the audio CD back in the CD drive so PowerPoint can find it. PowerPoint also links to the track number on the CD. If you inserted Track 2 of an audio CD and then replace it with another CD, PowerPoint will still play Track 2. If you want to avoid these issues altogether, rip the CD track to your hard drive using an audio ripping application (see the sidebar, "Ripping CD Tracks"), and then insert the resulting .wav or .mp3 file into your presentation using Insert THE ANNOYANCE: I added .mp3 files to my presentation and emailed it to a friend, but the sound is missing. THE FIX: You also must send the .mp3 file in the email because .mp3 files are always linked to PowerPoint files. They aren't embedded. The only sound file that can be embedded into PowerPoint is a .wav file. To ensure that your .mp3 file will play in the presentation on the other end, use this process to insert it: Create a folder on your C drive. Save your PowerPoint file in that folder. Copy the .mp3 file to that folder. Open the PowerPoint file and select Insert In your email program, be sure to attach both the PowerPoint file and the .mp3 file. Tell the recipient to save the PowerPoint file and the .mp3 file into a folder on his hard drive and open the PowerPoint file from that location. You should always put the .mp3 file in the same folder with the presentation before you insert it into the presentation; otherwise, the sound may not play on the recipient's computer. This system is a hassle for whoever receives your email. You can use a utility like WinZip to zip the .mp3 and PowerPoint files together, but it's still a hassle. A better solution is to convert the .mp3 file to a .wav file and embed it into the PowerPoint file (see "WAV File Not Embedded"). 8.1.5. WAV File Not EmbeddedTHE ANNOYANCE: I converted my .mp3 file to a .wav file so I could embed it into my presentation. I inserted the .wav file, but it's not embeddedthe file size stayed the same, and when I emailed the file, there was no music. THE FIX: Before you insert the .wav file into the presentation, select Tools Figure 8-2. The "Link sounds with file size greater than XXX Kb" setting really means "Embed .wav files smaller than XXX Kb." Change this setting before inserting .wav files if you want them to be embedded in your presentation. The name of this setting hurts my brain. It should read "Embed .wav files smaller than XXX Kb" because it really tells PowerPoint to embed .wav files smaller than the amount you type in the box. The largest number you can input is 50,000 KB, which is just a hair smaller than 50 MB. But you have to set the amount before you insert the .wav file into your presentation if you want to make sure it's embedded. 8.1.6. Shrink Your WAV FileTHE ANNOYANCE: Okay, okay. I converted my .mp3 file to a .wav file and entered 50000 in the "Link sounds with file size greater than XXX kb" box on the General tab of the Options dialog. Now that it's embedded in my PowerPoint file, the presentation's too big to email! Now what? THE FIX: Make the .wav file smaller. Using an audio editing program, you can convert from stereo to mono, and the file size will be cut in half. Resampling can also help48,000 Hz is DVD-quality sound, 44,100 Hz is CD quality, 22,050 Hz is radio quality, and 11,025 Hz is telephone quality. PowerPoint files generally don't need CD-quality sound. You can often drop the bit-depth from 16-bit to 8-bit when you save the sound as well, which will further cut the file size. Some files sound very bad when dropped to 8-bit; others still sound okay. You'll just have to experiment. A very slick alternative is to trick PowerPoint. You can make an .mp3 file look like a .wav file by adding a RIFF-WAV header to it. This combines the small size of the MP3 with the WAV header information PowerPoint needs to embed the sound. To do this, download and install the open source utility CDex (http://sourceforge.net/projects/cdexos), choose Convert Figure 8-3. In CDex, click the button at the top right to navigate to the folder holding your .mp3 files. Click the Convert button to make your file look like a .wav file. The resulting .wav file will be the same size as the original .mp3 file. Make sure you've changed your settings appropriately in the "Link sounds with file size greater than XXX kb" box in PowerPoint (select Tools Reports in the newsgroup microsoft.public.powerpoint indicate that these converted .mp3 files may not play in PowerPoint on Windows 98 systems. This may cause you problems if your presentation will be played on computers running that operating system. 8.1.7. Add Sound from iTunesTHE ANNOYANCE: I want to add music from iTunes to a presentation. When I try, I get an error saying "PowerPoint cannot insert a sound from the selected file. Verify that the path and file format are correct, and then try again." So what's the deal with this file format? THE FIX: Music from Apple iTunes downloads as an .m4p file encoded with proprietary AAC codecs. Not surprisingly, iTunes offers no "Convert to MP3" option. To convert an iTunes .m4p file into something PowerPoint can recognize, you must download the file, burn it as an audio CD, rip the file from the CD as an .mp3, and save it to your hard drive. Once it's an .mp3 on your hard drive, you can select Insert The iTunes Help files have good information on creating audio CDs. Also, read the "Ripping CD Tracks" sidebar for a list of programs you can use to rip the file from the CD to your hard drive. It's a long way around, but it works. 8.1.8. Add Sound from Clip OrganizerTHE ANNOYANCE: If I add sound from the Clip Gallery or Clip Organizer, it doesn't play when I move my presentation to a different computer. THE FIX: Basically, this boils down to a broken link. PowerPoint's looking for the sound file buried somewhere in your clip art folders. The problem is, your clip art folders aren't on the other computer. If the sound file is a small .wav file, it will probably be embedded in your PowerPoint file. But many of the sound files in the Clip Gallery (PowerPoint 97 and 2000) and the Clip Organizer (PowerPoint 2002 and 2003) are .midi and .mp3 files. They are not embedded in your presentation, they're linked (see "Absolute Versus Relative Links" in Chapter 7).
Overall, it's best not to insert sound and video files from the Clip Gallery or Organizer, as tempting as it might be. Instead, right-click the clip preview in the Gallery or Organizer, choose Preview/Properties, and look at the path to the sound file (see Figure 8-4). Write down or copy the path, navigate to the file on your hard drive, copy it to the folder with your PowerPoint presentation, and then select Insert Figure 8-4. If you insert a sound from the Clip Gallery or Organizer, it usually results in a long, convoluted link from the PowerPoint file to the sound, as shown in the Paths area of the Preview/Properties dialog box. Note: Did you know that you can drag a movie, sound, or image clip from the Clip Gallery or Clip Organizer to the folder with your presentation? First, open the folder with your presentation, and then click the clip in the Gallery or Organizer. When you do this, the folder will minimize to the Windows task bar. Drag the clip from the Gallery or Organizer on top of the folder on the Windows task bar until the folder opens on your screen. Move your mouse to the open folder and let go to copy the clip to the folder.
8.1.9. Add Background MusicTHE ANNOYANCE: When I add background music to my presentation, the slides don't advance. I know the music is the problem because when I remove it, the slides advance just fine. This shouldn't be so freaking hard! THE FIX: If you're using a .wav file for your background track and it's smaller than 50 MB, you can embed it in your slide transition. Select Slide Show In PowerPoint 97 and 2000, click the Apply button to apply the transition with the sound to the slide. In PowerPoint 2002 and 2003, just select the .wav file, and it will be applied to that slide transition automatically. In all versions, if you click the Apply to All Slides button, the .wav file will start over every time your slides transition. Transition .wav files are always embedded into PowerPoint, regardless of the size you specify in the "Link sound files greater than XXX kb" area on the General tab (select Tools If you are not using a .wav file or don't want to embed the background files in the transitions for some other reason, you need to specify how many slides you want the sound to play through in the animation settings. In PowerPoint 97 and 2000:
In PowerPoint 2002 and 2003:
8.1.10. Use CD Tracks for Background MusicTHE ANNOYANCE: I'm using PowerPoint 2002, and I added a couple of CD tracks to my presentation as background music. They're set to play for the correct number of slides, and the timings are all fine. So why doesn't the second one start playing when it's supposed to? THE FIX: PowerPoint 2002 is really buggy when it comes to handling sound. If you're trying to play more than one CD track in a presentation and it's not working right, try adjusting the settings on the Effect tab. In the Custom Animation task pane, double-click the sound in the list, or right-click the sound in the list and choose Effect Options, to open the Play Sound dialog box. On the Effect tab, enter 999 in the "Stop playing sound files after XXX slides" box. This should allow your CD track to play and your slides to advance as you expect. For some reason, entering the actual number of slides to play through doesn't always work in PowerPoint 2002, but entering 999 often seems to fix the problem. The following steps show you how to play multiple CD tracks in PowerPoint 2002: For example, say your presentation has 100 slides. You want the first CD track to play for slides 1 through 30 and the second CD track to play for slides 31 through 100. Follow these steps:
8.1.11. Start Sound Partway ThroughTHE ANNOYANCE: I'm using PowerPoint 2002, and I have a sound file I want to start 30 seconds into the file. When I set the sound start time to 00:30 on the Effect tab, the music doesn't play. If I set the start time to 00:00, it plays fine. THE FIX: You'll have to edit out that first 30 seconds of the file in a sound editor. PowerPoint 2002 is buggy when it comes to handling sound, and you've just hit one of those bugs. Or upgrade. You can start a sound at a point other than the beginning in PowerPoint 2003 just fine. 8.1.12. Background Sound Won't Play in PowerPoint Viewer 2003THE ANNOYANCE: I created a presentation with background sound in PowerPoint 2000. When my friend plays it in PowerPoint Viewer 2003, she doesn't hear any sound. THE FIX: Often, simply opening the file in PowerPoint 2002 or 2003 and resaving it will resolve this issue. If not, you'll have to open the file in PowerPoint 2002 or 2003 and disable the new animation effects (select Tools This is a known issue with PowerPoint Viewer 2003. The Viewer doesn't recognize the PowerPoint 97 and 2000 "Continue slide show" setting, because you can't access this setting through the Custom Animation task pane in PowerPoint 2002 and 2003. Unfortunately, you must use PowerPoint 2002 or 2003 to make this fix. 8.1.13. Sound Starts Over When Slides AdvanceTHE ANNOYANCE: I added some background music to my presentation, but every time the slide changes, the music starts over. THE FIX: You inserted the music on the master slide, didn't you? Sound files must be inserted on the slide you want them to begin playing on. Remove your sound file from the master slide (View It's also possible you inserted the sound as a transition sound and clicked the Apply to All Slides button. If that's the case, remove the sound from the slide transitions by selecting all the slides in Slide Sorter view. Next, select Slide Show 8.1.14. Change the Sound VolumeTHE ANNOYANCE: I changed the volume of my sound in the Sound Settings tab of the Play Sound dialog box, but it didn't do anything. How do you control the volume of the sound in the presentation? THE FIX: PowerPoint's volume control option ignores sounds that get their volume from the system's volume settings. That means the volume control, even though it's still visible on the Sound Settings tab, does not work for CD tracks, .wav, .mid, .midi, .mp2, .mp3, .mpa, or .rmi files. It does work for .afi, .aiff, .aifc, .au, .m3u, .snd, and .wma files. Where is the volume control option? In PowerPoint 2002 and 2003, right-click the sound icon and choose Custom Animation. In the Custom Animation task pane, double-click the sound to open the Play Sound dialog box, and then click the Sound Settings tab (see Figure 8-11). In PowerPoint 97 and 2000, you can't control the volume of sounds in your presentation. Figure 8-11. Although PowerPoint 2002 and 2003 have a volume control option on the Sound Settings tab, it works only for certain sound file types. If your computer speaker volume controls prove inadequate, you can change the volume of your sound in other ways. You can edit the volume of the sound file in a sound editor, or convert it to one of the file types supported by PowerPoint's volume settings. You can also download the $20 Volume Control add-in from Microsoft PowerPoint MVP Chirag Dalal (http://officeone.mvps.org/volctrl/volctrl.html). Once installed, select all the slides in your presentation, choose Edit Figure 8-12. The Volume Control add-in lets you adjust the volume of sounds on slides. After setting the sound for the entire presentation, you can go back and make changes to individual slides. Select the slide, choose Edit 8.1.15. Synchronizing SoundTHE ANNOYANCE: My presentation plays differently every time, which throws my carefully synchronized sounds and photos out of whack. I spent hours making this presentation. THE FIX: PowerPoint is simply not designed to perfectly synchronize slides and sound. PowerPoint playback depends on the system itselfthe hard drive space available, the RAM installed, the file cache, how defragmented the drive is, the speed of the CD-ROM drive, all kinds of things. That's why PowerPoint files rarely play exactly the same on the same system the second time. If you really just need some photos set to background music, use the free Windows Movie Maker (http://www.microsoft.com/windowsxp/downloads/updates/moviemaker2.mspx) or Photo Story (http://www.microsoft.com/windowsxp/using/digitalphotography/photostory/default.mspx) application to create a video file of your photos and sound. It will make your life much easier. If you need more features, consider using Macromedia Flash or Director, although timing can be "off" in files created with these programs as well. 8.1.16. Extract Sound from PowerPoint FilesTHE ANNOYANCE: My friend sent me a presentation with some background music of him playing the guitar. He told me I can use it in another presentation, but I can't figure out how to extract the sound file. Help! THE FIX: Save the PowerPoint file as a web page, and you should get a useable sound file in the resulting HTML and other files. Follow these step-by-step instructions:
|
 Movies and Sounds
  Movies and Sounds


EAN: 2147483647
Pages: 83