What is Reusable Content?
|
This may be obvious, but it's important we explain what we mean when talking about reusable content. Simply put, it's content (including HTML, web controls, and code) that we want to use on multiple pages, or multiple times on the same page. We can wrap this content up within a special type of ASP.NET Page, called a user control. When creating user controls you use the same methods you've learned throughout this book – you drag web controls onto the design surface of the user control, you add code to interact with these web controls, and so on. We can then use this user control in the same way we use other web controls – by dragging it onto the design surface of other pages.
Creating a user control is just like creating an ASP.NET page – there's a template to help you. The main difference is that user controls have a different file extension. Standard ASP.NET web pages have an extension of .aspx, whereas a user control has an extension of .ascx. It's fairly easy to understand – the p stands for Page and the c stands for Control.
When Should I Reuse Content?
Even though web pages within a site tend to be different, there are still plenty of examples of content that you'd want to use on more than one page. A really good example is the use of header and footer information. For example, consider the following pages:
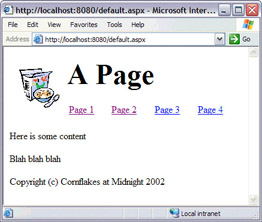
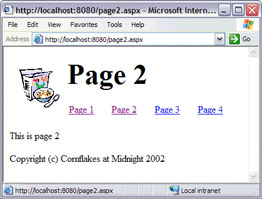
Notice that they look similar. The header area only differs with the header text, but the logo and links are the same. Likewise, the footer is the same. Both of these areas were created with a user control and just dragged onto the pages. Let's see how to do this.
Try It Out—Creating a user control
-
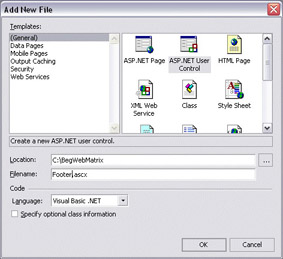
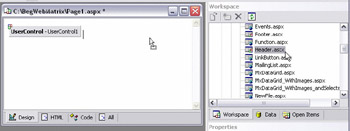
First you need to add a new file. Instead of using the ASP.NET Page template though, you need to pick the ASP.NET user control. Call it Footer.ascx:
-
Now add the text you wish to display at the bottom of each page. I've used a copyright notice:

-
Save the page and close it.
-
Create another user control, this time calling it Header.ascx.
-
To get the layout we need for the header details we're going to use HTML tables. So, from the HTML menu (not the toolbox), select Insert Table…. From the dialog that appears, give the table 1 row and 2 columns, and leave the Width and Height as they are.
-
We want this table to stretch across the whole page, so select the table on the page. You'll have to hover the mouse pointer over the border of the table until the cursor changes (into a cross with arrows) before you select it. Once selected, set the width property to 100% and delete the contents of the style property:

-
We also want to change the width of the first column, so click the mouse into the first cell. The Properties window will change to show properties for the <TD> element.
-
Change the width property to 15%.
-
Drag an Image control from the Toolbox into this first cell, and set the ImageURL property to point to an image you want to use for the logo. You can copy the logo from the downloadable samples if you like. Resize the image, setting both the height and width properties to 90px.
-
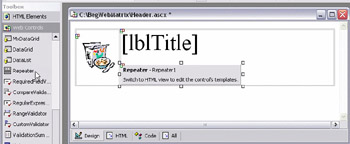
Drag a Label control into the second cell, delete the text from the Text property, and set the ID to lblTitle. You can also set the font size, perhaps to XX-Large.
-
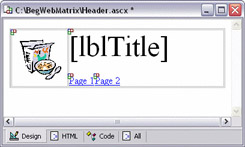
Drag two HyperLink controls onto the page, putting them underneath the label. Add some spaces between each one so that they are easier to read. Change the Text properties to Page 1 and Page 2, and the NavigateURL properties to Page1.aspx and Page2.aspx. Your control should now look like this:
-
Now we need to add some code that will enable us to change the title in each page that uses the control. So, switch to Code view and add the following:
Public Property Title As String Get Return lblTitle.Text End Get Set lblTitle.Text = Value End Set End Property
By adding a property to this control we allow it to be customized in the different pages on which it is used.
That's it for the controls, so save this page and close it. Now we need to see how to use them.
Try It Out—Reusing Content
-
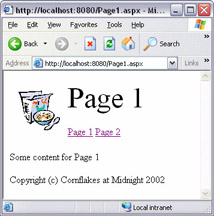
Create a new ASP.NET Page called Page1.aspx.
-
From the Workspace drag Header.ascx and drop it onto the page:
-
Now type in some text – anything to identify this as page 1. Then drag Footer.ascx onto the page underneath:

-
To set the title for the header we need to switch to HTML view (You can't change properties of user controls from the Property page in Web Matrix). The HTML for the header will look like this:
<uc0:Header runat="server"></uc0:Header>When we created the control we added Title as a property, and this becomes available to us as part of the declaration, as an attribute. So change this HTML to:
<uc0:Header Title="Page 1" runat="server"></uc0:Header>
-
Save the page and close it.
-
Repeat the process with another ASP.NET Page, this time calling it page2.aspx. Use different title text so that it's easy to see the difference between two pages.
-
Now hit F5 to run this, and click on the hyperlinks to flip between pages. See how the menu, logo, and copyright text appear on both pages, exactly the same.
How It Works
There's actually very little to understand in regards to how user controls work. When you drag and drop them onto a page they act just like any other control, and their content is drawn along with the rest of the page content when the browser displays the page.
In our header control, the one thing that isn't automatic is the title, as we wanted to have the title different on each page. We needed a way of changing this, so we implemented this as a Label control. To gain access to this label we use a property. The user control is an object, so we can define properties on it. Since we only want one property, the Title, we added the following code:
Public Property Title As String Get Return lblTitle.Text End Get Set lblTitle.Text = Value End Set End Property
Let's break this down. Firstly we have the declaration of the property. We define it as Public, so that it can be accessed from outside the user control. We need to do this to allow the property to be accessed when the control is used on another page.
Public Property Title As String
Next we define the Get part – this is how we can get the value of the title.
Get Return lblTitle.Text End Get
Then we define the Set part, where we can set the title:
Set lblTitle.Text = Value End Set End Property
What's worth explaining is the use of Value in the Set part. This is a special object used in property declarations, and it's this object that contains the value being set. So, doing this:
Title="Page 1" means that Value contains Page 1. When setting properties in the HTML declaration we use the attribute syntax:
<uc0:Header Title="Page 1" runat="server"></uc0:Header>
Naming of User Controls
One thing that is worth mentioning is the way in which the user controls are linked into a page. When you drop a user control onto a page, Web Matrix adds the following line at the top of the page:
<%@ Register TagPrefix="uc0" TagName="Header" src="/books/3/257/1/html/2/Header.ascx" %> This is only visible when you pick the All view from the editor, and it's this line that lets ASP.NET know which file the user control is using. This is worth mentioning because it allows you to understand how the control is named when it's used. If you think about the standard web controls, they are used like so:
<asp:TextBox ... /> <asp:Label ... />
The bit before the : is the prefix, and the bit after is the name. These are part of ASP.NET and so you don't need to tell the page where they come from. For user controls however, ASP.NET doesn't know where the control is, or what it should be called, so Web Matrix adds this line for us. This means that the control can be used on the page like so:
<uc0:Header runat="server"></uc0:Header> Here uc0 is the TagPrefix and Header the TagName. When you drop a user control onto a page, Web Matrix assigns a tag prefix for you, and the tag name is taken from the file name of the user control.
Making the Menu Dynamic
One limitation of this header control is that the menu is fixed. So if we wanted to change the menu we'd have to edit the header control itself. A far better way of implementing a menu is to use a data-bound control (such as a Repeater), and store the data elsewhere (such as a database or an XML file).
Try It Out—Making the Menu Dynamic
-
Add a new item to your code directory. Pick XML File from the template list, naming it menu.xml. Add the following to the file that appears:
<menuItems> <menuItem Title="The First Page" src="/books/3/257/1/html/2/page1.aspx" /> <menuItem Title="Another Page" src="/books/3/257/1/html/2/page2.aspx" /> <menuItem Title="Last but not least" src="/books/3/257/1/html/2/page3.aspx" /> </menuItems>
-
Save the file and close it.
-
Open Header.ascx and delete the hyperlinks (and the spaces between them).
-
Drag a Repeater control into their place.
-
Switch to HTML view and change the repeater code so it looks like:
<asp:Repeater runat="server"> <ItemTemplate> <asp:Hyperlink runat="server" NavigateUrl='<%# Container.DataItem("Src") %>'> <%# Container.DataItem("Title") %> </asp:Hyperlink> </ItemTemplate> <SeparatorTemplate> </SeparatorTemplate> </asp:Repeater>
Make sure you change the ID of the repeater control to Menubar.
-
Switch to All view, and add the following between the Register and Script parts:
<%@ import Namespace="System.Data" %>It should look like this:
<%@ Control Language="VB" %> <%@ import Namespace="System.Data" %> <script runat="server">
-
Switch to Code view and add the following:
Public Sub Page_Load(Sender As Object, E As EventArgs) Dim dsMenu As New DataSet() dsMenu.ReadXml(Server.MapPath("menu.xml")) MenuBar.DataSource = dsMenu MenuBar.DataBind() End Sub
-
Save the page and close it.
-
Open Page1.aspx and press F5 to run it. Notice how the menu now shows what's in the XML file:

The really important point about this is that if you want to change the menu you can do so easily by changing the menu structure in the XML file, without worrying that you might accidentally change something in the user control. The user control is really just an ASP.NET page so it can run code as well as just being a place to hold content. In the above example the Page_Load event is used to read the XML file containing the menu items, and use this data to fill the Repeater.
|
EAN: 2147483647
Pages: 141