Dealing with Text - Strings
|
Dealing with Text – Strings
Now that we've covered the basics of creating and accessing variables, it's time to move on to some specific types of variable. We'll start by looking at strings, the data type used for holding text, in more detail. The web is all about strings. Pages are mainly text. Even the special tags used for displaying pictures or changing the format of a page are text, although the user doesn't get to see it (we'll see some examples of this later in the chapter).
In a website you will probably declare more strings than any other data type. You'll also use lots of strings that you don't declare – for example a control's Text property is a string, and we've already used them a lot. Since strings are so important, the designers of Visual Basic .NET made working with them easy.
Defining a String
Whenever you place data into a string within your code, you must enclose it in quotation marks. This tells Visual Basic .NET which parts of your code are supposed to be names for variables, procedures, and so on, and which parts are literals – values that you actually type in when you are writing the program, such as numbers, dates, and text.
The following code:
Dim myName As String myName = "David"
means "Create a string variable called myName, and set it to David." myName is a variable, and can change. David is a literal, a string that has its value defined in the program code.
Now look at this code:
Dim myName As String myName = David
This means "Create a string variable called myName, and set it to the value of the variable called David." Since there are no quote marks, there is no way to tell that David is supposed to be a literal. If there is a string variable called David available, that's exactly what this will do, otherwise you will get a Name 'David' is not declared error message. Don't forget to open and close your strings with " and " marks. Sometimes, this even slips the mind of experienced programmers , and it's a frustratingly easy mistake to make!
If you want to put double-quotation marks " inside the string itself, you can. You just need to double them up, like this: "". So, a string assignment like this:
myString = "Hello, my name is ""Meryll Streep""." will result in the string Hello, my name is "Meryll Streep"..
| Note | The pair of double-quotes used in this way to represent a double-quote within a string is known as an escape character. We need it because the double-quote is a reserved character in Visual Basic .NET, used to mark the start and finish of a string. |
Joining Strings Together
We've already seen how to concatenate two strings using the + sign, even if it was accidentally on purpose! Most Visual Basic .NET programmers don't use + for joining strings because it's confusing to have two signs that do two different things (adding and joining). Instead, most programmers use the & sign:
myFullName = myFirstName & " " & myLastName This does the same thing to strings as the + operator, but is less ambiguous. By the way, when joining strings together, always remember to add spaces if you need them, as shown in the above example by adding " " into the string. This is another of those "easy to do, easy to forget" programming necessities.
Pulling Strings Apart
So much for joining strings together – we also often want to pull them apart. For example, we might want to get only the first three letters of a string, or we might want to break it down into smaller sections.
There are basically two ways to access parts of strings. The first is to get sections of the string by requesting specific characters based on their position within the string – for example, getting the first seven characters, or the last seven, or seven from the middle. The second is to split it into sections based on a particular character – for example, using the space character to split a string into individual words. Let's see an example of each.
Try It Out—Pulling Strings Apart by Number
In this example, we'll see how to get particular sub-sections of a string by expressing the positions of the range of characters that we are interested in.
-
Start a new page called Strings.aspx.
-
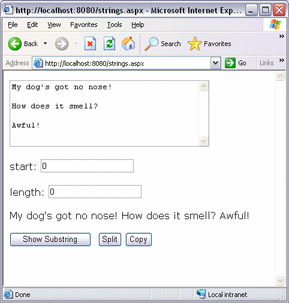
Drag a TextBox onto the page, then add a new line and type start: , and add another TextBox next to the prompt. Add another line, type length: , and add another TextBox. Finally on two separate lines, add a Label and a Button. You'll end up with this:
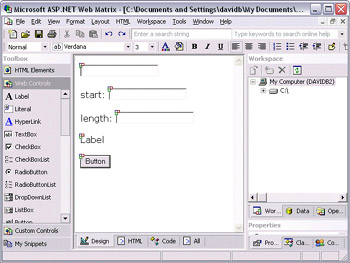
Set the TextMode property of the first TextBox to MultiLine, and make it a fair bit bigger than the default size. Set the Text property of the Button to Show Substring, and also clear the Text property of the Label control.
-
Now double-click the button, and add this code:
Sub Button1_Click(sender As Object, e As EventArgs) Dim fullString, subString As String Dim startPos, length As Integer startPos = CInt(TextBox2.Text) length = CInt(TextBox3.Text) fullString = TextBox1.Text subString = fullString.SubString(startPos, length) Label1.Text = subString End Sub
-
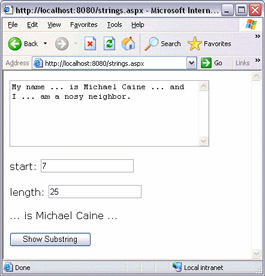
Press F5 to run the page, and then enter a sentence or two in the top textbox. Now enter a whole number into each of the other textboxes. The start number represents a position in the string where our substring will start. The length number represents how long our substring will be. You need to make sure that start plus length are not greater than the total length of the string in the box. When you click the button, you will see a subsection of the text you entered in the textbox:
How It Works
The number in the start box represents the starting point for the substring (with the very first character being zero). The second box represents the length that you want the substring to be. So the substring in the above screenshot starts at the 8th character position (because we're starting from zero), and carries on for 25 characters.
In the first couple of lines, we declare a pair of strings, and a pair of integers:
Dim fullString, subString As String Dim startPos, length As Integer
In the next two, we assign the values in the second two textboxes to our integer variables:
startPos = CInt(TextBox2.Text) length = CInt(TextBox3.Text)
As we saw in previous chapters, CInt() is a function that can convert a string to an integer – provided the string is actually a whole number within the acceptable range for an integer. (So if we enter something other than a whole number into one of these boxes, ASP.NET will detect the error, and throw an exception.)
| Note | We'll look at how to cope with exceptions and other errors in Chapter 7. |
The next line assigns the value in TextBox1 to our fullString variable:
fullString = TextBox1.Text
This next line is where the magic happens. All strings have a built-in method that takes two integers as arguments, and returns the substring according to those values. We assign this to subString:
subString = fullString.SubString(startPos, length)
Finally, we assign the subString variable to the Label1.Text property:
Label1.Text = subString End Sub
Often, it is not completely necessary to declare variables. To save space, we could have done all this on a single line – and not declared any variables at all:
Sub Button1_Click(sender As Object, e As EventArgs) Label1.Text = _ TextBox1.Text.SubString (CInt(TextBox2.Text), CInt(TextBox3.Text)) End Sub
This works just as well, in fact it will be a little faster, but it's a bit long and unwieldy. This is sufficient reason alone for declaring variables – they can dramatically increase the readability of your code, which is an advantage when you're forced to review your own work months down the line!
Try It Out—Splitting Strings
Often we don't want to access a particular numeric position in a string – we want to break it down into separate units, based on what it contains. For example we might want to break a full name like "Dave Sussman" into separate first and last names. We can do this by breaking the string into different substrings, based on where the space appears. Let's see how to do that now:
-
Keep the same file open, add a space after the button, and then add another button. Set its Text property to Split.
-
Double-click this button, and add the following code:
Sub Button2_Click(sender As Object, e As EventArgs) Dim myString As String Dim myWords As String() myString = TextBox1.Text myWords = myString.Split(" ".toCharArray()) ' Start bulleted list Label1.Text = "<ul>" Dim word As String For Each word in myWords Label1.Text = Label1.Text & "<li>" & word & "</li>" Next word ' End bulleted list Label1.Text = Label1.Text & "</ul>" End Sub
-
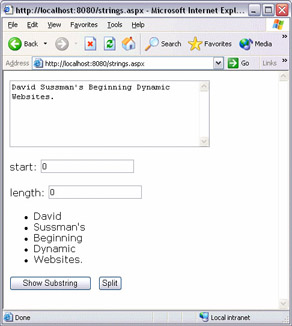
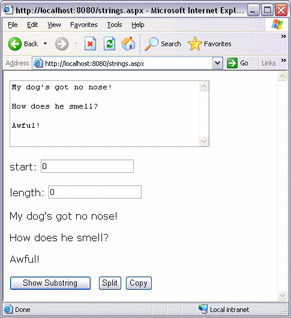
Run the page, put some words in to the box, and click the Split button. You should see a bulleted list of every word you entered:
How It Works
There's some new stuff going on here – and this example will take quite a bit of explanation. This is because we're using one language, Visual Basic .NET, to generate code for another language, HTML. The string that we end up passing to Label1.Text is actually something like:
<ul><li>Hello,</li><li>my</li><li>name</li><li>is</li><li>Meryll</li><li>Stre ep.</li><li>Please</li><li>leave</li><li>a</li><li>message</li><li>after</li> <li>the</li><li>beep!</li></ul>
but your web browser knows that the tags in the angle brackets represent bullets – so it displays a bulleted list. ul is short for "unordered list", and everything between <ul> and </ul> is therefore part of an unordered (meaning un-numbered) list. li is short for "list item", so everything between a <li> and </li> is a single item on that list.
This is HTML – if you look at the HTML tab for any page in Web Matrix, you will see a lot of stuff in angle brackets. Web Matrix makes it easy to avoid thinking about HTML, but if you're serious about web development you should definitely learn all about it.
This isn't the only new thing about this particular example, so let's take a proper look at the code. The first unusual line is this one:
Dim myWords As String()
When you have parentheses after the data type, this means that you want an array. An array is a single variable that contains many variables of the same type. We'll have a better look at arrays in the next chapter, but just remember that myWords is a single variable that can hold lots of strings. The next new line is this:
myWords = myString.Split(" ".toCharArray()) Strings have a Split() method that lets you split one string into a number of smaller strings, based on separator characters that you specify. To let you specify multiple separators, the Split() method takes an array of characters as an argument – that is, one variable made up of one or more individual Char (short for character) variables.
It just so happens that there's a very easy way to convert a string to an array of characters – the string has a ToCharArray() method, which will take a string of any length and convert it into an array of separate characters. For example, if you were to change the content of the string from " " to " /-\", the code would split words that were divided not only by spaces, but by slashes and dashes too.
We could split a string by any character or set of characters we wanted. The important thing is that these are individual characters – their order is not important in this case.
The last new thing in this example is a new kind of For loop. Remember, we now have an array of words – but we don't know how many words are in that array (because we don't know how many spaces there were in the string). We want to display every single word, so we want to loop through the array. The For Each loop is a very easy way to do this:
Dim word As String For Each word in myWords Label1.Text = Label1.Text & "<li>" & word & "</li>" Next word
In the above code, word is a String. Each time we go around the loop, the next item in myWords automatically gets assigned to word. We then add that word to our label, along with the additional tags needed for your browser to display a bullet.
| Note | We will look properly at For Each loops in the next chapter. |
Comparing Strings
We've played around with strings quite a bit now, but one of the most common things you'll want to do with strings is compare two or more of them to see if they're the same. There's a couple of ways we can do this – we could compare a string variable to a literal:
If emailAddress = "davidb@wrox.com" Then ' give the man a cigar End If or we could compare two string variables:
If emailAddress1 = emailAddress2 Then ' yep, this is the same person End If There is a complication here though. When you want to compare two strings to see if they match, the test is case-sensitive. This means that DavidB@Wrox.com does not equal davidb@wrox.com. In a lot of cases you would want them to be considered equal – after all, they will both work and end up sending e-mail to the same person because e-mail addresses themselves are not case-sensitive. The solution is to compare versions of the string that have been converted to all the same case. Let's have a go at that now.
Try It Out—Changing Case
-
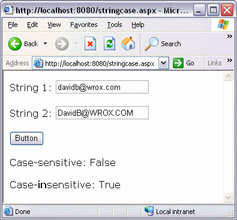
Create a new page called StringCase.aspx, and drag on a pair of textboxes, a button, and two labels, and add some text, so that your page looks like this:
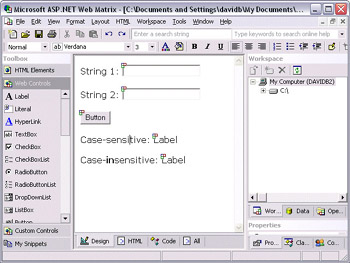
Note Similar to Microsoft Word, you can use the formatting bar to make any of your text bold, italicised, or underlined, and so on.
-
Double-click on the button, and add the following code:
Sub Button1_Click(sender As Object, e As EventArgs) Label1.Text = (TextBox1.Text = TextBox2.Text) Label2.Text = (TextBox1.Text.toUpper() = TextBox2.Text.toUpper()) End Sub
-
Run the page, and play around with different strings in each textbox. The top label will present the result of a normal (case-sensitive) comparison. The bottom one will present a case-insensitive one:
How It Works
The first line tests to see if TextBox1.Text and TextBox2.Text are equal, in both value and case. If they are, this expression is true – and we assign True to Label1.Text.
On the second line, we use the toUpper() method to get an uppercase version of TextBox1.Text and TextBox2.Text – this means that whatever case people have typed into the textbox, we're comparing an uppercase version. For example, if I type davidb@wrox.com in one box, and DavidB@Wrox.com in the other then the first line will make Label1.Text display False, but the second line ends up comparing DAVIDB@WROX.COM and DAVIDB@WROX.COM, so we get True displayed in Label2.Text.
We can also use toLower() to convert a string to all lowercase, which works in a similar way.
Strings on the Web
There are some problems with getting and displaying strings, which are specific to using strings on the Web. To really make use of strings, you need to understand how to get around these problems.
Try It Out—Copying Strings
-
Go back to Strings.aspx, and add one last button next to the others, and set the Text property to Copy. Double-click it and add the following line of code:
Sub Button3_Click(sender As Object, e As EventArgs) Label1.Text = TextBox1.Text End SubThis just means that whatever's typed into the top textbox gets copied to the label.
-
Now run the page using the usual method of pressing F5 or hitting the Start button to test the page out. Type in a few lines of text (and add some blank lines too). Now press the Copy button. It won't work quite as well as we hoped:
How It Works
Although we entered text on different lines, we ended up with everything displayed on one line in the label. This is irritating, but there's a very simple reason for it – web browsers ignore the normal carriage return character. Web browsers use <br/> for adding a new line. If we want to present text on different lines, we need to replace each normal carriage return with a <br/> tag. We'll do that now, using the Replace() method.
Try It Out—Using Replace()
-
Double-click the Copy button again in Web Matrix, and edit the code. You will need to change the line that we added before, modifying it to look like the following:
Sub Button3_Click(sender As Object, e As EventArgs) Label1.Text = TextBox1.Text.Replace(vbCrLf, "<br/>") End Sub -
Run the page again using the same joke as before and, as you will see, the results are much better:
How It Works
The key to this example is the Replace() method, which takes two strings as arguments – the first one is the string we want to remove, and the second one is the one we want to replace it with. It returns a copy of the string with the specified replacement:
Label1.Text = TextBox1.Text.Replace(vbCrLf, "<br/>")
In this case, we're replacing vbCrLf with <br/>. vbCrLf is the term Visual Basic .NET uses to refer to a 'normal' new line, and literally means "carriage return character followed by line feed character".
Of course, the Replace() method is useful in far more circumstances than replacing vbCrLf with <br/>, and can be used to replace any string with any other.
OK, now for another problem. HTML tags are based around angle brackets. If somebody types a < into our textbox, without a > afterwards, then the results can be messy, because the browser will attempt to interpret everything after the < bracket as HTML code. Try typing <a href=" or <!-- into the box for a particularly despicable result!
Fortunately, there is an easy way around this and you are about to see this in the next Try It Out.
Try It Out—Using HtmlEncode()
The method we use to get round the problem we just spoke about is HtmlEncode(). This takes normal text, and makes sure that it's suitable for displaying in a web page. Let's give that a try now.
-
Re-open the code for the Copy button and modify it to read like this – make sure you get all the brackets right!
Sub Button3_Click(sender As Object, e As EventArgs) Label1.Text = Server.HtmlEncode(TextBox1.Text).Replace(vbCrLf, "<br/>") End SubEnter your text into the box and whatever you type now should be accurately portrayed in the label below when you use the Copy button:

How It Works
This line is starting to get a little bit complex now, and we could break it down into simpler units by declaring variables. I wanted to show you a more complex line of code, though, because you won't be able to avoid seeing them forever, like this:
Label1.Text = Server.HtmlEncode(TextBox1.Text).Replace(vbCrLf, "<br/>")
First of all, TextBox1.Text is HTML-encoded. This means that angle brackets – and other special characters – are replaced with special codes so that your web browser displays them, rather than thinking that they are special instructions, and then getting confused. This is the meaning of:
Server.HtmlEncode(TextBox1.Text)
This special function (which is actually provided by the Server object) returns a string. Instead of assigning the string directly to a variable, we perform another method on it – this time replacing vbCrLf – the special Visual Basic .NET code for a carriage return, which we saw earlier, with "<br/>".
This in turn returns another string, so the whole expression to the right of the = sign is assigned to Label1.Text.
Instead of this line, we could have used:
Dim originalText, encodedText, replacedText As String originalText = TextBox1.Text encodedText = Server.HtmlEncode(TextBox1.Text) Label1.Text = encodedText.Replace(vbCrLf, "<br/>")
This is longer, but clearer.
You can also keep adding more Replace() method calls onto the end, and have quite a bit of fun with them. Try finding a smiley face picture, and then adding the following line to the end of the procedure:
Label1.Text = Label1.Text.Replace(":-)", "<img src='/books/3/257/1/html/2/mysmileyface.gif'>") where mysmileyface.gif is the name of your smiley picture.
| Important | As well as the Server.HtmlEncode() function, there is also Server.HtmlDecode(), which changes HTML-style text back into normal text. |
That's all the discussion of strings we need for now, but you'll be seeing more ways to play with strings as we work through the book. Now let's turn our attention to an altogether different type of data – numbers.
|
EAN: 2147483647
Pages: 141