Building an XML Web Document Template
The information needed to create a complete XML document that will work in an XML-compliant browser such as Internet Explorer 5 is presented over the course of several chapters in this book. We will begin in this chapter by building a well-formed XML document that will always default to standard HTML. Any browser can read this document. We will use XML Notepad to create an XML Web document using a simple user interface.
Using XML Notepad
XML Notepad enables us to focus on working with elements, attributes, and comments and to properly position them in the document structure. XML Notepad will handle the complexities of writing the XML document in a well-formed manner. In the section "The Final XML Document" later in this chapter, you'll find a review of the code created by XML Notepad. To create the initial document structure, follow these steps:
- To open XML Notepad, choose Program Files from the Start menu, and then choose Microsoft XML Notepad.
- XML Notepad will be displayed with a root element, which will contain all the other elements of the XML document. Every XML document must have a single root element to be well formed. Click on the root element (Root_Element), and rename it html.
- We will create two main child elements for our HTML document, body and head. Change the name of the default child element (Child_Element) to head.
- To add a second child element, click on head and choose Element from the Insert menu. Name the new child element body.
Figure 3-1 shows XML Notepad after you've made these changes.
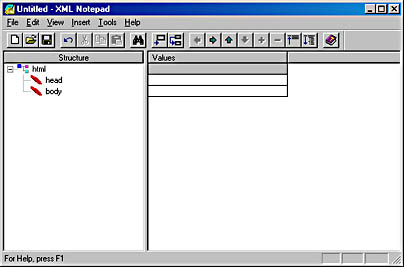
Figure 3-1. XML Notepad, showing the root element and two child elements.
In this example, we will build a simple help desk Web page that uses a table to properly place the page elements in the Web browser. The Web page is shown in Figure 3-2.
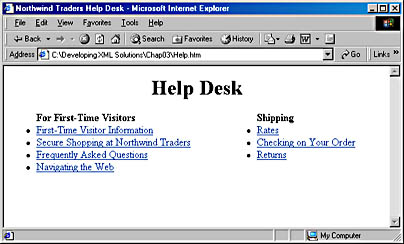
Figure 3-2. Sample help desk Web page.
The table consists of two rows and two columns, for a total of four table cells, as shown in Figure 3-3. Notice that the title spans the two columns in the first row.
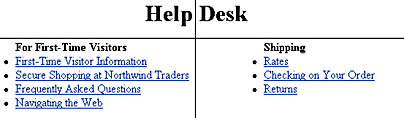
Figure 3-3. The four table cells.
In the following section, we'll create a generic template for producing Web pages that follow this design. These pages will use tables for formatting text and lists for presenting information.
The head Section
To complete the head element, follow these steps:
- To add a child element to the head section, click on the head element and choose Child Element from the Insert menu. Name the new child element title.
- To add another child element, click on title and choose Element from the Insert menu. Name this element base.
- In HTML, the base element has an attribute named target. The target attribute defines the default page to which a link will go when no link is specified in an a element. To add an attribute to this element, click on base and choose Attribute from the Insert menu. Name the attribute target.
- Choose Source from the View menu to display the source code, shown in Figure 3-5.
The completed head element is shown in Figure 3-4.
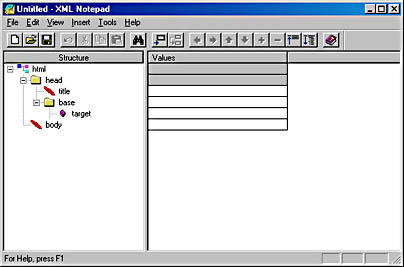
Figure 3-4. The completed head element in XML Notepad.
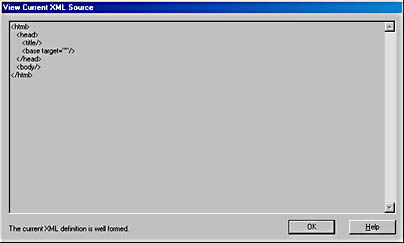
Figure 3-5. Source code for the completed head element.
As you can see, this source code looks a lot like HTML. This document meets the requirements for a well-formed XML document, but it can also be used as an HTML document with a little work. Three of the elements are empty elements: <title/>, <base target=""/>, and <body/>. XML uses the singleton format to denote an empty element, which is not recognized by HTML. To modify these elements so that HTML Web browsers can read them, they should be written as follows:
<title></title> <base target=""></base> <body></body> |
We could leave the title and body elements as singletons since a Web browser reading this as an HTML document will simply ignore them. However, we don't want a Web browser to ignore the empty base element because it has the target attribute associated with it. The base element is supposed to be empty because it exists only as a container for its target attribute. We should change the base element to <base target=""></base>, but this cannot be done in XML Notepad. If you edit the document in a regular text editor and change this element, XML Notepad will change it back to the singleton when it reads the file.
We can prevent XML Notepad from converting the element back to a singleton by adding a comment to the element. To do so, click on base and choose Comment from the Insert menu, and then add the following comment value in the right pane of XML Notepad:
Default link for page |
The source code will now look as follows:
<base target=""><!--Default link for page--></base> |
This added comment solves the empty element problem without having to resort to any ugly hacks.
These problems are caused by the fact that HTML doesn't understand singletons. You will encounter these difficulties when you XMLize currently existing HTML document structures.
The body Section
Now that we have completed the head section, we can next make the body section. The body section will contain the information that will be displayed in the browser. To complete the body element, follow these steps:
- Add the following attributes to the body element: text, bgcolor, link, alink, and vlink. Then add the following child elements: basefont, a, and table.
- Click on vlink, and add the following comment below the attribute:
Default display colors for entire body |
Figure 3-6 shows the modified body element.

Figure 3-6. The body element, with attributes and elements added.
Completing the basefont element
To complete the basefont element, you need to add a size attribute and the following comment:
Size is default font size for body; values should be 1 through 7 (3 is usual browser default). |
Once again, the comment solves the problem of the empty tag.
NOTE
Although we have placed constraints on the possible values for size, you will not be able to verify whether the correct values are used unless you create a DTD. You'll learn how to do this in Chapter 4.
Completing the a element
This a element will act as an anchor for the top of the page. Add the following attributes to the a element: name, href, and target, and then add the following comment to the name attribute:
Anchor for top of page |
Completing the table element
To complete the table element, follow these steps:
- Add the following attributes to the table element: border, frame, rules, width, align, cellspacing, and cellpadding. Add the following comment below cellpadding:
- Next you will need to add a tr child element to the table element to create rows for the table. The result is shown in Figure 3-7.
- Add the following attributes to the tr element: align, valign, and bgcolor.
- Add a td child element to the tr element. The td element represents a table cell. Each cell will contain the content that will go into the Web page.
- Add the following attributes to the td element: rowspan, colspan, align, valign, and bgcolor. Then add the following comments:
Rules/frame is used with border. |
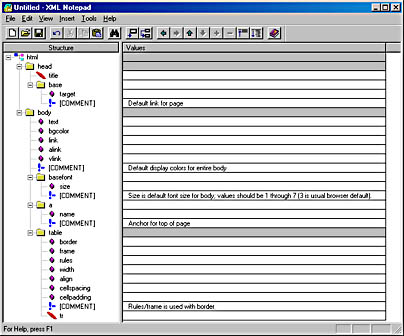
Figure 3-7. Adding a tr element to the table element.
Either rowspan or colspan can be used, but not both. Valign: top, bottom, middle |
Next we will add a child element to td named CellContent. CellContent is not recognized by HTML, so HTML Web browsers will ignore the tag. We will use CellContent to identify the type of information being stored in the cell. This information can be used later by applications to help identify the content in the Web site.
The CellContent element will contain a series of tags that can be used as a template to create the content that will go into the cell. To keep things organized, h1, h2, h3, and h4 headers could be used. To keep this example simple, we will use only an h1 child element. Below each header will be a paragraph. Within the paragraph will be a series of elements that can be arranged as necessary to build the cell.
Completing the CellContent element
To complete the CellContent element, follow these steps:
- Add an attribute named cellname below the CellContent element.
- Add an h1 child element to the CellContent element, and add an align attribute to the h1 element.
- Add a p child element to the CellContent element, and add an align attribute to the p element. Add the following comments to the p element:
- Add the following child elements to the p element: font, font, img, br, a, ul, and ol. Two font elements are needed because one will be used to create sections of text that are marked to be displayed in a different font than the default font and one will be used with the b element to display any content within the b tags in boldface.
- Click on p, and then choose Text from the Insert menu to create an object that you can use for adding content to the p element.
- In the first font element, add the following attributes: face, color, and size. In the second font element, add the same attributes and a b child element.
- In the img element, add the following attributes: src, border, alt, width, height, lowsrc, align, hspace, and vspace. Add the following comments after vspace:
- The br element prevents text wrapping around images. Add an attribute to the br element named clear. Add the following comment after the clear attribute:
- Add a type attribute to the ul element, and add the following comment:
- To create text that appears in boldface at the top of the list as a heading, click on the font element that contains the b element, and choose Copy from the Edit menu. Click on the ul element, and then choose Paste from the Edit menu. Next add an li child element to the ul element. An li element represents an item in the list. Copy the font element that does not contain the b element into the li element. Copy the a element into the li element. Add a text object to the li element.
- Finally, add the following attributes to the ol element: type and start. Add the following comment:
- Copy the font element that contains the b element from the p element into the ol element. Copy the li element from the ul element into the ol element.
All of the elements below can be used in any order within the p element. You must remove the li elements from ul and ol if they are not used. |
Border is thickness in pixels. Align = right, left The hspace and vspace attributes represent padding between image and text in pixels. |
Clear = left, right, all; used to prevent text wrapping around an image |
Figure 3-8 shows what the structure of your XML document should look like at this point.
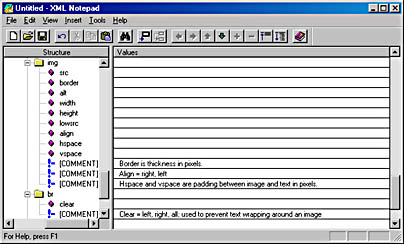
Figure 3-8. The structure of the img and br elements.
Type: circle, square, disk |
Type: A for caps, a for lowercase, I for capital roman numerals, i for lowercase roman numerals, 1 for numeric |
Figure 3-9 shows the completed CellContent element.
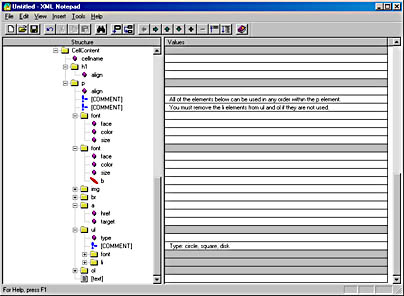
Figure 3-9. XML Notepad, showing the CellContent element.
NOTE
Several elements in Figure 3-9, such as the img and br elements, are collapsed.
You have now created a basic XML template that can be used to build Web pages. In the next section, we will build a Web help page using this XML document.
EAN: 2147483647
Pages: 115