Chapter 8: Expressions
Expressions are one area of Maya that most people will readily agree requires knowledge of MEL to fully exploit. Yet, by and large, many people who use expressions daily do not, in fact, fully exploit the fact that expressions are scripts that evaluate during run time. Our project both shows expressions in their more mundane use, but also in a somewhat more exciting manner, creating a very limited AI routine.
Project 8.1: It s a Sine of the Time
Project Overview
Expressions are extraordinarily useful for creating procedural animation, not only in the sense of adding automated follow through or secondary motion to an animated character, but also to create motion.
Our task is to create a small flying ball, with a silvery shell, with rapidly flapping wings. We will use an expression to automate the wings, but still keep them under animator control.
Definition and Design
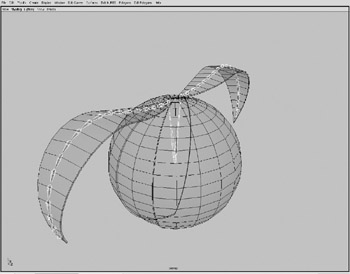
The design for our flying ball is seen in Figure 8.1, which is a simple design, but suits our purposes well.
Figure 8.1: The flying ball.
The two wings will simply open and close, creating a flapping effect.
| On the CD | This file is found on the companion CD-ROM as /project_05/flappingBall01.mb |
Implementation
First, open the model and adjust the pivots of the wings, as seen in Figure 8.2.
Figure 8.2: Moving the wing pivot points into position.
On select either wing, and right-click on the Rotate Z channel label in the Channel box, selecting Expressions from the menu that appears. By default, this brings up the Expression Editor, but Maya can be configured to use an external editor to edit expressions. The Maya Expression Editor is seen in Figure 8.3, page 222.

Figure 8.3: The Expression Editor window.
| Note | We can also access the Expression Editor from Windows>Animation Editors>Expression Editor. |
We should now ensure that the wing object, and the Rotate Z channel, are highlighted in their appropriate sections. This guarantees that if we use any of the shorthand assignment statements in the expression, they are properly converted to reference the object.
We now enter in our first iteration of the expression. See Example 8.1.
Example 8.1: Adding a sine wave to the rotation Z channel.
rz = sin(time);
We then click the Create button. Depending on which wing object you selected, the expression text expands to something like what appears in Example 8.2.
Example 8.2: The expression expands to the full attribute name .
wing01.rotateZ = sin(time);
What we have done is use a mathematical function, sine, and used one of two variables available to expressions, time . The time variable returns the global animation time, regardless of frame format. For example, if you were at frame 36, and operating at 24 frames per second (fps), the time variable would return a value of 1.5. However, if the user environment is set to 60 fps, it returns a value of 0.6 if, again, we are at frame 36. Because the sine mathematical function always returns a value that varies between “1.0 and 1.0, we get an undulating value, known as a sine wave, which is easily visualized in the Graph Editor by selecting Show>View Results, as seen in Figure 8.4.
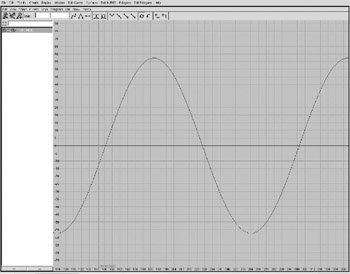
Figure 8.4: The Graph Editor shows the sine wave results.
If we play the animation, the wing flaps, but at a very slow pace, and not very much. To increase the flapping speed, we multiply the time variable by an arbitrary value. See Example 8.3.
Example 8.3: Modifying the flap time.
wing01.rotateZ = sin( 10 * time );
This speeds up the flapping of the wings, but the current methodology does nothing to add in easy tweaking of the value by the animator, as well as the possibility of animating it. Therefore, we add a dynamic float attribute to the main group , called flapIntensity as seen in Figure 8.5.
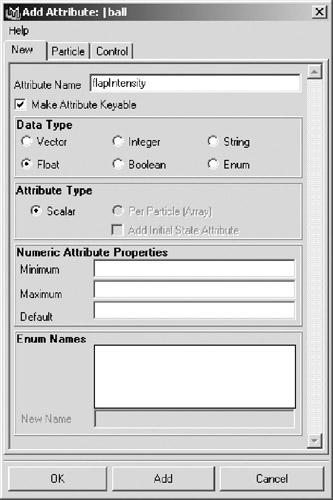
Figure 8.5: Adding a dynamic attribute.
We can now use this attribute, even though it is on another object, in our expression. See Example 8.4.
Example 8.4: Bringing dynamic attributes into our evaluation.
wing01.rotateZ = sin( ball.flapIntensity * time );
| On the CD | This file is found on the companion CD-ROM as /project_05/flappingBall02.mb. |
Next , to increase the amount the wings open and close with each flap, we will determine a good maximum amount for the wings to open. This can be anything that looks good. Here, we ll use 50 . If we multiply the value returned by our sine operation by that value, we can increase the flapping amount. See Example 8.5.
Example 8.5: Increasing the flap of the wings.
rz = ((sin(flapIntensity * time))*50);
Now, if we press play and see the results, the flapping is increased, but the wing passes through the body. Because the sine value goes into the negative, so does the resulting rotation value.
Also notice that the wing currently has a 100 range of motion. To counter both these problems, we will alter the expression to generate a value between “25 and 25, then add 25 to that value, resulting in a value between 0 and 50. See Example 8.6.
Example 8.6: Altering the axis of motion.
rz =(((sin(flapIntensity*time))*25)+25);
Now, we can add the working expression to the other wing, changing the appropriate object names . While it works, it is not very appealing visually.
To give the wings a more organic appearance, we will modify the setup to create skinned wings. This setup is seen in Figure 8.6.
Figure 8.6: The ball with a skeleton controlling its deformation.
| On the CD | This file is found on the companion CD-ROM as /project_05/flappingBall03.mb. driven key |
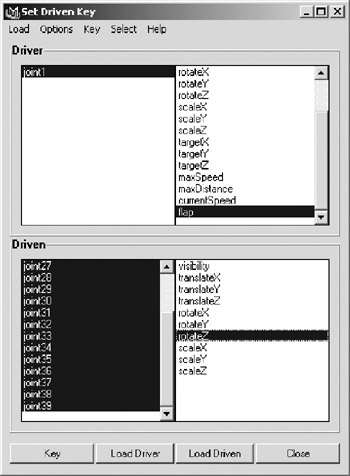
Figure 8.7: Creating a driven key animation.
While we could put an expression in each of the skeletal joints rotate Z channels, we would have very little control over the look of the animated wings. Instead, we use a driven key to get control over the look of the flapping animation. To make our job easier, the dynamic float attribute that controls the driven keys will have a minimum value of “1 and a maximum of 1. After adding the attribute flap, we create a driven key animation of the wings flapping, as seen in Figure 8.7.
Now as the attribute flap progresses from “1 to 1, the wings flap up. As the attribute goes from 1 back to “1, the wings flap down.
| On the CD | This file is found on the companion CD-ROM as /project_05/flappingBall04.mb. |
We can now add the flapIntensity attribute to the root, and add the expression we used in the rigid wing version. We add the expression to the flap attribute, having it control the animation of the flap attribute. See Example 8.7.
Example 8.7: Using the dynamic attributes in our soft skinned version.
flap = sin(flapIntensity*time);
Now, as time changes during playback, the attribute flap driving the keys updates, so the animation plays, all automatically. The flapIntensity attribute can also be animated, and the expression will take this animation into account.
Now that the wing motion is complete, we can animate the ball flying about by hand. However, what about animating the motion of the ball itself with an expression? Is it possible to embed intelligent behavior in an object with an expression? Of course. The level of intelligence is, of course, somewhat limited by the intelligence of the programmer (in this case, the author), so ours won t be overly intelligent . So, we ll be creating something akin to Artificial Stupidity.
Our goal is to create a routine wherein the ball will randomly move about. Because a single expression can drive multiple channels, we will be putting all of the following into a single expression.
In the Expression Editor, with the skeletal root active, create an expression to randomly assign a value between 0 and 10 to each of the translation channels. See Example 8.8.
Example 8.8: Bringing random values into the expression.
tx = rand(10); ty = rand(10); tz = rand(10);
Playing this back shows us the rather erratic results. We want the motion to be erratic, but not insane. Because the expression generates a new random value at every frame, the position from one frame to the next has no relation to each other.
What we want to do is have the expression randomly determine a position, then move to that position over the course of a few frames, and then repeat the process.
The first thing the expression needs to do is to find its current position. Unlike in MEL scripts, in order to get the value of an attribute, and assign it to a variable, we make a simple assignment. Using the getAttr command will actually slow the expression evaluation down and could cause errors. We will assign the position to a vector attribute, to aid in further mathematical functions. See Example 8.9.
Example 8.9: Assignment of variable values in an expression.
vector $currLocation = << tx, ty, tz >>;
Once we have that, we can move on to picking a direction. We will use the rand() function to generate random components of a vector. See Example 8.10.
Example 8.10: Randomizing a direction.
float $x = rand(-1,1); float $y = rand(-1,1); float $z = rand(-1,1); vector $direction = << $x, $y, $z >>;
We can then unitize the vector easily, using the unit() function. At the same time, we can optimize the vector creation, by putting the rand() functions directly in the vector assignment. See Example 8.11.
Example 8.11: Unitizing the vector.
vector $direction = unit(<<rand(-1,1),rand(-1,1),rand(-1,1)>>);
Now that we have a direction, we can pick a point along that vector as our destination point. While we could put the parameter directly in the expression, we will add a Dynamic attribute to the root joint, called maxDistance . We can now determine our target simply by finding a random number between 0 and that maximum distance. See Example 8.12.
Example 8.12: Finding the point we want to travel to.
vector $target = ($direction * rand(maxDistance))
We could theoretically add a minimum distance attribute as well, but we have chosen not to.
We could pass values around from one frame to the next; instead, we will use Dynamic attributes added to the root node, targetX , targetY , and targetZ . Then we can assign the randomly generated target position to those attributes. See Example 8.13.
Example 8.13: Storing values on dynamic attributes.
targetX = ($target.x); targetY = ($target.y); targetZ = ($target.z);
Because we want this motion to be erratic, we can also randomly generate a speed at which the ball will travel. Again, we use two dynamic attributes, maxSpeed and currentSpeed . We will limit the minimum possible speed to 0.1 to prevent the possible speed being an infinitely small number, like 0.0003, which would bring the animation to a near halt. See Example 8.14.
Example 8.14: Setting the speed of our object.
currentSpeed = rand(.1,maxSpeed);
In order to determine the new position, we take the vector defined by the difference between our current position and the target location. We unitize that vector, and multiply it times our current speed, giving us the offset position the ball will travel to in one frame of the animation. We can take that result and add it to the current position, and then assign that to the three translation channels. See Example 8.15.
Example 8.15: Determining the new position.
vector $newPos = ((unit($target-$currLocation)*currentSpeed) + $currLocation ); tx = $newPos.x; ty = $newPos.y; tz = $newPos.z;
Right now, the expression is evaluating everything at every frame. We will set up an initialization routine, using an if statement. We will set it so we initialize the values at frame 0. See Example 8.16.
Example 8.16: Adding an initializing element.
vector $target = << targetX, targetY, targetZ >>; vector $currLocation = << tx, ty, tz >>; if (frame==0) { vector $direction = unit(<<rand(-1,1),rand(-1,1),rand(-1,1)>>); $target = ( $direction * rand(maxDistance)); targetX = ($target.x); targetY = ($target.y); targetZ = ($target.z); currentSpeed = rand(.1,maxSpeed); } vector $newPos = ((unit($target-$currLocation)*currentSpeed) + $currLocation ); tx = $newPos.x; ty = $newPos.y; tz = $newPos.z; Now, when the animation plays, the ball travels along a random vector, but overshoots its target position. We will alter the initialization routine to re-evaluate when the ball reaches the target position. The likelihood of landing directly on the target position is low, so we will use the mag() function to check if the ball s position is closer to the target than the distance defined by the currentSpeed attribute. We also will continue to reinitialize at frame 0. See Example 8.17.
Example 8.17: Now reevaluate when the target position is reached.
vector $target = << targetX, targetY, targetZ >>; vector $currLocation = << tx, ty, tz >>; if (mag($target-$currLocation)<currentSpeedframe==0) { vector $direction = unit(<<rand(-1,1),rand(-1,1),rand(-1,1)>>); $target = ( $direction * rand(maxDistance)); targetX = ($target.x); targetY = ($target.y); targetZ = ($target.z); currentSpeed = rand(.1,maxSpeed); } ((unit($target-$currLocation)*currentSpeed) + $currLocation ); tx = $newPos.x; ty = $newPos.y; tz = $newPos.z; | On the CD | This file is found on the companion CD-ROM as /project_05/flappingBall05.mb. |
With this, the behavior of the ball is suitably erratic, and we can call it finished.
Project Conclusion and Review
In this project, we saw the power of expressions. Expressions create animation based on the ever-changing attributes of objects in the scene. Often used simply to connect attributes or implement simple repetitive motion, we saw how combining expressions and Driven Keys can add complexity to a repetitive motion. We also saw how simple behaviors can be implemented using expressions. Our example behaved erratically, but by putting simple conditional statements into that expression, we could keep the target within a given distance of another object, or limit the new direction to be within a certain angle of the previous vector.
EAN: 2147483647
Pages: 101