The Scripting Process
It is important to realize that the pre-production process is as vital to a well- constructed script as it is to a well-built art asset. An animator would never sit down to work on a complex shot without storyboards, thumbnails, or both. A modeler would never begin a sculpture of an important character or item without a model sheet or a portfolio full of production sketches . Scripting is the same. While we often do the scripting equivalent of sketching, playing things by ear, this process just doesn t work with more complex tools. The analogies made were chosen for a reason. In art, there are occasions when we do not have an extensive pre-production. Perhaps the director needs a quick reaction shot of a character, or wants to digitally insert an object into the background. With MEL, it s much the same. Perhaps all that is needed is a shelf button to do a simple three- or four-step process, like triangulating 400 objects, putting them in a specific layer, and then saving the file. This use of MEL, while still very useful and can technically be called scripting, is not what we mean when we refer to a script.
So what does the word script apply to? When we speak of a script, we are referring to a tool that is either a multifunction , multipurpose item, or a tool that serves a very specific purpose but requires the structures a script provides. The complexity of the proposed action plays no relevance in whether to make it an actual script, and some of the more useful scripts can actually be surprisingly short. What makes a script a script is the action existing as a self-contained file containing a global procedure of the same name .
The process of creating a script is similar to creating any computer program. Every script, every program, begins with a problem. This can either be an actual problem, such as the need for a custom file exporter, or a new approach to doing an everyday task. Many users turn to scripting not to create wholly new functionality, but to realize tools that other software implements that Maya does not include in its base package. Whether it is something as simple as a way to automatically hide cameras or as complex as a subdivision surface modeling system, the process for creating any script is the same.
The process for creating a script can be broken down into four basic steps:
-
Definition and vision.
-
Research and development.
-
Design and implementation.
-
Bug-fixing and refinement.
Definition and Vision
We start the scripting process by defining what we want to accomplish with the tool. This definition process most often begins by setting goals for our script and asking ourselves , or the members of the production for which we are creating the tool, what the tool needs to do. There are some basic questions that should be asked at the outset of this design process.
Form Follows Function
The American architect Henri Sullivan was famous for promoting the concept that a building s form is defined by its function, Although this idea was popularized by more famous designers later in the twentieth century, such as Frank Lloyd Wright and Mies Van Der Roe, it was Sullivan who originated the concept of stripping away unnecessary elements and making a building s design fit its purpose rather than designing a building simply to be, regardless of what the building will be used for. This basic tenet also applies to programming. When designing a script, simplicity is key. By stripping away the extra elements, we can concentrate on keeping the core functionality both efficient and flexible.
To begin a script, we first begin by setting an overall design goal. What is the main function of our tool? Most tools can be put into one of the following categories, with some examples for each:
-
Data I/O
-
Motion capture data import
-
Proprietary game data export
-
Scene meta-data for production tracking
-
Geometry creation/modification
-
Custom primitives
-
Third-party renderer specific data type (e.g., RenderMan sub- divisional surfaces)
-
Modeling tools not offered in the base package
-
Animation tools
-
Muscle simulators
-
Rigging/setup controls
-
Crowd AI behavior
-
Lighting /rendering tools
-
Automatic creation of common complex Shader setups
-
Pre- and post-render effects
-
Making calls to third-party renderers
-
Dynamics
-
Custom particle behavior
-
Cloth simulation
-
User interface customization
-
Custom character controls
-
Removal of invalid Maya commands (e.g., removing the creation of NURBs surfaces at a game development studio)
-
UIs for a tool
While occasionally a random tool will fall outside these basic types, it is rare. The purpose for classification is to guide the scripter in planning his work. Once the script type is determined, we have a basic structure of questions that need to be asked.
At this point, all that exists of our script is our problem. We now decide how to solve this problem. This is a simple matter of brainstorming. At this point, it is important to remember there is no such thing as a bad idea. Some ideas are better than others, but every idea should at least be explored. Invest in a good whiteboard, some dry erase markers, and a good source of caffeine . Try not to go into this process with any preconceived notions. Occasionally, the goal seems to define the solution, such as an importer for a specific file type, but often this step requires some creative thinking. Good questions to ask are:
-
If it were possible, how would this process be done by a person?
-
Are there any existing tools that are similar that can serve as a template?
-
Is this functionality already provided in Maya, but is hidden?
Before we explore the validity of any of these possible solutions, three questions should be answered that will help us determine which is the best solution to pursue .
-
Who needs this tool?
-
When is the tool needed?
-
What is the importance of the tool?
The answers to these three questions will guide us in many of our upcoming decisions. The answers actually overlap in determining where our resources need to be spent during the creation of our tool. There are no hard-and-fast rules, no magic formula, because it is such a nebulous process. For example, while most artists like working with clever user interfaces, if a tool is being created to accomplish a single effect, it is most likely not worth the effort to create a UI. However, if that one effect is likely to go through 500 iterations and is the big money shot of the show, the time spent adding a UI might no longer be considered a waste. Another common situation is where a tool is needed immediately, but will be used throughout the entire 18-month production cycle. Therefore, a first iteration of a tool might not have all the usability bells and whistles, but later versions might add such things as a UI, saved preferences, and so forth.
Research and Development
With the basic elements of our script design in place, we can move into what is often the most challenging aspect of scripting for non-programmers ”research and development. This is the point in the process that most often acts as a stumbling block for artists trying to get into scripting.
Often, this step involves opening up those scary math or physics books. Since we gained a basic understanding of math in Chapter 2, A Primer on Mathematics, and since all physics we deal with in computer graphics is an implementation of mathematics, we can now tackle this step with confidence.
If the proposed tool does require mathematics or physics, we need to make sure we have all the equations needed to accomplish the goal on hand. Many of the operations we covered in Chapter 2 exist as commands in MEL; for example, calculating dot products and cross products. However, by having an understanding of how they work, we can perhaps use them in a way not intended. We might even stumble onto some new mathematical proof not yet discovered . While that might sound ridiculous, we should remember that Albert Einstein was a clerk in the patent office before going on to discover that whole Theory of Relativity thing.
Another great source for effective math and physics routines to solve our computer graphics problems are the proceedings from the AMC SIGGRAPH and the Game Developers Conferences. More and more, the papers at these conferences serve as simple abstracts to protect the intellectual property of the studios or software developers who originated the research, but many universities still publish extensive treatises on advanced concepts. Even the papers that do not publish the complete algorithms used can generate and inspire new ideas, and help us come to a viable solution.
Making Decisions Based on Acquired Research
Once all the research has been accumulated , we can realistically evaluate our possible solutions generated during the definition stage. At this point, we evaluate each possibility based on the balance of two qualities:
-
How easy is this solution to implement?
-
How effective and efficient is this solution computationally ?
The importance of the answers to these two questions is modulated by the requirements of the project. If the tool is needed immediately, picking a solution that can be implemented quickly, even if it takes the programmatic equivalent of the scenic route, can be beneficial. On the other hand, if this is a tool that will be used by 25 artists, each using it 100 times a day, creating a solution that manipulates our data in two minutes as opposed to six minutes adds up to significant time savings. In fact, that previous example would save an astounding 166 man-hours a day. Considering the salaries paid to artists, that is a significant monetary cost. Faster tools also allow us to do more iterations, if for example, our tool is a dynamic solver, as in the case of a cloth simulator. More iterations mean we less frequently have to settle for something good enough. and get something that s just right.
At this point of our script building process, we have nearly finished the research and development process. We have all the mathematical formulas at our fingertips, have decided which of the possible processes we will pursue, and have at least a rudimentary idea of the form the final script will take.
Design and Implementation
The design and implementation step is where the script comes into existence. Before we sit down at our computer to create the actual script file, we have to complete the final design of our script. Many programmers, both the traditional code writers and MEL scripters alike, neglect to do any planning when creating tools. This is hubris and folly. A good plan of attack is essential to creating efficient tools, and key to that planning is the flowchart .
The Flowchart
A flowchart is a diagram that defines each action that takes place within a script. More than a simple listing of parts , the flowchart helps to visualize how each action relates to each other action. The creation of the flowchart can be a very educational experience both in regard to what MEL commands will be needed and how data will be passed around the script. How elaborate a flowchart needs to be is determined more by the programmer than the program itself.
Some programmers prefer to just list out different areas of the script, while others create elaborate poster- size diagrams complete with colored lines, small passages of code written out, and so forth. In fact, there are entire programs that exist just to create flowcharts. One such program, OmniGraffle, was used in the creation of all the charts in this book. Note that OmniGraffle is a Macintosh-only program.
Throughout this book, we will take something of a middle-ground approach, providing a complete picture of the structure of a script, but without an overly extensive pre-writing of the script. A flowchart example is seen in Flowchart 5.1.
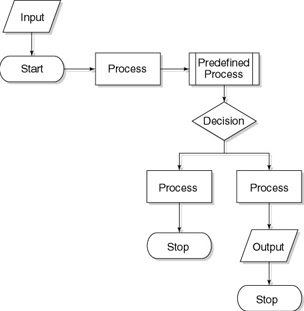
Flowchart 5.1: What a typical flowchart looks like.
Multiple Procedures
Often, when writing scripts, the same action is used multiple times, but not in a way that can use one of the many types of looping commands available within MEL. While a scripter can choose to simply write the action again, or more likely cut and paste the lines of code, a more elegant way is to have that action as a separate procedure.
Before we go any further, we will add a new term to our vocabulary, one that doesn t exist within the standard MEL manual, but does exist within C and C++ programming, and that is the function . In this book, we will occasionally use the label of function, and their use, which is termed a function call , to refer to a non-global procedure. The term function is used in a slightly different way in other languages, but it is simpler to use a familiar term than to invent some new word. It is also for issues of clarity, or we would be using the term procedure so often that confusion could reign.
Now that we have our terminology issues cleared up, we should discuss why and how we split up a script into separate procedures and functions. The why is threefold.
The first is for memory usage reasons. It is important to realize that when a script file is sourced, through either the first execution of a script or by explicitly sourcing it, Maya stores all the global procedures it encounters within that file, not just the one with the same name as the script. While almost every workstation running Maya is equipped with ample amounts of RAM, almost every artist always seems to use up every available kilobyte of RAM, and then some, leading to the inevitable paging and hence a slowdown in operation. In some cases, lack of RAM can even cause Maya or the entire OS to crash. Obviously, everything the scripter can do to minimize the memory usage of a script is important. Structuring large scripts so that a large majority of their functionality is not held in global procedures can put a little less strain on the resources of a workstation.
The second reason to cut one procedure into separate pieces is that it makes writing scripts much more manageable. By taking different parts of the script and splitting them up according to their function, we make the process of writing, and more importantly debugging, scripts much easier. If, for example, when the script is executed, it crashes when sorting our selection into different object types, we know exactly which procedure or function to check for errors. While stack tracing with line numbers helps to find errors, by splitting different actions into separate functions, the errors reported by stack trace are easier to find. Later in this chapter, we discuss the activities of debugging and bulletproofing scripts.
The last of the big reasons to split some actions off is for efficiency in the production of the script itself. If within a script we find ourselves doing the same, or so similar it can be adapted to be the same, action specific to the script multiple times within a script, it is best to place that as a function within that script file itself. However, what often happens is that some functions have such a universal utility that it can be worthwhile to split these procedures off to their own global functions, which allows them to be called from multiple unrelated scripts. Looking through the functions in the MEL command list, some of the more useful ones dealing with manipulating variable data such as stringArrayContecate are actually scripts rather than true commands. Creating these same types of tools are a perfectly valid way to split up scripts, but an important part of splitting scripts up this way meant for distribution is to co-ordinate the distribution of the utility scripts as well. For this reason, if scripts are meant for dissemination to the public, it is important to be sure that the names of procedures and script names are not too generalized.
There are different ways we can approach splitting a script up and adding those pieces as separate functions. The first is to split off sections of code that constitute a complete action and place these functions in the same script file, being sure to place them before the global procedure and before any other functions that need to make call to that function.
The second choice is to convert these into their own individual global procedures. For very specific actions, this is not a good choice, as it simply adds to the memory footprint of a script s components and adds complication to maintaining a tool. However, if we were to create a utility script, such as to return only the base name of an object regardless of its path , then that could be worthy of its own tool.
The final choice is to create a utility script with functions within it, to carry out specific operations. This is a great technique for easy programming; rather than having to remember the names of a multitude of various scripts and maintain a vast library of scripts, it is a simple matter of compiling scripts structured around common themes. For example, imagine that two utilities are needed; the first, the aforementioned tool to get the base name of an object, the other to get the full path name of an object. While it is possible to create separate utilities for each, it would also be possible to create a utility simply called returnName that we could pass arguments, such as returnName -base or returnName “path . Creating and using scripts that serve a utilitarian purpose make the job of scripting easier, faster, and less likely to have bugs .
EAN: 2147483647
Pages: 101