Creating Macros
The easiest and quickest way to create a macro, especially one that will be used to automate a lengthy series of steps, is to record the steps that make up a task. Recording a macro is just what it sounds like: Start the macro recorder, perform the series of actions you want the macro to do, and then stop the recorder. In most cases, there's no need to edit the VBA code generated by the recorder.
| Cross-References | For more information about creating macros by writing VBA code directly, including how to edit macros, see Chapter 31, "Writing Microsoft Project Code with Visual Basic for Applications." |
Understanding the Record Macro Dialog Box
Before you can record a macro, you must first get your project environment ready for recording by setting the conditions that are required for the steps in the macro to occur. Such conditions might include something obvious such as opening a particular project, but can also include steps such as selecting a certain task or resource. You should also have a clear plan for what you want to record; any mistakes you make while the macro recorder is running will be included in the macro. Now you're ready to begin recording.
Click Tools, Macro, Record New Macro. The Record Macro dialog box appears (see Figure 27-1), in which you can enter information about the macro (such as a name and a description) and assign it a shortcut key.
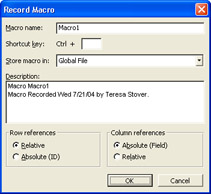
Figure 27-1: The decisions you make in the Record Macro dialog box determine not only when you can use a macro, but also aspects of how it will behave when it runs.
| Cross-References | For more information about assigning keyboard shortcuts to macros, see "Creating Keyboard Shortcuts" later in this chapter. |
There are three settings in the Record Macro dialog box that are even more important than the name of the macro or the keyboard shortcut you might use to run it:
Store Macro In. Use the choices in the drop-down list to specify where the macro will be stored. If you choose This Project, the macro is stored in the file with the project that is currently open and will be available only when that project is open. If you choose Global File, the macro is stored in the global file (Global.mpt) and is available whenever Microsoft Project is running, regardless of whether a particular project (or any project at all) is open .
Row References. Accept the default setting of Relative if you want Microsoft Project to record relative row references. Thus, when the macro is run, it will always attempt to move the same number of rows from the selected cell after the macro encounters the command to select a new cell .
For example, suppose that a cell in row1is selected and you select a cell in row4while recording the macro. From then on, every time the macro is run and encounters the command to select a new cell, it always moves three rows from whatever cell was selected before the macro was run.
Select the Absolute option if you want be certain that a particular row ”based on the selected cell's row ID ”will be selected when a macro runs. In the example just given, your macro will always select a cell in row 4, regardless of which cell is selected before the macro is run.
Column References. Unlike row references, the default setting for column references is Absolute, based on the selected field. No matter where fields are positioned, absolute column references select the same column every time. Relative column references work just like relative row references.
| |
When creating a new macro, you need to decide whether you will be storing the macro in the current project or in the project global file. Which is best? Well, that depends. Table 27-1 lays out the conditions and recommendations for different situations.
| Store the Macro in the Project If | Store the Macro in the Global If |
|---|---|
| Certain very specific conditions must be met in the project plan in order for the macro to run successfully. For example, you might need to select a particular task before running your macro or you might need to select a varying group of resources. | Conditions aren't as stringent for the macros. Many formatting macros can fit this category. |
| You're distributing the project to others and want the project to be fully self-contained, without also having to provide the global. | The macro is entirely for your own use, or for the use of individuals using the same project plan on the same computer. Or if you all have access to the global, through a network share, for example. |
| You're not expecting to need to edit the macros. | The macro is used in multiple projects or by multiple users, and you know you might need to adjust the macros and want to make the change just once. When you edit a macro in the global, the change is implemented the next time any user accesses the global to open his project. That is, you don't have to edit the macro 30 times for 30 different users on 30 different computers. |
| You've set up a number of keyboard shortcuts, and you're concerned about the limited number of keyboard shortcuts in the global and keyboard shortcuts in the project getting in each other's way. | Keyboard shortcuts are not a big issue in your macros, or if you're certain that macros in the project plan and the global file use different keyboard shortcuts. |
Another note about keyboard shortcuts and the global file: because all the macros in a particular project must share the available keyboard shortcuts, toolbar buttons , and names , only one macro in a project can use Ctrl+A as a keyboard shortcut, for example. This rule also applies to the Microsoft Project global file, which is open whenever Microsoft Project is running. If you use Ctrl+A as a keyboard shortcut in the global, no other macro in the global file can use that shortcut. If you store your Ctrl+A macro in the project file, however, you can have another macro, stored in another project, which also uses Ctrl+A as its keyboard shortcut.
| |
| |
The decision to use absolute column references might seem like a no-brainer, but absolute column references are based on the selected field. Because fields can be moved, you might sometimes get unexpected results.
For example, suppose that you recorded a macro using absolute column references in a project you share with someone else. When you recorded the macro, you selected the third column, which contained the Start field. At some point, however, your co-worker opened the project and inserted the Duration field as the third column.
The next time you run the macro, the fourth column gets selected because that's the new location of the Start field. If you assumed that the third column would always be selected because absolute column references are "safe" and that's where you always put the Start field, your macro is now broken.
| |
Knowing When to Say "When"
Knowing when to stop the recorder can be as important as the recording environment itself. For an automatic procedure like a macro to be truly trustworthy ”and therefore useful ”it should have an ending point that is intuitive, or at least easy to remember.
For example, the Bold button on the Formatting toolbar is basically a macro to automate clicking Font on the Format menu and then clicking Bold in the Font Style list. If you have already selected a word, you know that clicking the Bold button formats the word a certain way and then stops. If you haven't selected a word, you know that the Bold button turns on a certain kind of formatting for anything you type until you click it again to turn that formatting off. Both endings are so easy to remember that they've probably become intuitive for you.
The same should be true for any macro you record. It should be easy for you to remember what conditions must be met before you can run the macro, what the macro will do, and when it will stop. A macro that performs a 20-step procedure for you is no good if you're afraid to run it because you can't remember what it might do along the way.
| |
If you record new macros frequently or prefer to run macros by selecting them by name rather than using a keyboard shortcut or a toolbar button, you might find it convenient to use the Visual Basic toolbar:
To display the Visual Basic toolbar, click View, Toolbars, Visual Basic. You can also simply right-click in the toolbar area of the screen and then click Visual Basic on the shortcut menu. The same commands that are available by pointing to Macro on the Tools menu are available here.
| |
Recording a Macro
Let's return to the idea of a weekly report, as described earlier in this chapter. The report that you print every Friday requires you to do the following:
-
Change the view to the Tracking Gantt.
-
Apply a filter to display only incomplete tasks .
-
Sort the tasks by finish date in ascending order.
-
Print the results using the Slipping Tasks report.
Tip Set up favorable conditions for successfully recording the macro Before recording your macro, make sure that all your planned steps will take you through to the end of the process you want to program.
In the following example, you need to open a project that actually contains slipping tasks. If there are no slipping tasks, a report is not generated, and you can't record the steps for printing the report and closing the dialog boxes.
You've decided to automate these tasks by recording them in a macro. Follow these steps to record the macro:
-
Click Tools, Macro, Record New Macro.
The Record Macro dialog box appears.
-
In the Macro Name box, enter a name for your new macro, for example, Friday_Report .
A macro name cannot contain spaces, but you can use the underscore character to represent spaces if you want. Although the macro name can contain letters , numbers , and the underscore character, it must begin with a letter. Also, the macro name cannot use any word that Microsoft Project reserves as a keyword.
-
In the Store Macro In box, click This Project.
-
In the Description box, change the first line to a descriptive name, for example, Weekly task report .
-
Because the macro won't be selecting cells , make sure that the Row References option is set to Relative and the Column References option is set to Absolute (Field).
-
Click OK to begin recording.
If you are showing the Visual Basic toolbar, the Record Macro button changes to the Stop Recorder button. Otherwise, there's no indication that you're in the macro recording mode.
Note Remember, everything you do when recording will be written into the macro that you are creating, including any mistakes.
-
Click View, Tracking Gantt.
-
Click Project, Filtered For, Incomplete Tasks.
-
Click Project, Sort, By Finish Date.
-
Click View, Reports.
-
 Double-click Current Activities, double-click Slipping Tasks and then click Print.
 -
Click OK in the Print dialog box and then click Close in the Reports dialog box.
-
Stop the recorder by clicking Tools, Macro, Stop Recorder. If you're showing the Visual Basic toolbar, you can also click the Stop Recorder button.
Note We chose to store this macro in the open project, but it's a good example of a macro that could be stored in the global file as well. Because all the macro does is change the way the data in a particular project is displayed and then print a report, you could record the steps to open the right project at the beginning of the macro. You could then print the report anytime Microsoft Project is running without having to manually open the project first.
| |
If your macro is supposed to select cells as it runs, but selects the wrong ones or even causes an error, one of the following items may be the cause:
-
The macro was recorded using one combination of settings for absolute or relative column or row references, but the actual conditions under which the macro is run require a different combination.
You can either rerecord the macro by using a combination that better suits the situation under which the macro is run, or you can edit the macro code in the Visual Basic Editor and then change it manually.
If you change the reference settings manually, the following table shows the different values that should be used when changing the type of column and row references:
Reference
Absolute
Relative
Column
The value for the Column argument is the name of the field in quotes.
The value for the Column argument is a positive number, indicating the number of the column.
Row
The value for the Row argument is a positive number, indicating the number of the row, and the RowRelative argument is False.
The value for the Row argument may be either a negative or positive number. The RowRelative argument is either True or is missing (the default value is True).
Note The columns for the row number and the Indicators field (if showing) are both counted when using relative column references. The first "normal" column is actually column3when manually editing column references in a macro.
-
The macro assumes that a particular cell or item has been selected before the macro is run.
You could always try to remember that the proper cell is selected before running the macro, but rerecording the macro (or editing it in the Visual Basic Editor) to select the proper cell before it does anything else solves the problem and also makes the macro more robust.
-
The column (or row, if it is for a subtask) containing the cell to select may have been hidden or the row may have been deleted.
Most of the solutions to this problem involve writing complicated Visual Basic code, so the best solution, until you're more comfortable working with the Visual Basic Editor to edit your macros, is to simply make sure that the proper conditions are met before running your macro. Using column references can also help you spot this problem early on because your macro will cause an error on the line that refers to the missing column and make it easier for you to guess at what the problem is.
| |
Looking at Macro Code
For many people, knowing how to record and play back a macro is sufficient for most of their needs. But what if you made a minor mistake while recording a macro? What if you recorded a complex macro that referenced a project by filename and then the filename was changed? Although you might not ever need to know how to write VBA code, much less create an entire macro with it, the first step to making simple changes or corrections is to understand how simple and logical the macro code can be.
| Cross-References | For more information about the Visual Basic Editor, see "Using the Visual Basic Editor". |
If you were to start the Visual Basic Editor that is included as part of Microsoft Project and open the Friday_Report macro, this is the code you would see:
Sub Friday_Report() ' Macro Weekly task report ' Macro Recorded Tue 3/5/04 by Steve Masters. ViewApply Name:="Tracking Ga&ntt" FilterApply Name:="I&ncomplete Tasks" Sort Key1:="Finish", Ascending1:=True ReportPrint Name:="Slipping Tasks" End Sub
It's quite short and reasonably simple. You might already have made some guesses about what different sections of the code mean, such as information that also appears in the Microsoft Project interface. Table 27-2 gives descriptions of each line in the VBA code.
| Macro Code | What It Means |
|---|---|
| Sub Friday_Report() | The beginning of the macro. Sub is short for subroutine, which is what a macro really is. The text that follows is the name of the macro. |
| ' Macro Weekly task report ' Macro Recorded Tue | Any line that starts with an apostrophe is a comment and is ignored by Visual Basic. You can use comments anywhere in a macro to remind yourself of what the different parts do. |
| ViewApply Name:="Tracking Ga&ntt" | This line changes the view to the Tracking Gantt. The ampersand (&) comes before the letter that acts as an access key on the View menu. |
| FilterApply Name:= | This line applies a filter to display only incomplete tasks. |
| Sort Key1:="Finish", Ascending1:=True | This line sorts the tasks by finish date in ascending order. |
| ReportPrint Name:= | This line prints the Slipping Tasks report. |
| End Sub | The end of the macro, like the period at the end of a sentence . |
If, after recording the macro, you decide that you prefer to sort the tasks in descending order, it doesn't take that much time or trouble to record the macro all over again. But it takes even less time to simply edit the macro and change True to False in the line Sort Key1:= "Finish", Ascending1:=True .
Follow these steps to start the Visual Basic Editor:
-
Click Tools, Macro, Macros.
Tip Pressing Alt+F8 is another way to display the Macros dialog box.
-
In the Macro Name list, click the name of the macro you want to edit.
-
Click the Edit button.
The Visual Basic Editor starts and displays your macro code (see Figure 27-2). You can now begin editing the macro code.
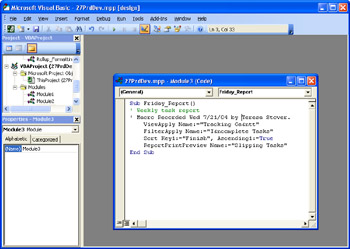
Figure 27-2: Open VBE to review and edit your macro code.
EAN: 2147483647
Pages: 268