Working with Enterprise Projects
With your user account set up and Project Professional connecting successfully to the project server, you're ready to get down to the nitty-gritty and start creating enterprise projects. You can save a new project to the project server or import an existing local project to the project server. Either way, your new enterprise project is associated with the enterprise global template, which sets the project management standards for your organization.
After your enterprise projects are in place on the server, you can carry out your day-to-day project management tasks. You check out a project from the server, add new tasks, modify existing tasks , work with resources, update progress tracking information, review and add information in custom enterprise fields, generate reports , and more. When done working with the project for the day, you check the project back in to the server.
You can work with multiple versions of a project. In addition, you don't always have to be connected to the project server; you can work with project information offline when needed.
Creating a New Enterprise Project
There are two methods for creating an enterprise project. One way is to start a new project plan in Microsoft Project, make sure you're connected to the project server, and then save it to the server. The other way is to open an existing project and import it to the project server.
As soon as either type of project is saved to the project server, the enterprise global template is applied to the project, and accordingly , the enterprise standards apply.
Saving a New Enterprise Project to the Server
To create a brand-new enterprise project, follow these steps:
-
Start up Project Professional and connect to the project server.
-
Click File, New.
-
In the New Project side pane, click Blank Project or the name of the existing project you want to use as the basis for the new project.
Cross-References To use an enterprise project template set up by your project server administrator, click File, Open Project Template. For more information about creating a new project, see "Creating a Project File".
-
Click File, Save.
The Save To Project Server dialog box appears (see Figure 22-7).
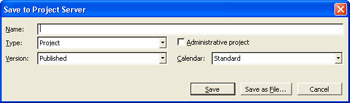
Figure 22-7: When saving a new file while connected to the server, the Save To Project Server dialog box appears. -
In the Name box, type the project filename.
-
In the Version box, make sure that the version is the one specified by your project server administrator as the correct one to use.
The default version is Published . Your project server administrator might create other versions for various purposes.
-
In the Calendar box, specify the base calendar being used as the project calendar.
This project calendar is the one specified in the Project Information dialog box.
-
Click Save.
Your new project is saved as a new enterprise project on the project server.
Importing a Local Project to the Server
To import an existing local nonenterprise project to the project server, follow these steps:
-
Make sure that Project Professional is connected to the project server.
A quick way to check whether you're connected to the server is to click the Tools menu. If the Substitute Resources command is available, you're connected. If it's dimmed, you're not. If you're not connected, close Project Professional, start it up again, and then connect to your project server.
The project you're importing may or may not be open; it doesn't matter to the process.
-
Click Tools, Enterprise Options, Import Project To Enterprise.
The Import Projects Wizard appears.
-
Read the Welcome page and then click Next .
A browser window appears, similar to the Open dialog box.
-
Navigate to the drive and folder containing the project you want to import. Click the filename and then click Import.
-
In the message about the currency setting, click OK.
-
In the next wizard page, make any necessary changes to the project's filename, version, calendar, or custom fields (see Figure 22-8). In most cases, you can retain the current settings. Click Next.
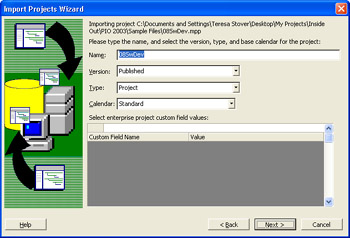
Figure 22-8: Specify any project settings to bring the project into conformance with enterprise standards. -
In the Map Project Resources Onto Enterprise Resources page, match local resource names from your local project to the corresponding enterprise resource names if possible.
You can map your local resources to enterprise resources if you know that the resources have already been added to the enterprise resource pool. For each resource name that you want to map, click in the Action On Import field and then click Map To Enterprise Resource. Then in the Calendar Or Enterprise Resource field, click the down arrow and then select the name of the corresponding enterprise resource.
If your local resource does not exist in the enterprise resource pool, you can import the resource. In the Action On Import field, click Import Resource To Enterprise.
If you don't want to map or import the resource to the enterprise, retain the Action On Import field default of Keep Local With Base Calendar. If necessary, in the Action On Import field, click the name of the base calendar (see Figure 22-9).
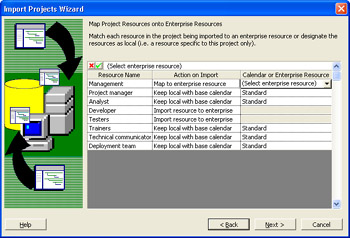
Figure 22-9: Import or map local resources to the enterprise resource pool.Note When in doubt, don't import a resource to the enterprise resource pool. That is, if you're not sure whether certain resources belong in the enterprise resource pool or whether they're already there, bypass this step for now. Once a resource has been added to the enterprise resource pool, they're in semi-permanently. They can be deactivated, but only a database administrator can actually delete an erroneously added resource from the enterprise resource pool.
As long as you have the proper permissions, you can always add a resource later.
-
When finished mapping resources, click Next.
The Map Task Fields page appears. This page shows any custom fields, such as Cost1 or Text3, you might have defined in the local project. You can map these custom fields to any corresponding enterprise fields that might have been defined for your organization.
-
If you want to map custom task fields, select the field in the From: Task Field column. Then in the To: Enterprise Task Field column, click the down arrow and select the corresponding enterprise task field (see Figure 22-10).
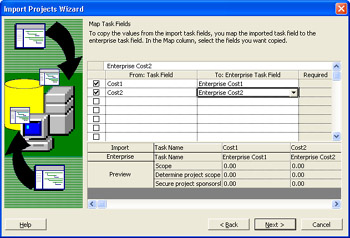
Figure 22-10: Associate custom fields defined in your project with custom enterprise fields.A preview of the enterprise fields appears in the lower part of the page.
-
When finished mapping custom task fields, click Next.
A table containing all tasks in the local project appears (see Figure 22-11).
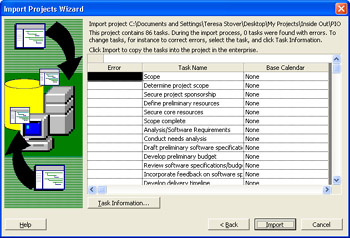
Figure 22-11: Review the table for any possible import problems. -
Scan through the table of tasks, looking for any problems showing in the Error column.
If there are any errors, click the task and then click Task Information. Modify the task information as needed to make the task acceptable for the import process.
-
Click Import.
The tasks, fields, and resources are imported to a new enterprise project, and the Import Complete page appears.
-
Click Import More Projects if you have more projects to convert to enterprise. Otherwise, click Finish.
Maintaining Your Enterprise Projects
Now that your projects are stored on the project server, you can work with them as enterprise projects. What does that mean to you?
Essentially, it means that you check the project out of the server when you want to work on it and check it back in when you're done for the day, for example. It also means that you're now using the enterprise global template containing any standard project elements that have been defined for your organization, including custom fields, outline codes, macros, views, toolbars , and so on. You also have access to enterprise resources and tools for working efficiently with those resources.
In the wider view, your enterprise projects can be reviewed and analyzed by others to see the big picture of all projects taking place throughout the organization.
Checking Out an Enterprise Project
When you want to open an enterprise project, you check it out of the project server. To check out an enterprise project, follow these steps:
-
With Project Professional connected to the project server, click File, Open.
The Open From Microsoft Office Project Server dialog box appears (see Figure 22-12). All enterprise projects that you have permission to see are listed, along with their version and current checkout status.
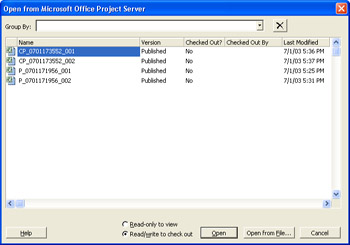
Figure 22-12: Check out your enterprise project from the project server. -
Click the name of the project you want to check out.
If there is a great number of projects, you can help yourself find the project by clicking the arrow in the Group By box and choosing a property by which to categorize the projects.
You can also click any of the table headings to sort projects by that field. By default, the projects are listed in alphabetical order.
-
Make sure that the project you want to check out is not already checked out by someone else.
A project can be checked out by only one user at a time.
-
Make sure that the Read/Write To Check Out option is selected, which is the default.
If someone else has checked out the project you want, you can still open it if you select the Read-Only To View option. You will see the project as it was when it was last saved.
-
Click Open.
The project opens (see Figure 22-13). The enterprise global template is attached to the template, and the enterprise resource pool is available for use in the project.

Figure 22-13: Your enterprise project opens in Project Professional.
Reviewing the Enterprise Global Template
When you start Project Professional and connect to your project server, the latest update of the enterprise global template is automatically attached. The enterprise global template is akin to a global template or the "global global" over the standard project global template . The enterprise global template dictates standards being enforced and customizations made available to Microsoft Project interface elements in projects throughout the enterprise. These standards provide for customization and consistency across all projects in an organization. The standards propagated through the enterprise global template also make it possible for project information throughout the enterprise to be compared and analyzed in meaningful ways. By default, the portfolio manager and project server administrator are the only users with the permission to modify the enterprise global template. However, project managers have the permission to view the enterprise global template, so you can see the controls behind your individual enterprise projects. The following list details the project elements that can be modified and propagated as standards via the enterprise global template:
-
Base calendars
-
Fields
-
Filters
-
Formulas
-
Forms
-
Groups
-
Import and export maps
-
Macros
-
Outline codes
-
Reports
-
Tables
-
Toolbars
-
VBA modules
-
Views
-
Currency
To review the enterprise global template and see the specific changes that are being enforced for your organization, follow these steps:
-
Make sure that Project Professional is connected to the project server.
As soon as you connect to the project server, the enterprise global template is loaded into memory for use with your enterprise projects.
-
Click Tools, Enterprise Options, Open Enterprise Global.
A project plan, which appears to be empty, is displayed (see Figure 22-14).
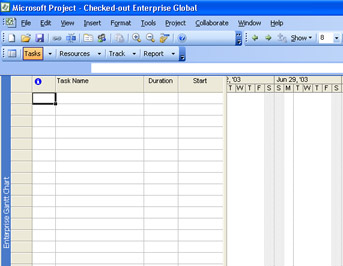
Figure 22-14: Review features in the enterprise global template to see your organization's standards.Using the default project manager permissions, the enterprise global template is not checked out to you in the sense that you can make changes to it; but rather that you're using it as the foundation structure to your own checked-out enterprise projects.
-
You can browse around the various interface features ”such as the view definitions, filter definitions, custom toolbars, and so on ”to see how the enterprise global template has been customized.
-
When finished reviewing the enterprise global template, close it.
While you can inadvertently enter data in the enterprise global template, they are not saved when you close it. Only specific elements (views, fields, macros, currency, and so on) are saved. Tasks or assignments would never be saved with the enterprise global template.
The global standards are still present in any enterprise projects you have currently checked out. In fact, if you browse the interface elements in your own enterprise project, you'll see that the same customizations are present there that are in the enterprise global template.
If the enterprise global template changes after you connect to the project server, you only see those changes after you close Project Professional and reconnect .
It's likely that your organization has a system ”either formal or informal ”for project managers to suggest changes to the enterprise global template. Find out from the project server administrator or portfolio manager how you can suggest changes you want to see implemented. When the enterprise global template is updated, you see the changes take effect the next time you check out an enterprise project.
Even though the enterprise global template affects all your enterprise projects, this doesn't mean that you can't still use your own project global template, which is active on projects on your own computer. As long as there's no conflict between elements in the project global and elements in the enterprise global template, you can create your own sets of standards for all your own projects. For example, you can create and use your own custom toolbar as long as it has a different name from any custom toolbars provided in the enterprise global template.
| Cross-References | For more information about working with the project global template, see Chapter 28, "Standardizing Projects Using Templates." |
Finally, you can change interface elements to apply to an individual project without it being a part of the enterprise global template or your own project global template.
Working with Custom Enterprise Fields
Custom enterprise fields often constitute a major area of customization and standardization implemented via the enterprise global template. Custom fields can be designed to store a specific category of numbers , durations, or text not provided by built-in Microsoft Project fields. Different data types of custom fields are available for assignments, tasks, and entire projects. The portfolio manager or project server administrator defines these fields as part of the enterprise global template, which are then available to you to add to your project.
Custom enterprise fields include the following:
-
Custom enterprise project fields, such as Enterprise Project Cost1, Enterprise Project Duration3, and Enterprise Project Outline Code5
-
Custom enterprise task fields, such as Enterprise Date3 or Enterprise Flag10
-
Custom enterprise task outline codes, using Enterprise Task Outline Code1 through Enterprise Task Outline Code30
Note There is also an extensive set of custom enterprise resource fields that help define resources in various ways in the enterprise resource pool.
Cross-References For more information about these enterprise resource fields, see "Working with Enterprise Resource Outline Codes" later in this chapter.
To add a custom enterprise field to your enterprise project, follow these steps:
-
With Project Professional connected to the project server, check out the enterprise project to which you want to add the custom enterprise field.
-
Display the sheet view and table to which you want to add the custom enterprise field.
If you're adding an enterprise task field, display a task view. If it's an assignment field, display the Task Usage or Resource Usage view.
If you're adding an enterprise project field, display the project summary row. To do this, first display a task view. Click Tools, Options and then click the View tab. Select the Show Project Summary Task check box.
-
Right-click the column heading to the left of where you want the custom enterprise field to be inserted. Click Insert Column on the shortcut menu.
-
In the Field Name box, find and click the custom enterprise field.
You'll know the name of the field from information you've received from your portfolio manager or project server administrator.
Custom enterprise fields are listed twice: once using the generic enterprise field name (for example, Enterprise Date1 ) and again using the name you gave it (for example, Deliverable Milestone ).
-
In the Insert Column dialog box, click OK.
A column containing the selected custom enterprise field appears in the sheet view.
Some custom fields are set up to be calculated from values in other fields in your project. If you added such a calculated field , it might already contain values.
Other custom fields are set up for you to simply add the appropriate data. For such entered fields , you might just type in data freeform. Entered fields can also be designed to contain a value list for you to choose from. If this is the case, click in the field; click the arrow; and then select the appropriate choice for the task, assignment, or project.
Checking In an Enterprise Project
When you finish working with your enterprise project for now, you check it back in to the project server. Your organization might have specific rules for when you need to check in your projects.
To check in an enterprise project, follow these steps:
-
Make sure that Project Professional is connected to the project server.
-
Click File, Save to save your final changes.
-
Check in the project by simply closing the project: click File, Close.
As long as the project was already an enterprise project, it is checked back in to the project server.
If you had not saved final changes, the Save And Check-In dialog box appears. Click Save Any Changes And Then Check-In. If you want to discard your changes, click Check-In Only.
Note If there are any required custom enterprise fields or outline codes that you have not filled in, you'll see a prompt reminding you to do this. You must complete these fields before you can successfully check the project back in.
Cross-References See "Working with Custom Enterprise Fields" in the previous section for more information.
After you check in your project, it becomes accessible for edit by other project server users with the proper permissions.
Working with Published Versions of Enterprise Projects
When you save or import a new enterprise project to the project server, you select a particular project version . By default, the version is published . The version is appended to the project name as a second filename extension; for example, Design.mpp.published . The version specifies all the projects that are a members of a given portfolio of projects.
The version is used in a variety of ways. Users can compare and analyze all projects in a given version. They can also compare the different versions of the same project, which is particularly useful for analyzing what-if scenarios. Versions can also be used to track different phases or milestones in a project, or different baselines in the same set of project tasks.
The project server administrator can create additional versions, as dictated by the project management requirements of the organization.
Working Offline with Enterprise Projects
You don't always need to be connected to the project server to work with projects. And you don't always need to work with enterprise projects when connected to the project server. This is particularly helpful when you're traveling and need to take a project file with you. It is also helpful if you are working with any projects that don't need to be a part of the published portfolio of enterprise projects.
The following is a list of possible offline scenarios:
-
You can save an enterprise project as a local project. To do this, check out the enterprise project. Click File, Save As. In the Save To Project Server dialog box, click Save As File. In the browser window, select the drive and folder where you want to save the local copy. Give the project a new name, if you want, and then click Save. Be aware, however, that the enterprise project is checked back in to the project server, which means that others can make changes to the project while you're working on your local copy.
-
You can save an enterprise project as an offline project. With the enterprise project checked out and displayed, click File, Save Offline.
-
You can be connected to the project server, but open a local nonenterprise project. To do this, click File, Open. In the Open From Microsoft Office Project Server dialog box, click Open From File. Browse to and select the local project and then click Open.
-
You can open Project Professional without connecting to the project server, and open and work with a local nonenterprise project. To do this, you need to have Project Professional set up for manual connection. In the Project Server Accounts dialog box, click My Computer and then click Work Offline. Or click the name of the project server and then click Work Offline.
You can work with an enterprise project without being connected to the project server. This is handy if you are physically away from the network or want to try some contingency scenarios with an enterprise project. When you are ready to reconnect, simply log on to the server, open your enterprise project file, and then save it. Because you are back online and connected to the system, your file will be checked in when you save it.
EAN: 2147483647
Pages: 268