Sending Project File Information
You can send information from your project file to others using Outlook or any other MAPI-based e-mail system. You can send project file information in the following ways:
-
Send the entire project file as an attachment.
-
Send a selected set of tasks or resources as a Microsoft Project file attachment.
-
Send a set of tasks or resources as a picture to a set of predefined recipients.
-
Route a project file to a group of recipients to obtain their input.
-
Publish a project file to a Microsoft Exchange public folder.
Sending an Entire Project File
You can quickly send an entire file to selected recipients directly from within your project file. To do this, follow these steps:
-
In Microsoft Project, open the project file you want to send.
-
Click File, Send To, Mail Recipient (As Attachment).
Your MAPI e-mail application is launched, if necessary. The new e-mail message form appears, showing your project file already attached and the name of the project in the Subject field.
-
In the To box (and Cc box, if necessary), add the e-mail addresses of the recipients.
-
In the message area, add any necessary comments regarding the project file (see Figure 18-6).
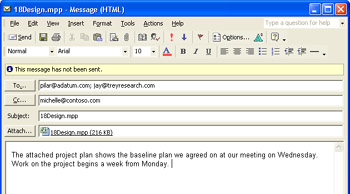
Figure 18-6: Quickly send the project file as an e-mail attachment. -
Click the Send button.
Your message and the attached project file are sent to the specified recipients.
| |
You can also send the project file by clicking File, Send To, Mail Recipient (As Schedule Note). Under Attach, select the File check box. Clear the Picture Of Selected Tasks check box. Under Address Message To, specify the group of recipients associated either with the entire project or the currently selected tasks.
If you're using a non-MAPI e-mail program, you can still send a project file as an attachment. You just can't do so from within Microsoft Project. Start in your e-mail program, select the attachment function, and then select the Microsoft Project file.
| |
Sending Selected Tasks or Resources
| Note | You can send a schedule note if you're using Outlook or any other 32-bit MAPI-based e-mail program. |
You can send a picture of selected tasks or resources in any given view to the assigned resources and other associated contacts by using the Send Schedule Note dialog box. Send a Schedule Note when you want to do the following:
-
Send information about critical tasks to the assigned resources.
-
Send information about tasks leading up to a major milestone to the assigned resources.
-
Ask assigned resources about progress on late tasks.
-
Ask assigned resources to report on the status of current tasks.
-
Alert contacts in human resources, procurement, or accounting about their responsibilities related to a set of resources.
-
Report current status of selected tasks to a managing stakeholder.
To send a Schedule Note, do the following:
-
In Microsoft Project, open the project file that contains the information you want to send.
-
Display the view, including the table and fields, you want to send.
-
Select the tasks or resources whose information you want to send.
-
Click File, Send To, Mail Recipient (As Schedule Note).
The Send Schedule Note dialog box appears (see Figure 18-7).
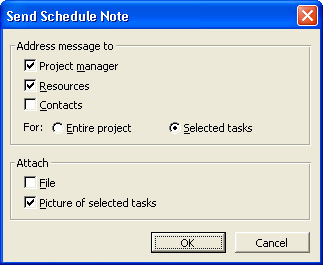
Figure 18-7: You can transmit a selected update with a Schedule Note. -
Under Address Message To, select the Resources check box.
The e-mail addresses for resources must be identified. This can be done by adding the Email Address field to the Resource Sheet or by entering it in the Resource Information dialog box.
If you are using the Contacts field in a task view to include the e-mail addresses of stakeholders or other individuals associated with tasks, you can also select the Contacts check box to send a schedule note to them.
-
Under Attach, be sure that the Picture Of Selected Tasks check box is selected.
If you also want to send the entire project file, select the File check box.
-
Click OK.
Depending on the settings in your e-mail program or virus protection program, you might see a message specifying that an outside program is attempting to access your e-mail addresses (see Figure 18-8). Specify that you do want to allow this. You might see this message for each recipient of your schedule note.
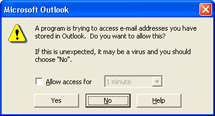
Figure 18-8: Your e-mail security settings or virus protection program might present an alert.Your MAPI e-mail application is launched, if necessary. The new e-mail message form appears with address information filled in and the title bar reflecting the name of the project file. The specified attachment is included. If you are sending a picture of selected tasks or resources, a .bmp file is attached. If you are sending the entire project file, an .mpp file is attached (see Figure 18-9).
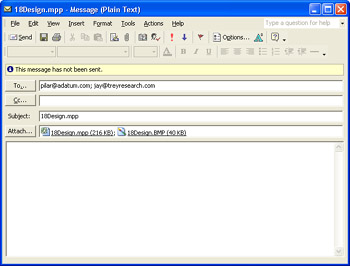
Figure 18-9: A new e-mail message is created with the recipients and attachments you specified. -
In the To and Cc boxes, add any additional recipients as necessary.
-
In the Subject box, enter a subject.
-
In the message area, type a message to inform your recipients of your intentions with the project attachments.
-
Click Send.
If your schedule note consists of a picture of selected tasks or resources, recipients can double-click the .bmp attachment to open it (see Figure 18-10).
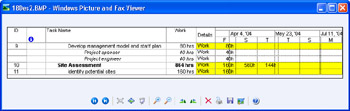
Figure 18-10: The schedule note sends a picture of selected tasks or resources via e-mail.
If your schedule note consists of the project file, recipients can double-click the .mpp attachment to open the project file in Microsoft Project, as long as they have it installed on their computer.
| Tip | E-mail report information It would be nice to be able to e-mail a report like the To-Do List to team members or a report like the Project Summary to your boss. But that capability is not available, for many of the same reasons that you can't save a report from a moment in time. What you can do, however, is use your MAPI-compliant e-mail application to send selected tasks or selected resources from your project plan to your team members. |
| |
Suppose that you're using the Send Schedule Note dialog box to send a project file, but only a few of the tasks or resources are showing up in the e-mail attachment.
When you select the Entire Project option in the Address Message To section, this refers to the recipients associated with the entire project. This does not indicate that the entire project is being sent.
Check the setting under Attached. By default, the Picture Of Selected Tasks check box is selected. If you want to send the entire project, select the File check box.
| |
Routing a Project File
| Note | You can route a project file if you're using Outlook or any other 32-bit MAPI-based e-mail program. |
Sometimes you need specific information from certain individuals regarding the project plan. Maybe one team member is developing the task list, someone else is adding the resources, and someone else is assigning those resources to tasks. Or perhaps you want various leads to update progress on their segments of the project. One very effective way to give a comprehensive picture of your work is to route your project plan through e-mail to a list of individuals. You can specify whether your addressees receive your e-mail message one at a time or all at once. To route a project file, follow these steps:
-
In Microsoft Project, open the project file you want to route.
-
Click File, Send To, Routing Recipient.
The Routing Slip dialog box appears (see Figure 18-11).
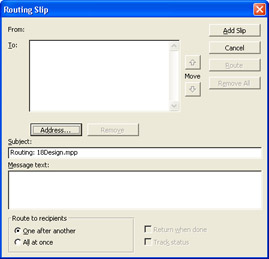
Figure 18-11: Complete the Routing Slip dialog box to send the project file to multiple recipients. -
Click the Address button.
The Address Book dialog box appears.
-
In the left window, click the names of the individuals you want on the distribution list and then click the To button.
Note that each individual on the distribution list must have access to Microsoft Project on their computer in order to open the project file.
-
If you're routing the project one recipient at a time, designate the order of recipients by rearranging their names on the list using the Move buttons .
-
In the Subject field, change the subject if necessary.
-
In the Message Text box, enter any comments or instructions to accompany the attached project file.
-
Under Route To Recipients, select the One After Another option (the default) or the All At Once option.
Although sequential routing can be time-consuming and impractical for urgent information, it's ideal for review and evaluation. Each recipient edits the project file and adds comments to the routing message. To send it to the next designated addressee, the recipient clicks File, Send To, Next Routing Recipient.
-
Select the Track Status check box to keep an eye on the progress of the project routing and make sure it doesn't get stuck too long with any one recipient. Select the Return When Done check box to make sure the file comes back to you so you can see everyone's changes and comments.
-
Click the Route button.
The message with the project file is routed to your designated recipients through e-mail.
Publishing the Project File to an Exchange Folder
| Note | You can publish a project file to an Exchange folder if you're using Microsoft Exchange Server and if you have permission to use public folders. |
You can send your project file to an Exchange folder, which is most useful for making the project file available to a large number of stakeholders. To send the file to an Exchange folder, do the following:
-
In Microsoft Project, open the project file you want to publish to an Exchange folder.
-
Click File, Send To, Exchange Folder.
The Send To Exchange Folder dialog box appears, displaying the folders available to you (see Figure 18-12).
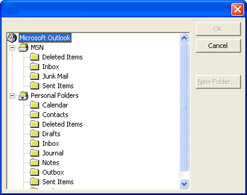
Figure 18-12: Select the public folder for your project file. -
Click the folder to which you'd like to send the project file and then click OK.
Your project file is copied into the selected folder.
EAN: 2147483647
Pages: 268