Copying Between Microsoft Project and Excel
By using the Copy and Paste commands, you can easily exchange sheet data and static graphics between Microsoft Project and Excel.
You can also use the Copy command to insert an embedded object.
| Cross-References | See "Embedding Between Microsoft Project and Excel" later in this chapter. |
Copying Information from Excel
You can copy information from Excel worksheets and graphs and paste it into your project plan.
Copying Sheet Information from Excel
Anything in Excel worksheet cells can easily be copied and pasted into a Microsoft Project table. However, you need to prepare either the Excel workbook or the Microsoft Project table ahead of time. The order and data type of the columns of information must match.
| |
Copying and pasting information is one of the easiest ways to get information from Excel to Microsoft Project. However, to paste successfully, the columns of Excel information must match the Microsoft Project columns into which you're pasting.
For example, suppose that your Excel worksheet contains four columns you want to copy to your project plan: Task Name , Resource, Duration, and Fixed Cost. Add, remove, and rearrange columns in a Microsoft Project task table so that these four columns appear next to each other (see Figure 17-1).
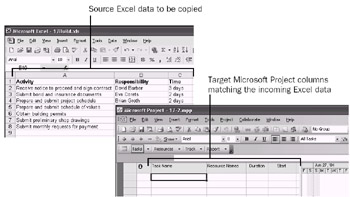
Figure 17-1: Make sure that the order and type of Microsoft Project columns match the Excel data being copied and pasted.
The following is a list of techniques you can use to arrange your Microsoft Project view to match the incoming Excel data:
-
Apply a different table to a Microsoft Project sheet view. Click View, Table and then click the table you want.
-
Add a column to a Microsoft Project table. Click in the column to the right of where you want the new column to appear. Click Insert, Column. In the Field Name box, click the field you want to add and then click OK.
-
Remove a column from a table. Click the column heading and then click the Delete key.
-
Move a column to a different location. Click the heading to select the entire column. Drag the left or right edge of the column body (not the heading) to the location you want.
A vertical gray marker appears to show where the column will be moved.
| |
To copy and paste Excel worksheet cells into Microsoft Project, do the following:
-
Arrange the source Excel columns to match the target Microsoft Project field order and data type. Or, arrange the target columns in Microsoft Project to match the incoming Excel data.
-
In Microsoft Excel, select the set of cells to be copied.
-
 On the Standard toolbar, click Copy.
 -
In Microsoft Project, select the anchor cell in the table where you want the incoming information to begin to be pasted.
This anchor cell will become the location of the upper-left cell of data selected in Excel.
-
 On the Standard toolbar, click Paste.
| |
There's no law that says you have to paste a set of resource names into the Microsoft Project Resource Name column. Although you probably wouldn't want to, technically you can paste those resource names into the Task Name field, the Group field, the Contact field, or even the WBS field because all these are text fields . Any of these fields can accept any text field information.
However, you could not paste that same set of resource names into the Work field or the Start field, for example, because they are incompatible data types . Work is a duration field , and Start is a date field . Those resource names need to go into a text field.
So when we say you need to match the columns of information from Excel to Microsoft Project, what we're really saying is that you need to match the data types. The data type specifies the kind of information that can be stored in a field; for example, text, number, or percentage. The data type also specifies the format that information can take; for example, 14d for a duration field, 6/29/04 for a date field, or $35.90 for a currency field.
If you don't want to use the exact Microsoft Project fields, you can use custom fields that are of the matching data type , such as text, duration, currency, date, number, and so on. Examples of custom fields are Text1, Duration5, Currency3, and so on.
To add a custom field to a Microsoft Project table, click in the column to the right of where you want the new column to appear. Click Insert, Column. In the Field Name box, click the field you want to add and then click OK.
| Cross-References | For more information about working with custom fields, see "Customizing Fields". For a list of custom fields available in Microsoft Project, see "Custom Fields and Custom Outline Codes" in Appendix B. |
| |
Copying Graphics from Excel
You can copy an Excel graph and paste it into certain areas of Microsoft Project as a picture. You can even copy Excel worksheet cells, and instead of pasting those cells into table cells, you can paste them as a picture in Microsoft Project.
To paste Excel information as a static picture, do the following:
-
In Excel, select the chart or other data you want to insert as a picture in Microsoft Project.
-
On the Standard toolbar, click Copy.
-
In your Microsoft Project file, display the location where you want to place the picture. The following specific locations in Microsoft Project can accept pictures:
-
Chart area of a Gantt chart
-
Notes tab on the Task Information, Resource Information, or Assignment Information dialog box
-
Objects box in the Task Form or Resource Form
-
Notes box in the Task Form or Resource Form
-
Header, footer, or legend of a printable view or report
-
-
Click Edit, Paste Special.
The Paste Special dialog box appears (see Figure 17-2).
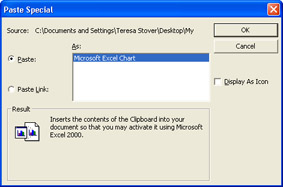
Figure 17-2: Use the Paste Special dialog box to specify that you want to insert the Excel information as a picture. -
Select the Paste option.
-
In the As box, click Picture or Picture (Bitmap).
This option ensures that the data, whether it's a chart or a set of worksheet cells, is pasted as a graphic rather than as an embedded graphic or straight text.
Note If the Paste Special command is not available for the location where you want to paste the picture, press Ctrl+V instead.
-
Click OK.
The new picture is pasted in Microsoft Project at your selected location (see Figure 17-3).
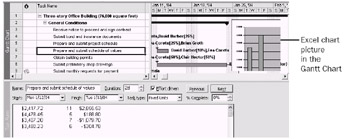
Figure 17-3: The Excel information appears as a picture in your selected Microsoft Project location.
Although static pictures look like embedded objects, they cannot be opened and edited. However, they can be moved and resized.
| Cross-References | For more information about embedded objects, see "Embedding an Excel Object in Project" later in this chapter. |
Copying Information to Excel
You can copy information from Microsoft Project sheets and graphs and paste it into Excel worksheets.
Copying Sheet Information to Excel
Anything in a Microsoft Project table can easily be copied and pasted into Excel worksheet cells. Unlike copying from Excel to Microsoft Project, you do not need to match columns or data types because all Excel fields can accept any data types.
To copy Microsoft Project table cells and paste them into Excel worksheet cells, follow these steps:
-
In Microsoft Project, display the view that contains the information you want to copy to Excel. If necessary, apply a different table or add a column that contains the information you need.
-
Select the cells or columns you want to copy.
To select a column, click its heading. Select multiple adjacent columns by dragging across the column headings. Select multiple nonadjacent columns by holding down Ctrl while you click each column heading.
-
On the Standard toolbar, click Copy Cell.
-
In Excel, select the anchor cell in the worksheet where you want the incoming information to begin to be pasted. This anchor cell will become the location of the upper-left cell of data selected in Microsoft Project.
-
On the Standard toolbar, click Paste.
The selected project data is inserted into the Excel worksheet starting at the anchor cell. Adjust column widths in the worksheet as necessary to see the data (see Figure 17-4).
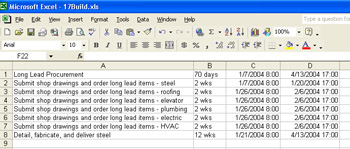
Figure 17-4: Your project data is pasted into the Excel worksheet.
Copying Graphics to Excel
You can copy a picture of any Microsoft Project view and then paste it into Excel. To do this, follow these steps:
-
In Microsoft Project, display the view you want to capture as a picture for Excel.
-
Manipulate the view to show the information the way you want it to appear in the target application.
-
Click Edit, Copy Picture.
-
In the Copy Picture dialog box, select the options you want.
In the Render Image section, select whether the image is to be viewed on a computer screen (the default), to be printed, or to be used in a GIF image file.
In the Copy section, select the Rows On Screen option (the default) if you want the rows currently showing on the screen to be copied, or if only selected rows should be copied.
In the Timescale section, select the As Shown On Screen option (the default) if you want the timescale to be represented as set in the current view. Select the From and To boxes if you want to specify the timescale and date range now.
When finished setting the Copy Picture options, click OK.
-
In Excel, select the location in the worksheet where you want to paste the picture of the view.
-
On the Standard toolbar, click Paste.
A static picture of the Microsoft Project view is pasted into Excel (see Figure 17-5). You can move the image by dragging it. You can also resize the image by dragging any of the edges.
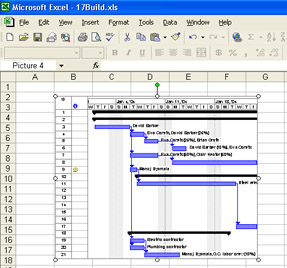
Figure 17-5: The copied picture of your Microsoft Project view is pasted into Excel.
EAN: 2147483647
Pages: 268