| With our introduction to public folders out of the way, we can now move forward and examine some of the more common tasks that you should be prepared to manage, and troubleshoot public folders within your Exchange organization. These tasks include, but are not limited to, the following: Creating general-purpose public folder trees Configuring client permissions for public folders Managing public folder replication Managing public folder referral Managing public folder full-text indexing Troubleshooting public folder replication issues Troubleshooting other public folder issues
We briefly examine each of these tasks in the following sections. Creating General-Purpose Public Folder Trees You might need to create new general-purpose public folder trees for any number of reasons. Some of the more common reasons include hosting Usenet newsgroups and providing departmental public folder stores. To create a new general-purpose public folder tree, perform the following steps: - Open the Exchange System Manager.
- Expand the administrative group within which you want to create the new public folder tree.
- Right-click the Folders container and select New, Public Folder Tree from the context menu, as shown in Figure 6.4.
Figure 6.4. New public folder trees are created at the administrative group level. 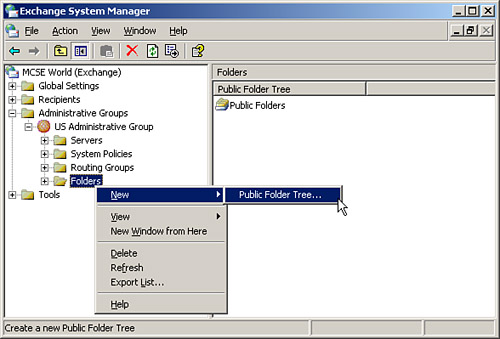
- The public folder tree Properties dialog box opens to the General tab. Enter a descriptive name for the new public folder tree. Click OK to close the Properties dialog box. The new public folder tree appears in the Folders container.
With the new public folder tree created, you now must create a public folder store with which to associate it. Without a public folder store, the public folder tree is inaccessible to clients. To create a new public folder store, perform the following steps: - Open the Exchange System Manager.
- Locate the administrative group in which you just created the new public folder tree. Expand the Servers node and locate the server and storage group within which you want to create the new public folder store.
- Right-click the selected store group, and select New, Public Store from the context menu, as shown in Figure 6.5.
Figure 6.5. You must create a new public folder store to house the new public folder tree. 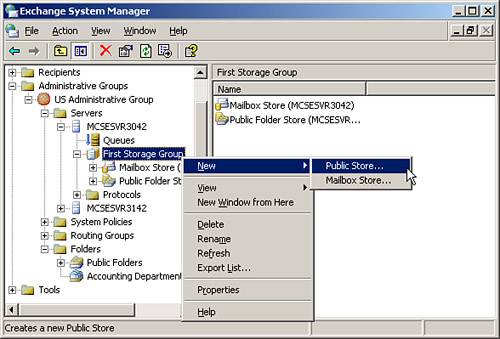
- The public folder store Properties dialog box opens to the General tab. Enter a descriptive name for the new public folder store.
- Click the Browse button to open the Select a Public Folder Tree dialog box, as shown in Figure 6.6. Select the applicable public folder tree (the one created in the preceding exercise), and click OK.
Figure 6.6. After you create the new public folder store, you need to associate it with a public folder tree. 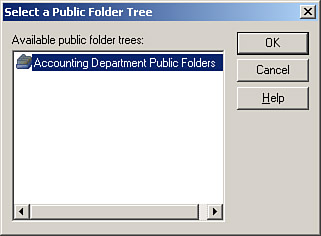
- Click OK to close the public folder store Properties dialog box.
- When prompted to mount the public folder store, click Yes this makes it available immediately to clients.
- Click OK to acknowledge the public folder store was successfully mounted.
Configuring Client Permissions for Public Folders As discussed previously in the "Client Permissions" section of this chapter, public folders have a somewhat unusual assortment of permissions that can be applied to them. Recall that client permissions are used to assign users roles that define what they are capable of doing within a public folder. By default, all users have the Author role, which allows the user to create and read items in the public folder. The user can also modify and delete items they have created within the public folder. Client permissions are also unique because they can be modified from two distinctly different locations: from the Exchange System Manager and from within Outlook. Outlook has the limitation of not being able to access general-purpose folder trees, thus you can only use Outlook to configure the client permissions on the default public folder tree. Client permissions for general-purpose folder trees can only be configured using the Exchange System Manager. When working with client permissions, keep the following points in mind about how they are applied to users: Client permissions that are explicitly (directly) granted to a user are the only ones that will be applied to that user. When a user is a member of a single security group that has client permissions configured for the public folder, the user's net permissions are the least restrictive of the group permissions or the implicit (default) permissions of the public folder. Note that this is in direct contrast to the typical behavior of NTFS permissions. When a user is a member of multiple security groups that have client permissions configured for the public folder, the user's net permissions are the least restrictive of the implicit (default) public folder permissions or the most restrictive of all permissions configured on the security groups of which the user is a member.
To configure public folder client permissions from within the Exchange System Manager, perform the following steps: - Open the Exchange System Manager.
- Locate the public folder (not public folder tree) for which you want to configure the client permissions, as shown in Figure 6.7. Right-click the public folder and select Properties from the context menu.
Figure 6.7. You configure client permissions for a public folder, not for a public folder tree. 
- The public folder Properties dialog box opens. Switch to the Permissions tab and click the Client Permissions button.
- The Permissions dialog box opens (refer back to Figure 6.1).
- Configure the public folder client permissions as required.
To configure public folder client permissions from within Outlook, perform the following steps: - Open Outlook.
- In the folder list, locate the public folder for which you want to configure client permissions.
- Right-click the public folder and select Properties from the context menu.
- The Properties dialog box opens, as shown in Figure 6.8. Switch to the Permissions tab and configure the desired client permissions.
Figure 6.8. You can configure client permissions for the default public folder tree from within Outlook. 
Managing Public Folder Replication Replication is critical for making your public folders available to all clients in all locations, regardless of the routing group or physical location in which they might be located. Replication can also be configured so that only specific routing groups contain a replica of a public folder as a means to limit access to that public folder. Recall that the default public folder tree is automatically configured to replicate to all Exchange servers using the "Public Folder Store" public folder store. General-purpose public folder trees are not automatically configured to replicate. Three basic steps are involved with configuring public folder replication: creating the replica, configuring the replication schedule, and monitoring the replication process. We briefly examine each of these items in the following paragraphs. The first two steps to configuring replication of a public folder are to create a replica on another Exchange server and to configure replication to occur. To accomplish these tasks, perform the following steps: - Open the Exchange System Manager.
- Locate the public folder for which you want to create a replica. Right-click the public folder and select Properties from the context menu.
- The public folder Properties dialog box opens. Switch to the Replication tab, as shown in Figure 6.9.
Figure 6.9. You configure replication from the Replication tab of the public folder Properties dialog box. 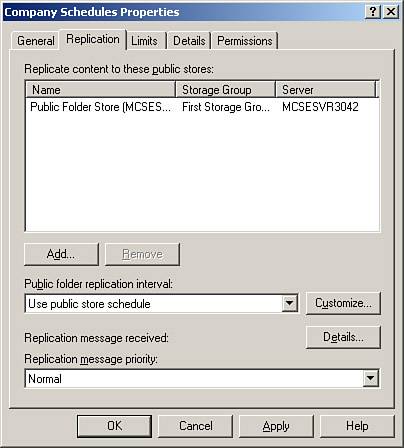
- Click the Add button to select another public folder store on which to create a replica of this public folder.
- Use the Public folder replication interval drop-down list to configure the replication schedule for the public folder.
- Close the public folder Properties dialog box.
You'll be able to see that the public folder is configured for multiple replicas and also be able to monitor the replication status using the Replication tab of the public folder, as shown in Figure 6.10. Figure 6.10. You can easily determine which servers house replicas of a selected public folder. 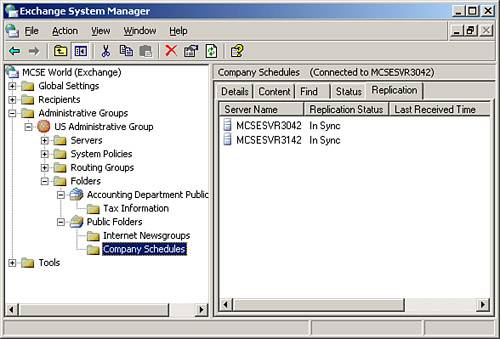
Managing Public Folder Referral As discussed previously in the "Public Folder Referral" section of this chapter, clients that cannot locate a local (local to their routing group) replica of a public folder need to utilize a public folder referral to locate and access a remote routing group's replica of the public folder. Recall that public folder referral can be controlled in one of the two following locations: on the routing group connector connecting the routing groups in question or directly on the public folder itself. You can use only one method of controlling public folder referral. To control routing group public folder referrals, open the routing group connector Properties dialog box and select or deselect the Do not allow public folder referrals check box, as shown in Figure 6.11. Figure 6.11. You can control public folder referrals over a routing group connector from the routing group connector's Properties dialog box. 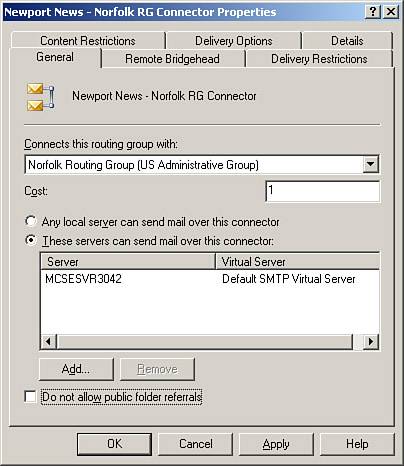
Alternatively, you can configure public folder referrals to specific Exchange servers on a server level using the server Properties dialog box. On the Public Folder Referrals tab, shown in Figure 6.12, you can use the drop-down list to change from routing group controlled to custom list controlled. After you've selected Custom List, you can enter servers and the route costs associated with them as needed (think of route costs as route metrics). Figure 6.12. You can configure specific Exchange servers to perform public folder referrals to. 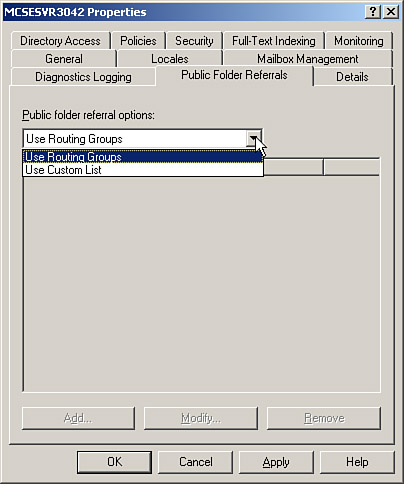
Managing Public Folder Full-text Indexing As we discussed in previous chapters, full-text indexing on a store allows clients to search for and locate information more quickly. The downsides are increased system utilization during the indexing process and, of course, increased disk space usage as the indexes can grow quite large. For best performance, you should always place your full-text indexes on a separate physical drive or set of physical drives (such as a mirrored set) than the drive on which the operating system, Exchange files, and Exchange databases are located. Indexes are typically 20% as large as the database they have been created from, so a 10GB database will likely yield a 2GB full-text index. Don't let the amount of space required scare you away from creating full-text indexes. The following benefits are provided as a result of full-text indexing: Each store can be configured for indexing independently of every other store. This includes whether or not to have an index, how often to update the index, and where to physically store the index. These options give a great deal of control over how indexing is performed in your organization. Searches against the index include related words to the search string for more choices. Searches are faster because the search is scanning an index of the database versus scanning the entire database. Searching of common attachment types is provided, thus allowing the user to search for information contained not only within a message, but also within its attachments. Only the following file formats can be indexed within: .eml, .txt, .htm, .html, .asp, .doc, .xls, and .ppt.
Of course, as we've already briefly examined, there are some drawbacks to creating and using full-text indexes: The disk space required for a full-text index grows quickly. Full-text indexes should be placed on a different physical disk or set of disks than the database they are indexing. A significant amount of system time and resources might be consumed creating the index for the first time. Search results might be incomplete or inaccurate if clients are using the index before it is fully populated. You can, however, prevent this from occurring by disabling searching of the index during this time.
To implement and configure full-text indexing on a public folder, perform the following steps: - Open the Exchange System Manager.
- Locate the public folder store for which you want to enable full-text indexing, and right-click it. Select Create Full-Text Index from the context menu.
- You are prompted for the location to place the full-text index, as shown in Figure 6.13. Enter your selection and click OK.
Figure 6.13. You should place the index on a different physical disk than where the database is located. 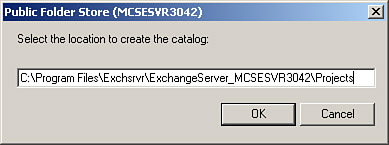
- Right-click the public folder store, and select Properties from the context menu. Switch to the Full-Text Indexing tab, shown in Figure 6.14.
Figure 6.14. You need to configure an indexing schedule. 
- Configure the indexing interval you desire. Note that you can also disable searching of the index as required. Click OK to close the public folder store Properties dialog box.
- To populate the index, right-click the public folder store and select either Start Incremental Population or Start Full Population from the context menu. These options are discussed in more detail following this exercise.
- Acknowledge the one (for incremental population) or two (for full population) warning(s) you receive by clicking Yes.
An incremental population event causes only new and modified items to be indexed. During normal scheduled indexing, incremental population occurs to keep the index up-to-date. A full population event causes all items in the public folder store to be indexed or reindexed, regardless of their current state of modification. This results in the entire index being rebuilt, one document at a time, and could take a significant amount of time and system resources to perform. It is not recommended that you perform a full population during normal business hours. Troubleshooting Public Folder Replication Issues Public folder replication is an event that typically occurs invisibly to users. Only when it does not work correctly do you hear about it. In Table 6.2, we examine some of the more common replication issues you might experience as well as some suggested courses of action. Table 6.2. Common Public Folder Replication Problems and SolutionsProblem | Suggested Solution |
|---|
Replication messages are not being received | Several different problems might result in this situation. Some of the more common include: The public folder stores do not have valid email addresses Ensure that the Recipient Update Service (RUS) has applied the email address to the public folder store's directory objects. Replication messages have no route to follow Ensure that normal message traffic is flowing between the servers in question.
| Backfill occurs very slowly | Backfill takes a long time when a new server is installed and the initial status request has been lost or sent to a server that has no knowledge of the public folder hierarchy. To monitor this solution, you can make a hierarchy change on a different server and check to see that it has replicated to the server in question within one to two days. | Backfill does not occur | Check to see if new folders recently added to other servers' replicas have been replicated during the hierarchy replication portion of replication. After the hierarchy has been updated, the replica will deem itself out of synch and complete the backfill synchronization, which might take several days to complete fully. |
Troubleshooting Other Public Folder Issues Of course, replication errors are not the only type of error you might encounter with public folders. To that end, some of the other common types of errors you might encounter are presented in Table 6.3. Table 6.3. Common Public Folder Problems and SolutionsProblem | Suggested Solution |
|---|
Cannot access permissions on a public folder (Invalid Windows Handle Error) | This problem is commonly caused as a result of an administrator configuring permissions on the M drive (the Exchange Installable File System) on a public folder. Although new installations of Exchange Server 2003 no longer use the M drive, it will still be present in upgrade situations. When permissions are modified through Windows (instead of through the Exchange System Manager), the permissions are modified such that Exchange can no longer convert them into their correct MAPI format. As a result, users can no longer use the dialog boxes in the Exchange System Manager or Outlook to edit public folder permissions. To correct this problem, you need to move the affected public folders into a newly created top-level public folder and force permission propagation to occur. This corrects the problem, but also overwrites all custom permissions entries, resulting in the affected public folders having permissions for only the folder owner (an administrative account), Default users, and Anonymous users. | Cannot add users to the public folder access list | This problem can occur when a user without a mailbox creates or modifies a public folder resulting in the user having explicit permissions on the public folder. You can correct this problem by creating a mailbox for this user or by removing them from the Client Permissions dialog box listing. | Messages sent to the public folder were not delivered | This problem might occur for a couple of different reasons. Email cannot be delivered to general-purpose public folder trees if the message must travel through an Exchange 5.5 server. In addition, email must make its way to the correct public folder store that houses the replica of the public folder this process can take some time. | Attachment size exceedsthe limit on the public public folder | This problem can occur when a user attempts to post an attachment to a folder that is larger than 1024KB in size. Users will receive the following message: "This item exceeds the maximum size defined for this folder and cannot be saved. Contact your administrator to have the folder limits increased." The problem is a result of the 1024 KB default size limit on the OWAScratchPad{ GUID} system folder. You can increase this size limit by changing the Maximum Item Size (KB) value for the OWAScratchPad folder in the Public Folders folder tree. |
|