2.1. Digital Camera Controls A-Z
| < Day Day Up > |
2.1. Digital Camera Controls A ZThis chapter covers camera controls alphabetically from A to Z, or more specifically, from Aperture Value Mode to Zooming. New terms are listed in italic. If you're not sure where to find any of these settings on your particular camera, double-check the owner's manual, or refer to Chapter 1 of this guide.
2.1.1. Aperture Value (Av) ModeMany intermediate and advanced cameras allow you to choose the aperture setting, and the camera sets the proper corresponding shutter speed. This setting is sometimes denoted as Av, which stands for aperture value. (Some cameras just go with a simple "A" for aperture priority.) You can typically access this setting via the mode dial or as a menu option. Choose the aperture priority mode when you want to control depth of field. In other words, how much of your picture, from front to back, do you want in focus? Shallow depth of field is often used for portraits your subject is in focus, but everything else is a little soft. Choose an aperture value of 2.0, 2.8, or 4 for this type of shooting situation. The lower the value, the shallower the depth of field will be, and less of the image will be in focus (see Table 2-1 for specific depth of field settings).
When shooting landscapes, you'll probably want "deep" depth of field, which produces a sharp image from foreground to background. Choose an aperture value of 8, 11, or 16 for deeper depth of field.
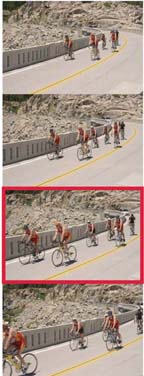
2.1.2. AutoexposureSee "Programmed Autoexposure." 2.1.3. AVIShort for Audio Video Interleaved,.avi files are one of the most common formats for storing audio and video captured with a digital camera. Even though AVI is considered a Microsoft Windows format, most variants of it play on Macintosh computers as well. If your digital camera records video, chances are good that you'll see this file designation on your memory card. Other common video formats used on digital cameras include .mov(QuickTime movie) and .mpeg(Motion Picture Experts Group). Many new cameras use MPEG-4 compression for their movies. See the "MPEG-4 Movie Format" entry later in this chapter for more information. 2.1.4. Burst/Continuous Shooting ModeAll but the most basic cameras have some sort of burst or continuous shooting mode. The icon, shown in Figure 2-2, looks like layers of rectangles. Typically this mode is a menu option, but some cameras display it as a button option that you can access at any time. Either way, it allows you to shoot a series of pictures while holding the shutter button in the down position. The number of pictures you can record in one burst is determined by the capacity of your camera's RAM buffer (discussed in Chapter 1). Most people use this continuous shooting feature for recording sports events, and it is a great choice for capturing a base ball player's swing or a quarterback's touchdown pass. But burst mode can also help you compensate for shutter lag that diabolical delay from the moment you press the shutter to when the picture is actually recorded. Some digital cameras have shutter lags as long as one second, which is a lifetime in action photography.
The key to overcoming shutter lag by using burst mode is to start the sequence just before the action begins, then shoot continuously until the buffer fills up. By doing so, you greatly increase your chances of capturing the decisive moment.
2.1.5. Close-upsDigital cameras are great for getting in real tight with your subject. This is sometimes referred to as macro photography. Unlike most film cameras, digicams usually have the macro capability built right into the camera you don't need any special accessories for impressive close-ups. Usually, you can access the macro mode by pressing the button that has the "flower" icon next to it ( The main thing to remember with close-up photography is that whenever you increase lens magnification, you have to hold the camera extra steady, as too much camera movement during the exposure can make your picture look out of focus. For important close-ups that you plan on printing, you may even want to use a tripod to steady the camera. The rule of thumb is this: increased magnification means increased camera shake. Also, your depth of field is very shallow in close-up photography, so be sure to focus on the element that is most important to you. If you have an aperture priority mode, you can increase the depth of field a little by setting the aperture to f-11, f-16, or f-22. The higher the f-stop setting, the more depth of field you'll have.
2.1.6. CompositionWhether you're using the LCD monitor or the optical view finder, the composition of your picture determines a large part of its success.Composition is the arrangement of the elements in your photograph. The subject, the horizon line, and back ground elements all play a role in successful composition, and this is just as true with basic point-and-shoot cameras as it is with a top-of-the-line Nikon digital SLR. The first step to creating great photographs is to consider all the elements in your viewfinder. Here are a few questions to consider when framing your picture: Where is the subject placed? Are there any distracting background elements, such as telephone poles? Is the horizon line straight? Should you raise the camera angle, or lower it? Most photographers keep five rules of thumb in mind when composing their shots. These are not hard and fast rules, but they are worth remembering and applying as often as possible. 2.1.6.1. Get closer.Use your feet and your zoom lens to frame your subject as tightly as possible. Once you get closer and com pose your image, take a few shots, then get closer again. Your pictures will improve dramatically. 2.1.6.2. Remember the Rule of Thirds.Don't always put your subject dead center in the frame. Instead, divide the frame into thirds, both horizontally and vertically (like a tic-tac-toe board), and position the important elements along those lines. Your compositions will be less static and more interesting. 2.1.6.3. Eliminate busy backgrounds.Trees are great, but not when they're growing out of the tops of people's heads. Look out for busy patterns, bright objects, and other distracting elements. 2.1.6.4. Go high, go low.Change your camera angle when working a shot. Get low on the ground and shoot upward. Raise the camera over your head and shoot down swiveling lenses and LCD monitors make this easier than ever. 2.1.6.5. Simple is better.Try not to clutter your compositions with nonessential elements. Keep things simple, move in close, and find an interesting arrangement.
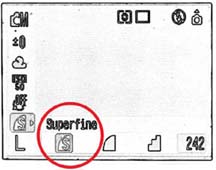
2.1.7. Compression and Image QualityAnother way in which digital cameras differ from their film counterparts is that they actually let you set the quality of the image via the compression or image quality setting. All digital cameras save images as some form of Joint Photographic Experts Group (JPEG) file. If you've worked with JPEGs, you know that you can save them at various quality levels, usually from 1 to 12. A JPEG saved at level 1 has both very poor quality and a very small file size it is said to be highly compressed. The same file saved at level 12 has excellent image quality, but the corresponding file size is quite large it is minimally compressed. Your digital camera gives you some of these same options in the compression or image quality setting, shown in Figure 2-6, which is usually one of the first items you'll see when you open the onscreen menu. Instead of providing you with number values such as "3," "6," and "9," cameras use terms such as basic, normal, and fine, or normal, fine, and superfine. Regardless of the actual terms used, pay attention to the order in which they are listed.
Some cameras also provide RAW or TIFF format options. These settings don't use any compression and produce very large files. If you know that the final product is going to be a large print or a picture in a magazine, then these settings are worth considering. But for everyday shooting, they might be overkill. For more information, see "Work with RAW Files" in Chapter 3.
For general shooting, you should be happy with the quality of pictures set at the highest compression level, which is usually fine or superfine. 2.1.8. Continuous Shooting ModeSee "Burst/Continuous Shooting Mode." 2.1.9. Deleting ImagesSee "Erasing Images." 2.1.10. Digital ZoomUnlike the optical zoom on your camera, which consists of actual glass elements, the digital zoom is a function of the camera's electronics. By enabling the digital zoom, you can increase the magnification of your lens to bring your subjects even closer than is possible with just the optics alone. The trade-off is that you compromise image quality when you use the digital zoom. Since it's a function of the camera's electronics and not of the actual lens, the digital zoom is really emulating the telephoto effect instead of actually recording the image at that optical magnification so even though you "get closer" by using the digital zoom, there's some quality loss too. You're usually better off staying within the limits of your optics, then cropping the picture later on your computer. You achieve the same effect of moving in closer, but without the image loss.
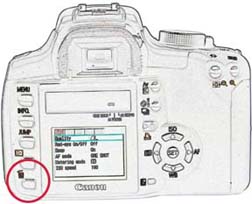
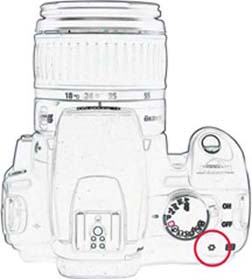
2.1.11. DNGDigital Negative Specification. See "File Formats (Still Images)." 2.1.12. Erasing ImagesThere are two types of erasing. Most photographers use the single erase option when they take a bad picture and want to get rid of it to free up space on the memory card. Cameras usually have a "trash" button for this procedure (see Figure 2-7). The other type of erasing is to use the Erase All command to wipe every picture off your card, usually after you've just uploaded them to your computer. The Erase All command is usually a menu item. You can also use the Format Card command, but before using either method to wipe clean the memory card, double-check that you have indeed uploaded your pictures to your computer. As for single erase, sometimes photographers discard images too quickly, before fully examining them. Obviously some pictures need to go right away if you're in a dark room and the flash doesn't fire, it's a pretty safe bet to dump that shot. But if you take a series of images and want to erase all but the best, make sure you carefully examine the others. Many digital cameras provide a magnify function for the LCD monitor. Try zooming in on your potential discards, and examine them closely before pressing the trash button. To be extra safe, view them on the computer, then trash them if they still don't make the cut. You can miss subtle details when viewing pictures on the tiny LCD monitor, and sometimes those very details make a great shot.
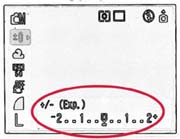
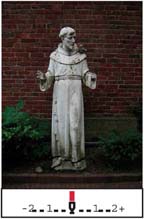
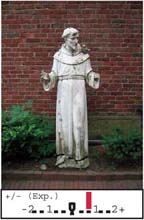
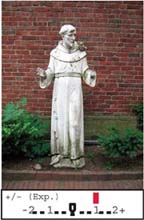
So, once you know for sure that you want to remove all the images you have stored on your memory card, which command is better to use: Erase All or Format Card? Generally speaking, you should use Erase All. Doing so gives you better odds of recovering accidentally erased images with software such as Lexar's Image Rescue (http://www.lexar.com/software/image_rescue.html). Memory cards that have been reformatted are more difficult, if not impossible, to salvage images from. However, if you use burst mode often or record digital movies, it's a good idea to use the Format Card command on occasion, to "clean up" the card's memory and ensure top-notch performance. 2.1.13. Exposure CompensationOne of the most valuable tools available on your digital camera is the exposure compensation scale, which allows you to override your camera's autoexposure reading so you can capture the image exactly the way you want it. On some cameras, this is a button option that you can get to easily, and on others it's a menu item that's not quite as convenient. Either way, you'll want to know where exposure compensation is on your camera it can help you take pictures that more accurately represent the scene you're trying to capture and save you time later when adjusting the exposure on your computer. You may be thinking, "But doesn't my camera always know the right exposure to set?" Not entirely. The light meter in your camera is calibrated to expose properly for anything that's 18% gray. This represents the approximate light reflection of a deep blue sky or green foliage, which are the most common backgrounds in outdoor shots. And indeed, your light meter works great most of the time. But what if you want to shoot a white statue of St. Francis? It's not 18% gray; it's white! If you don't override your camera's light meter via exposure compensation, your camera will render that statue in 18% gray. In effect, your automatic wonder digicam will underexpose your subject. You can use your camera's exposure compensation option to render the image correctly. When you find the control, you'll see a scale with "0" in the middle, positive numbers to the right, and negative numbers to the left, as shown in Figure 2-8.
When you're shooting an object that's very bright, such as a white statue, you may want to add more exposure to render it white. So, move the pointer on the exposure scale to +1. On the other hand, if you're shooting a very dark object with your camera in autoexposure mode, the camera will overexpose the shot and render the object lighter than it really is. If you want to avoid this situation, you should subtract exposure by moving the pointer on the exposure scale to 1. As you become more comfortable with the exposure compensation function, you can make more subtle adjustments to your pictures. You can also fine-tune your images later in Photoshop or another image editor, but the more energy you put into capturing your pictures the way you want them in the first place, the less time you'll have to spend processing them later.
2.1.14. Exposure LockTypically, when you press the shutter button halfway down and hold it there, the camera locks in both the focus and the exposure. While still holding the button halfway down, you can then recompose the shot and take the picture. But what if you want to lock the focus on one item and the exposure on another element? Some cameras allow you to lock the exposure independently of the focus. If your camera has this function (you can see the icon in Figure 2-12), it usually works like this: first, you press the shutter button halfway to take a meter reading; while still holding down the shutter button, you then press another but ton to lock in the exposure. An indicator usually appears on the LCD screen to let you know you've locked the exposure. Now you can focus on another element and take the picture. Remember to turn off the exposure lock once you're done working with that particular shot. For example, say you want to take a picture of your daughter wearing a white outfit and standing in the sunshine on a bright day. You want the camera to focus on her, but you know that because she's wearing white in the full sun, your digicam will have a hard time getting the exposure right. The green grass is much closer to the magical 18% gray that exposure meters are calibrated for. The solution is to lock the focus on your daughter, then point the camera at the grass and press the exposure lock button. You've just instructed the camera to focus on one part of the scene and measure the exposure from another part. The result? A beautiful portrait of your daughter. You can use exposure lock as a shortcut for exposure compensation. Instead of accessing the exposure scale and adjusting your image that way, you can find a middle tone in the picture you want to shoot, such as a patch of grass, and lock your exposure on it. This is a faster way to override your camera's autoexposure setting in difficult lighting situations.
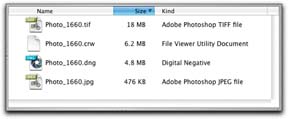
2.1.15. Exposure MeteringMost digital cameras rely on programmed autoexposure metering to set the aperture and shutter speed. Essentially, the camera's light meter "reads" the light and compares the data to a set of instructions stored in the camera's memory. The camera then chooses the best aperture/shutter speed combination based on the data it receives from the light meter. The most important thing you need to know about exposure metering is that cameras are not perfect when it comes to evaluating exposure. They are most often fooled by very bright or very dark subjects. Fortunately, most cameras allow you to override the programmed exposure setting (see the "Exposure Compensation" entry). 2.1.16. File Formats (Still Images)JPEG is the format used by most digital cameras. JPEG files are very portable and can be read by nearly every computer and web browser. JPEG files use compression to keep the file size small for easy transport. You can determine the amount of compression by selecting options from the menu function on your digital camera usually "high," "medium," and "low," but not always using those exact terms. For example, the terms "superfine," "fine," and "normal" are sometimes used instead. See the "Compression and Image Quality" entry for more detail about these settings. Over the last few years, a specialized version of JPEG has emerged for digital camera use. Exchangeable Image File (EXIF) has the same compression properties as the standard JPEG file format, but allows the camera to record to the picture file additional data such as shutter speed, aperture, and date that can be "read" by most modern image editors. This additional information is sometimes referred to as metadata, and it's a real blessing for photographers who like to be able to access the technical specifications for every shot they record, but hate taking notes. The current EXIF version is 2.2. Tagged Image File Format (TIFF) settings are sometimes available as an alternate high-quality format. TIFFs recorded by digital cameras are usually not compressed, though, so file sizes are very large. For general shooting, using the "high" quality JPEG setting is just fine. But for those special situations when you want to squeeze every drop of quality from the image, the TIFF setting might be appropriate. Some camera makers also provide a RAW format option that is also uncompressed. As with TIFFs, the file sizes are large, and the quality is very high. RAW is a good choice for the most accurate color fidelity because you can delay your white balance choice until later, while you're working on the computer. But keep in mind that the time your camera takes to write information to the memory card might be longer when using this format, and you might need a special application to work with these images on your computer. For more information, see "Work with RAW Files" in Chapter 3. Adobe's Digital Negative Specification (DNG) is an archival format for digital camera RAW data. This format can be used in a couple of ways. You can convert your existing RAW files to DNG using a free converter available from Adobe. The DNG file sizes are more compressed (without quality loss), and you'll then have a standard working format for the various RAW formats you use. Some manufacturers, such as Leica and Hasselblad, have adopted DNG as the high-quality format inside the camera, too. At this point it's difficult to say how widespread the DNG format will become, but it's certainly worth keeping an eye on. The relative sizes of these common file formats, based on a 6-megapixel picture, are shown in Figure 2-13. The CRW file is the Canon version of a RAW image. Note how much smaller the file size is for a JPEG than for a RAW file.
2.1.17. Film SpeedSee "ISO Speed." 2.1.18. Flash CompensationThis feature, more common on advanced amateur cameras than on basic point-and-shoots, enables you to manually adjust the flash exposure. Much in the same way that exposure compensation gives you a tool for fine-tuning your camera's programmed autoexposure, flash compensation provides a way to increase or decrease light output from your flash. So ifyour subject is too bright after you take a test shot (i.e., the image is overexposed), you can set flash compensation to 1 to decrease the light output. On the other hand, if your model is rendered too dark in the first shot, you can set flash compensation to +1 to increase the light output. 2.1.19. Flash ModesThe default flash mode for most cameras is automatic, and that's where it stays for most folks. But even the most basic of digicams offers multiple flash settings that can help you take engaging photos under a variety of lighting conditions. Some of the typical flash settings that you might encounter on your camera are: 2.1.19.1. AutoThe camera activates the flash as determined by the light meter reading. If you're indoors in low light, the flash fires. Outside on a bright sunny day? The camera turns off the flash. 2.1.19.2. Red eye reductionMany digicams have some sort of red eye reduction mode. Red eye occurs when the subject's eyes are dilated (in dim lighting), exposing the retina. When the light from the flash reflects off the retina, the resulting color is red. Most cameras tackle this problem by shining a light at the subject before the flash goes off. The pre-flash causes the pupils to constrict, which may reduce the chance of red eye. The challenge for a photographer using red eye reduction flash modes is coping with the extended delay from the time the shutter button is pressed until the actual picture is recorded. If you use red eye reduction, remind the subject to hold the pose until the final flash has fired, and remember to hold the camera steady during this entire process. 2.1.19.3. Auto red eye reductionThe combination of auto and red eye reduction modes. The camera uses red eye reduction whenever it determines that flash is required. 2.1.19.4. Flash onThis setting is usually referred to as fill flash. The camera will fire the flash with every exposure, regardless of the light meter reading. "Flash on" is one of the most useful camera settings, because it allows you to take professionallooking portraits outdoors by adding enough light to properly illuminate the subject while balancing the exposure for the background. The result is a beautiful image with all components properly exposed (see Figure 2-15). 2.1.19.5. Flash offSometimes the flash destroys the mood of a shot. This is particularly true with indoor portraits where the subject is next to a window with daylight streaming in. Creative photographers like to turn off the flash in these settings, steady the camera, and record an existing light photograph that captures the mood of the setting. 2.1.19.6. Slow-synchro flashOften referred to as nighttime mode, this setting tells your camera to use a slow shutter speed in combination with the flash. By doing this, you can capture more background detail in dimly lit scenes, such as portraits shot at twilight, or in an indoor shoot where you want to capture the mood of the setting in addition to having your main subject properly exposed by the flash. Remember to hold the camera very steady when using slow-synchro flash, to prevent blurring of the background. If you have a tripod, you may want to use it for these types of shots.
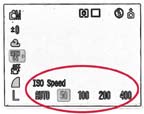
2.1.20. Focus LockOne of the most common pitfalls with point-and-shoot cameras is their tendency to focus on objects other than your intended subject. Instead of capturing your best friend perfectly exposed and in focus, the back wall 10 feet away is sharp as a tack, while your buddy is a fuzzy blob in the foreground. The odds for this scenario increase if your buddy is standing off to one side of the frame. You can avoid blurring your buddy by using focus lock. Simply point your camera directly at the primary subject, then depress the shutter button halfway until the focus confirmation light goes on. Continue holding the shutter button down in the halfway position and recompose your shot. Then take the picture. 2.1.21. Format CardOften included as a menu item, the Format Card command is an alternative to Erase All. Either procedure clears your memory card of all images so you can shoot more pictures, but Format Card also customizes the memory card to your camera by writing a small amount of data to it. This is a good option to choose before you start using a new memory card, or if you're switching in a memory card from another camera. You'll enjoy better performance if you format your memory card using your camera, rather than your computer. Keep in mind, however, that after formatting the card you probably won't be able to recover any accidentally erased images until you're sure all of your pictures are safe and sound (and backed up!), you might want to use the Erase All command instead of Format Card. 2.1.22. Infinity LockSome cameras have an infinity setting( Infinity lock helps reduce shutter lag, too. If, for example, you're taking pictures at your daughter's soccer game and are missing too many shots because of the lag between the time you press the shutter button and the moment the picture is actually recorded, try using the infinity lock. The camera is now pre-focused and will respond more quickly. Also, if you're shooting landscapes through a car or train window and the camera is having a hard time focusing through the glass, enabling the infinity lock feature should solve your problem. 2.1.23. ISO SpeedSometimes referred to as "film speed," ISO speed is actually a better term for expressing the light sensitivity of your digital camera. ISO stands for International Organization for Standardization. This entity has established many standards, including those for light sensitivity of photographic materials. If your camera has multiple ISO speed settings, you can use these adjustments to increase the light sensitivity of the image sensor. The default setting for most digicams is ISO 100 (see Figure 2-16). This is the speed setting for general photography. If you're in a low-light situation and need to increase the sensitivity of your image sensor, change the ISO speed setting from 100 to 200, or even 400, if necessary. Each setting is equivalent to one f-stop of light.
Keep in mind, though, that increasing the ISO speed also increases image noise, which decreases the quality of your picture. Image noise is more of a problem with compact consumer cameras than with digital SLRs. Generally speaking, you can push the ISO setting on a DSLR to 400 or even 800 and still get excellent quality. For consumer cameras, however, try to keep the setting at 50 or 100, and save the higher ratings for low-light situations where the importance of getting the shot is worth a little extra noise.
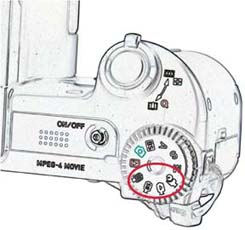
2.1.24. JPEGJoint Photographic Experts Group. See "File Formats (Still Images)." 2.1.25. Macro ModeSee "Close-ups." 2.1.26. Magnify ControlSee "Zoom/Magnify Control." 2.1.27. Manual Exposure ModeMany compact digital cameras allow only programmed autoexposure, but more advanced models also provide complete control over the aperture and speed settings. If your camera has this option, it's probably denoted as manual or manual exposure mode. In traditional film photography, switching to manual mode was a true rite of passage. The photographer would fiddle with the aperture and shutter speed settings, then hope that the pictures were properly exposed when returned from the photo finisher. This process was by no means for the faint of heart. But digital photography has changed all of that, and because you can preview the final result on the LCD monitor before you press the shutter button, manual mode has become much more friendly. Now manual mode represents both control and convenience. For outdoor photography, start by setting your shutter speed to 1/125th of a second and the aperture to f-8. Preview the scene in your LCD monitor. If the image looks too dark, then "open up" the aperture to f-5.6 or "slow down" the shutter speed to 1/60th of a second. You'll see the results of your adjustments in real time on the LCD monitor. If the scene is too bright, "stop down" the aperture to f-11 or "speed up" the shutter to 1/250th of a second. This is the beauty of manual mode photography you have the option of adjusting the aperture and the shutter speed to reach the desired result. Sometimes aperture is more important, such as for portraits where you want to soften the background. In that case, set the aperture to f-2.0 or f-2.8 (wide open), and change the shutter speed until the image looks correct in the LCD monitor. At other times shutter speed might be more important, such as for "stopping the action" during a sporting event: set the shutter speed to 1/500th of a second and adjust the aperture until the image looks properly exposed. With a little practice, you'll find that manual exposure is an easy way for you to be in complete control of your digital camera. 2.1.28. Movie ModeDigital cameras are versatile imaging tools; many provide the option to capture video (often with sound) as well as still images. Typically, you access this function via the movie mode setting (see Figure 2-17).
Less expensive cameras sometimes limit your capture to only 30 seconds of video at a time. After it records the sequence, the camera then writes the data to the memory card and allows you to shoot another 30 seconds, and so on until the memory card is full. But thanks to improved video codecs (short for compressor/decompressor), more robust internal electronics, advanced battery technology, and cheaper high-capacity memory cards, many advanced consumer cameras enable you to record full-size (640 x 480), full-speed (30 frames per second) video until the memory card is full. The playback quality still isn't quite as good as the footage you can capture with a dedicated DV camcorder, but it's getting closer to that standard every day. Some digital cameras, often referred to as "hybrid" models, let you shoot for an hour if you have a 1-GB memory card. You can preview your movies on the camera's LCD viewfinder, connect it to a TV (via supplied cables), or upload the footage to your computer. Most cameras write the movie files in a QuickTime-compatible format, which means that you can play and edit the video on both Windows and Macintosh computers.
2.1.28.1. Hold the camera steady during filming.Tripods are best for video shooting, but in a pinch, you can use your neck strap to stabilize the camera. Hold the camera out from your body until the strap is taut. Keep the camera in this position during filming, and it will help steady your shots. Also keep an eye out for posts, newspaper stands, fences, and other items on which you can steady your camera. The world can be your tripod, if you're creative. 2.1.28.2. Shoot in good lighting.Even more so than still photography, video requires good lighting. If your scene doesn't have enough ambient light, consider adding some with an additional light source. 2.1.28.3. Frame your subjects tightly.Keep in mind that your movies are often only 320 pixels wide and 240 pixels tall to begin with, so you can't afford to stand too far back from the action, or your subjects will be ant-sized. Get close and shoot tight. Your digital camera still won't replace a good video camcorder for top-quality recordings, but in a pinch it can capture special moments that you would otherwise have missed. 2.1.29. MPEG-4 Movie FormatMany of the newest digital cameras that record video as well as still pictures use the MPEG-4 format to compress those movies. MPEG (Moving Picture Experts Group) compression has been available for years in formats such as MPEG-1, MPEG-2, and now MPEG-4. This technology works its magic by storing only the changes from one frame to another, and not the entire frame itself. This enables much smaller file sizes than uncompressed formats, which is important when you're trying to squeeze full-size video onto a small digital camera memory card. See "Movie Mode" for more information about shooting video with your digicam. 2.1.30. Panorama ModeHave you ever remarked to someone viewing your vacation pictures, "It sure looked a lot more impressive when I was standing there"? If you want to capture the breadth of a scene, you most likely won't be able to fit all the grandeur into your camera's viewfinder even at the wide-angle setting. Panorama mode is a clever alternative offered by camera makers to help you capture the grandeur of big landscapes. You work the magic by photographing a sequence of images, then "stitching" them together later on your computer. Panorama mode prepares the sequence of shots for easy assemblage. Cameras that have this option also include the corresponding software required to make seamless final images. If your camera didn't come with stitching software, you can use Photoshop Elements, which is a terrific all-purpose image editor that costs less than $100.
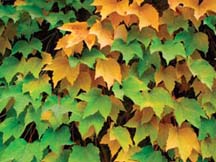
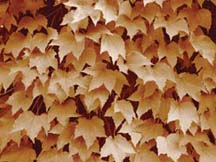
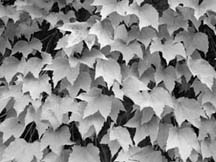
2.1.31. Partial Metering AreaSee "Spot Meter." 2.1.32. Photo EffectsMany cameras allow you to apply creative effects such as black and white, sepia tone, vivid color, and low sharpening instead of recording standard color images. You can apply those effects when you take the pictures, using the camera's effects settings, or convert your standard color images on your computer after you've uploaded the images it's your choice. Here are the most common effects modes and what they do (see the following practical example for some example photos): 2.1.32.1. Black and whiteCaptures the picture as a grayscale image, eliminating all color. 2.1.32.2. BlackboardUnderexposes the image, ensuring that a blackboard (with chalk writing) will appear black and not gray. 2.1.32.3. Low sharpeningSoftens the outlines of the subject. This is a good effect to experiment with for portraits. The effect isn't as strong as with a softening filter that goes over the lens, but this setting is effective. 2.1.32.4. Sepia toneAdds a warmish brown tone to the image. Unlike black and white, which is easy to apply on a computer, sepia toning is easier to use as an in-camera effect. You might want to take a second shot in full color as a backup. 2.1.32.5. Vivid colorEnhances the color saturation of the picture. This can also be easily accomplished on a computer later, but this effect is handy because you can use your camera's LCD monitor to preview how a highly saturated image will look. 2.1.32.6. WhiteboardOverexposes the image, so you can use the digital camera to capture notes from a whiteboard or photograph posters with white backgrounds.
2.1.33. Programmed AutoexposureThe most common method for setting the aperture and shutter speed for digital cameras is programmed autoexposure. On many basic models, this is the only exposure mode offered. When using programmed autoexposure, all you have to do is "point and shoot." The camera's light meter "reads" the scene and compares the information gathered to data stored in the camera's electronics. The camera then selects the aperture/shutter speed combination that best matches the information recorded by the light meter. The caveat is that the camera's electronics can be fooled, resulting in a less than perfect picture. See the "Exposure Compensation" entry for more information on how to adjust programmed autoexposure to handle tricky lighting situations. The bottom line is that programmed autoexposure is a reliable tool for capturing good pictures most of the time. You can increase your odds by learning a few of the override controls, such as exposure compensation, spot metering, and exposure lock. 2.1.34. Protect ImagesThe Erase All command removes all images from your memory card. It's a handy way to clean house without having to remove each picture individually. What if, however, you wanted to remove all pictures except for one or two? The Protect Images option can help you do just that. Display the first picture you want to retain on the LCD monitor, then choose Protect Images from the menu. An icon (such as a key) should appear on the monitor, to indicate that the picture is safe. Repeat for any other images you want to keep, and then use the Erase All command to delete the other images. Be sure to practice this on test pictures to make sure everything works properly, or try it after you've already downloaded all the pictures you want to keep to your computer. Also, remember that Protect Images doesn't work when you use the Format Card command. With this command all of your images will be erased, regardless of whether they are protected. 2.1.35. RAWSee "File Formats (Still Images)." (Also see "Work with RAW Files" in Chapter 3.) 2.1.36. ResolutionBy far one of the most important settings on your camera, resolution sets the pixel dimensions of your picture, thereby determining the size at which it can be displayed or printed later on. Most cameras allow you to set the resolution of the picture via the menu options. If, for example, you select your camera's smallest pixel dimensions say, 640 x 480 your picture will be adequate for web page display. But if you wanted to make a photo-quality print of that picture, you would only have enough resolution for a 3" x 4" print at best. On the other hand, if you select your camera's maximum resolution, such as 2560 x 1920 pixels (on a 5-megapixel camera), you'll be able to make an 8" x 10" photo-quality print, or even a good 11" x 14" print, from the same picture. (See Table A-7 in the Appendix for more details.) The trade-off is that the higher the resolution, the more room each picture occupies on your memory card. So, if you have a 5-megapixel camera with a 1-GB memory card, you'll be able to squeeze 461 pictures onto the card when the camera is set to its highest resolution (2560 x 1920 pixels). At medium resolution (1600 x 1200 pixels), your capacity increases to 854 pictures. And at the smallest resolution (640 x 480 pixels), you can save a whopping 4,721 pictures to your card! As tempting as 4,721 pictures may sound, remember that if you take that once-in-a-lifetime shot at 640 x 480, your once-in-a-lifetime print will be wallet-sized. On the other hand, if you shoot at 2560 x 1920, you'll always have the option of making a photo-quality 8" x 10" print, and if you just want to send images via email to friends and family, you can scale down your "master" image to a smaller resolution before mailing.
2.1.37. Self-TimerThe easiest way for you as the photographer to join a group shot is to use your camera's self-timer, which delays the triggering of the shutter (after you push the button) for 10 seconds or so. First position the camera on a solid surface or on a tripod, and then compose the picture. Before firing away, activate the self-timer. That way, when you push the shutter button, the camera will count to 10 before taking the picture, giving you plenty of time to join your friends. The self-timer is also valuable any time you want to shoot with minimum vibration to the camera. One of the tricks to self-timer mastery is to make sure the camera's focusing sensor is reading the subjects and not the background. Be especially careful when using the self-timer for portraits of couples, because the sensor often reads the area right between their heads. If your camera has focus lock, you might want to use it. Using manual focus is also handy for these types of shots, but only advanced cameras offer this option.
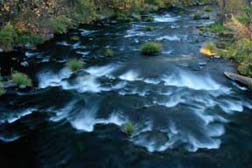
2.1.38. Sequence ShootingSee "Burst/Continuous Shooting Mode." 2.1.39. Shutter Priority ModeSee "Timed Value (Tv) Mode." 2.1.40. Spot MeterThis metering pattern enables you to "read" the exposure for a small area or "spot" in the viewfinder, usually five percent or less of the center of the frame. Not all cameras include a spot meter option, but those that do enable the photographer to set the exposure on an element in the composition rather than on the scene as a whole. The most practical method for spot metering is to point the metering area at the object in the scene that is most important to you, then use exposure lock. You can then recompose the scene any way you want, knowing that the most important element in the picture will be exposed properly. Some cameras have partial metering instead of a true spot meter. Partial metering behaves the same way as a spot meter, but the metering area is bigger. Spot meters usually read 5% or less of the viewfinder, while partial metering patterns typically read about 10%. 2.1.41. TIFFTagged Image File Format. See "File Formats (Still Images)." 2.1.42. Timed Value (Tv) ModeOften referred to as shutter priority, this setting is commonly available on advanced amateur and pro-level cameras. Tv enables you to set the shutter speed and lets the camera figure out the corresponding aperture setting. A common use for Tv is for sports photography, in which the action is frozen with a "fast" shutter speed. Tv is also useful for situations that demand a very slow shutter speed, such as to create a soft, dreamlike effect with running water. Here are a few scenarios where you might want to switch to Tv mode: 2.1.42.1. Sports eventsA fast shutter speed of 1/500th or 1/1000th of a second will "stop the action." You'll need plenty of ambient light to use these settings. In a pinch, you can increase your ISO speed setting to 400 to make your camera more lightsensitive, but remember that you'll also gain image noise as part of the bargain. 2.1.42.2. Children playing outdoorsA fast shutter speed of 1/250th or 1/500th of a second will help you record children at play. If you feel like you're missing good shots because of shutter lag (delay from the moment you press the shutter to when the picture is actually recorded), try using focus lock to shorten lag time. You may also want to turn on the fill flash (see "Flash Modes) and stay within 10 feet of your subjects. In addition to improving the lighting for outdoor portraits, the flash helps freeze the action. 2.1.42.3. Running waterThe effect you want determines the shutter speed you choose. If you want to freeze the water and see droplets suspended in air, use a fast shutter speed such as 1/250th or 1/500th of a second. If you're shooting a waterfall and want a soft, dreamlike effect (see Figure 2-23), select a slow shutter speed, such as 1/8th of a second. In this case, make sure you have your camera securely mounted on a tripod.
2.1.42.4. Streaking lightsTo show motion, use a very slow shutter speed, such as 2, 4, or even 8 seconds (if your camera provides those options). This method is particularly effective at twilight to capture cars' lights as they drive by. Again, mounting your camera on a tripod is essential. If you have a remote release, you might want to use it to prevent you from jarring the camera as you trip the shutter. These examples don't cover every situation, but they will help you use shutter priority to create the effect you want when working with subjects in motion.
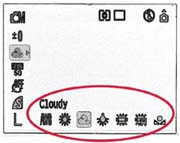
2.1.43. White BalanceDifferent light sources, such as tungsten light bulbs, produce light at different color temperatures than normal daylight (different temperatures often result in pictures that are "cooler" or "bluish" in some situations, or "warmer" or "reddish" in others). Your optical/nervous system compensates for these variations in color, but cameras need a little help as you move from outdoors to indoors. Film cameras rely on color correction filters to capture natural tones under a variety of conditions. Digital cameras make things easier by providing a built-in white balance adjustment. This control not only allows you to capture pictures with accurate tones, but also enables you to preview the effect on your LCD monitor before you take the shot. Think of the white balance control as your own personal filter collection, built right into the camera. The default setting for your camera is auto white balance. This mode works amazingly well most of the time. To test for yourself, point the camera at a different light source, such as a regular light bulb, and watch in the LCD monitor as the image slowly goes from very amber to a less surreal off-white. Still, the effect produced by auto white balance may not always be exactly what you're looking for. In these instances, you can override the auto mode via one of the color correction presets available on your camera. Here's a list of the most common ones: 2.1.43.1. DaylightUsed for general outdoor photography. Adds slight warmth to the coloring to offset a blue, cloudless sky. 2.1.43.2. CloudyHelps correct overcast skies, but is also good for shooting in open shade, such as under a tree. This setting adds more warmth to the scene than the daylight selection. 2.1.43.3. TungstenAdds a bluish tone to offset the reddish cast created by standard light bulbs. 2.1.43.4. FluorescentCorrects for the greenish cast under warm-white or cool-white fluorescent tubes. 2.1.43.5. Fluorescent HHelps balance the color for daylight fluorescent tubes. Figure 2-25 shows a typical white balance menu. The Cloudy white balance setting warms (adds red/yellow to) the tones in the picture. The Tungsten setting (represented by the light bulb to the right of Cloudy) cools (adds blue to) image tones. Many intermediate to advanced cameras also include a custom white balance that allows the camera to find the right color correction when you point it at a white surface. Even better, some advanced digital SLRs, such as the Canon 20D, let you select specific hues via the Kelvin color temperature scale. If your camera has this capability, be sure to see Table A-9 in the Appendix for a complete listing of Kelvin degrees and their corresponding light sources.
One final thought on white balance: if you use the RAW format when capturing images, you can stick with the auto white balance setting, then fine-tune the color temperature later on your computer with the RAW image editor. I wouldn't recommend this technique as your default approach, but it is helpful in tricky lighting situations when you're having a hard time determining the right camera setting. 2.1.44. Zoom/Magnify ControlMost people are familiar with using the zoom lever (or buttons) to zoom in and out when composing images in picturetaking mode. But magnifying the picture you just captured on the LCD monitor for closer inspection is equally valuable. The problem with LCD monitors is that they are very small, colorful, and sharp. What's wrong with that? If you don't "zoom in" when you review your pictures on these little screens, you might be misled as to the quality of your shots. In other words, LCD monitors make your pictures look better than they really are (conversely, you may miss small details that make one shot better than the next). By using the magnify control to zoom in on your subject as you review a picture, you can get a better idea of its true quality. For example, you may want to take a closer look at the subject's face on the LCD monitor after you've shot a portrait. If you don't zoom in to check out the image, when you upload it to your computer you may find (much to your dismay) that the subject's eyes were closed. If you had used the magnify control right after you had taken the shot, you might have seen the closed eyes and continued the shoot. Obviously, you don't want to employ the magnify control after every shot you take, or people will lose patience with you. But before you let your subject leave, take a few moments to review a sampling of the images so you know you won't be disappointed when you get home and upload the pictures. |


| < Day Day Up > |
EAN: 2147483647
Pages: 44