Hack 70 Brighten Teeth
| < Day Day Up > |
Hack 70 Brighten Teeth It seems like everyone wants whiter teeth these days. You might not have the time for peroxide-based solutions, but there's no need for such drastic measures anyway. This Photoshop hack takes only a few seconds and instantly removes years of stains . Most teeth, by design, have a slight yellow cast. Add coffee, wine, tobacco , and a host of staining foods , and the smile isn't quite as bright as it could be. In everyday life, this isn't a major issue. But for special portraits, a warm, inviting smile is important. This Photoshop hack is so easy, you'll wonder why you never figured it out before. As long as you show a little restraint with the technique, the results look quite natural. First, open your portrait in any version of Photoshop. I'll use Photoshop Elements for this illuminating exercise. Use your favorite tool to select the teeth. I usually start with the Magic Wand. Click on a middle-toned tooth with the wand and see what it selects. By holding down the Shift key, you can make another selection to add to the first one. At this point, I switch to the Lasso tool to clean things up. You can add to the existing selection by holding down the Shift key and lassoing more areas. Or, by holding down the Option key, you can deselect areas that you don't want affected by the upcoming adjustments. Now it's time to remove some of that natural yellow tint. In Photoshop Elements, open the Hue/Saturation dialog box (Enhance Figure 6-17. Desaturating the yellow tint in the Hue/Saturation dialog box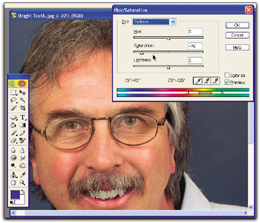 I've found that setting the Yellow channel to somewhere between -70 and -80 does the trick nicely . Once you've toned down the yellow, select Edit Figure 6-18. Using the Lightness control to brighten teeth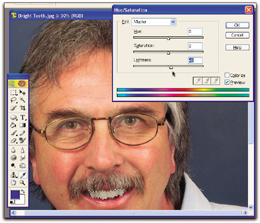 Click OK to exit the Hue/Saturation dialog box and review your handiwork. You might want to hide the selection marker (known by Photoshop pros as the marching ants ) to get a better look at the adjustment. Just press Ctrl-H or choose View Once the smile is clean and bright, deselect the teeth by choosing Select Remember, the best corrections are the ones that look natural. |
 Adjust Color
 | < Day Day Up > |
EAN: 2147483647
Pages: 161