Hack 52 Great Color Prints from Your Inkjet Printer
| < Day Day Up > |
Hack 52 Great Color Prints from Your Inkjet Printer The battle cry for his hack is "go forth and calibrate!" That's about the only way you're going to get consistently accurate prints from your inkjet printer . One of the promises of digital printing is that you can produce images in your own digital darkroom without the mess of mixing chemicals. However, while there is no water involved in digital printing, your prints might still get wet from the sweat of frustration. If you've ever tried to print color photos by just plugging your camera into the computer, opening your image, and printing, you know where this frustration comes from. Consistent color out of the box is almost impossible without a little upfront work. But, if you follow the techniques outlined in this hack, what you see on your monitor will look very much like what you print out. The solution starts with your monitor. Monitors are made by a wide variety of manufacturers. This results in a surprising array of color variance between your monitor and another brand. Even the age of a monitor affects its color. This means that the perfectly color-correct image on your monitor might not really be color-correct. The only real way to ensure that the color on your monitor is consistent with the color on your printer is for them to work off the same protocol. The industry-standard software for this protocol is documented by the International Color Consortium (ICC), a group founded by Apple and seven other vendors in 1993. The most popular and mature implementation of the ICC system is Apple's own ColorSync (http://www.apple.com/macosx/features/colorsync/). Using ColorSync, you can match what you see on your screen to what you see on paper with uncanny accuracy. ColorSync is built into the Macintosh operating system (including Mac OS X, 9, and older versions) in a seamless way. If you have a PC, don't fret. While the ICC system is not as well integrated into Windows as it is on the Mac, it's still possible to utilize a color-management workflow. 5.7.1 Measure MeFor this hack, you need to purchase a colorimeter , which measures color densities and enables you to calibrate your monitor. There is really no way around using a colorimeter if you want truly accurate color on your monitor. Popular brands start at US$150 and include the Pantone Spyder, Monaco Sensor, and the Gretag Eye-One Photo. You can find many models at Amazon.com (http://www.amazon.com). Some colorimeters can calibrate only CRT monitors, so if you have an LCD monitor, make sure to purchase a colorimeter than works for you. You could use the Adobe Gamma tool that comes with Adobe Photoshop, but because this is entirely a software tool, your results will be mixed at best. A colorimeter is a little camera that you place on top of your monitor and plug into your computer. You then run an application that comes with the colorimeter. Depending on the software included, your monitor will go through a series of routines, flashing different screens of color and making what might seem like strange patterns. The colorimeter reads these colors and, using software, creates an ICC profile for your monitor. By having your monitor calibrated to an ICC profile, you've taken an important step toward output that looks like what you view on the screen. The implications of calibrating your monitor are fantastic. Now, when an image has too much yellow in it, you know that it really has too much yellow in it. Calibration will not automatically fix your images, but it will give you the ultimate control to see what needs to be fixed. And when you begin using levels or curves to makes adjustments, you will be doing so with the utmost accuracy. Yes, a more expensive monitor will give you even more accuracy, but even a relatively cheap monitor that is calibrated using a colorimeter provides a quantum leap in accuracy. 5.7.2 Print MeWith your monitor calibrated accurately, the next step is to get whatever you print to match, as closely as possible, what you see on your screen. You could go out and buy a colorimeter that will accurately match your printed output, as described in the previous section. However, because printers have much tighter tolerances than monitors, this isn't necessary. (But if you have money to burn, or if you want to take your color accuracy to the next level, go for it.) Printer manufacturers include ICC profiles with their printers, as shown in Figure 5-9. Many manufacturers even include different profiles for different papers. For example, my Epson printer comes with profiles for matte paper, glossy paper, and a number of different varieties in between. This is because, depending on the actual paper's substrate on the color gamut (or amount of colors), your print output can vary from paper surface to paper surface. Figure 5-9. Available ICC profiles for a few Epson printers When working with images in Photoshop, make sure to work within the RGB (red, green, and blue) color space, and don't convert your images yourself to CMYK (cyan, magenta , yellow, and black). Yes, most inkjet printers use CMYK to print (some use additional tints to achieve even more colors), but believe it or not, the software that runs these printers works in the RGB color space. Also, when you convert your image to CMYK, you are not converting it to a generic version of CMYK; you are converting it to a specific color space (the default version in Photoshop is US Web Coated, Webin this case, meaning web offset printing). Using profiles and the soft-proofing feature built into Photoshop, you can simulate how your image will look when printed, without ever having to actually change the color space of the image. You can access these profiles right within Photoshop to preview how your photo will print. Go to View Figure 5-10. Previewing how your image will print in Photoshop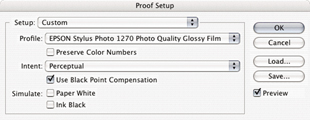 Because your monitor is accurately calibrated, you can be certain that the yellowish cast in your image will appear yellowish when you print. Now, you can accurately adjust the yellow cast on your monitor before printing. When you do print, make sure you select "No color correction" from the Epson printer setup window. If you don't select that option, Epson's own color-management feature will kick in, ostensibly color-managing your already color-managed image. 5.7.3 LightingWalk into any gallery or museum and you'll immediately notice the quality of the light. These institutions spend plenty of money and time to make sure their color cast is as neutral as possible. That way, a Monet in Paris will look the same in New York. You need to do the same thing with your photos; otherwise , all the work you have done to get good color will be lost when you look at them under that tungsten light bulb. You can neutralize your color cast either by purchasing a viewing booth with neutral lighting or by putting together your own rudimentary, but pretty accurate, viewing environment. A neutralized workspace is achieved by combining tungsten lighting with fluorescent lighting. Local art stores sell desk lamps that incorporate both tungsten and fluorescent bulbs , but you can also make your own viewing area by having two lights: one fluorescent and the other tungsten of equal wattage. Make sure to view your prints in this light and make any color decisions here. Now that your monitor, printer, and desk space are color-calibrated, you can now make adjustments in Photoshop confidently. Hadley Stern |
 Proof Setup
 | < Day Day Up > |
EAN: 2147483647
Pages: 161