Hack 46 Second-Curtain Flash for Cool Effects
| < Day Day Up > |
Hack 46 Second-Curtain Flash for Cool Effects One of the most magical of all camera tricks, second-curtain flash lets you show a trail of motion behind an object that is frozen in mid flight . Typically, you use a camera flash to add light when there's not enough ambient illumination for a well-exposed shot, or to fill in shadows for portrait subjects. In either of these scenarios, you typically have a relatively fast shutter speed (1/60 of a second or so) with the flash occurring at the beginning of the exposure, otherwise known as the first curtain . The term curtain refers to the phases of the shutter. The first curtain occurs at the beginning of the exposure and the second curtain occurs at the end. For an evening portrait, you use a much longer exposure time [Hack #29] to capture some background information that would otherwise be dark because the flash can't reach that far. Subjects must stand still during these long exposures; otherwise, they'll blur in the photo. Technically, a second-curtain flash is just a technique in which the flash fires at the end of a long exposure rather than at the beginning of it. So, why would you ever want to have the flash fire at the end of the exposure? Well, it creates great opportunity for the best of both worlds . On one hand, you get the artistic motion trail that illustrates the movement of an object, often revealing patterns or characteristics about the movement that we can't otherwise perceive. On the other hand, you also get to freeze the subject at the end of the motion. By having the sharp representation of the object at the end of the motion trail, rather than at the beginning or middle, you end up with a more interesting shot that shows the history of the subject's movements. A classic application of second-curtain flash photography is to show a dancer in motion or a moving object, such as a golf club or a bouncing ball. In the example shown in Figure 4-14, I shot a playing card flying through the air at 1/2 second at f-7.1. Figure 4-14. Second-curtain flash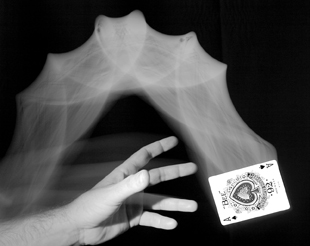 4.9.1 How to Create the MagicYou'll need a camera with a Second Curtain flash mode or one that accepts external flashes with this option. In this hack, I used a Canon Digital Rebel with a Canon Speedlite 550EX. When shopping, you'll have to check the specs carefully , because some great digital SLRs don't have this feature, while a plain-Jane consumer digicam just might. For your setup, mount your rig on a tripod, set the flash to Second Curtain mode (it will be there somewhere in the controls), put the camera in Manual Exposure mode, and try a beginning setting of one second at f-5.6. It's also helpful to have a remote release for this type of shot. Now, pay some attention to your background, because you'll want one that differs in tone and/or color from the subject. Typically, these types of photos are shot with a light object on a dark background. Put the object in motion and trip the shutter. You'll hear the click of the shutter opening, but no flash...at least not yet. When the shutter clicks again to close, the flash will fire. That's the beauty of the second curtain. The shutter is open , capturing the object's movement, and then the flash fires right at the end of exposure, freezing the subject in mid flight and thereby rendering a natural-looking composition. You'll need to take many test shots to perfect the composition, the lighting of the scene, and the motion of the object. The length of the trail is determined solely by the length of the exposure time (given that you don't have any control over the speed of the subject). The intensity of the motion trail is determined by the strength of the ambient light on the subject, as well as the camera's ISO and aperture settings. The intensity of the frozen image at the end of the exposure is determined by the flash strength. To maintain the most control, put the flash strength on manual control; this feature typically requires an external flash. If you are shooting a light object on a dark background, the goal is to light the subject but not the background. There are a number of things you can do to achieve this. For starters, move the background as far away as possible. In my example, I used a large black sheet as the background and moved the camera as far away as the size of the sheet would permit. Another tip is to place the ambient light source (such as a desk lamp) and the flash off to one side and light the subject at an angle. The goal is to place the lights so that their illumination doesn't hit the background. So, how do you move the flash off the camera but still retain communication? One trick is to buy a relatively inexpensive coiled cable that connects to the flash on one end and the hot shoe on the other [Hack #42] . A more expensive approach is to use a wireless flash system [Hack #43] . A homemade approach is to aim the flash off to the side or directly up and bounce it off a reflective surface, such as a piece of white cardboard. Also, keep in mind that the less reflective your dark background is, the easier it will be to control the lighting. Choosing to tackle a shot with a dark object on a light background will make your work harder, because you will have to light the background but light the subject only minimally . If you have too much ambient light, the motion trail will be blown out in the background. If your shot involves throwing an object across the frame, keep in mind that you probably won't get the perfect throw on your first shot. It might take a hundred or more attempts. That's okay; it's not like you're burning film. In fact, many of your best shots come from unexpected results. If you're shooting a scene that you can't test over and over and you don't know how long it will take the subject to run through the composition, you can set the camera to Bulb mode and hold down the shutter as long as you want, which ideally should be until just before the subject exits the end of the scene. Keep in mind, however, that with digital SLRs the viewfinder is blocked during these long exposures because the mirror is flipped up, allowing light to pass through to the sensor. You can get around this problem by looking for a reference point on the background where your composition endsperhaps a distant tree or building. While you're shooting, observe the scene with your eye over the top of the camera and judge the end of the frame based on the reference point. You don't want to ruin a good shot by having it run off the scene, so frame a little wider and crop on the computer later if necessary. Try second-curtain flash with a variety of subjects. You can combine this technique with others mentioned in this book (such as [Hack #33] ) for some truly impressive results. Let your imagination run wild. David Goldwasser |
| < Day Day Up > |
EAN: 2147483647
Pages: 161