Hack 44 Eliminate Glare in Reflective Surfaces
| < Day Day Up > |
| You've probably felt the frustration of trying to take a picture of a reflective object, such as a framed painting, and getting glare. The secret is to add another flash . Using two external flashes instead of your camera's built-in unit offers all sorts of new photographic possibilities. As discussed in [Hack #43] , you can produce great-looking portraiture with just a couple electronic flashes and light stands. Here's another use for this capability: photographing reflective surfaces without producing glare. As you know, when you try to use your camera's built-in flash to take a flash picture of, let's say, a painting on the wall, you always get a hot spot somewhere in the image. You could turn off the flash, lug everything outside, and then use natural light, but that's not always convenient either, such as when it's night. Plus, if you're shooting a lot of different objects to sell on eBay, do you really want to be standing outside with your equipment all day? Try this method instead and work comfortably indoors. Hang your artwork on the wall and get your flashes and light stands together [Hack #43] . For this assignment, you won't need the photo umbrella, but you will need both the flashes mounted on their light stands. Raise the light stands so that the flashes are the same height as the painting. Now, position one on the left and one on the right, each at 45 angles from the painting. The flashes and painting should form a triangle. Mount your camera on a tripod and extend the legs so that the camera is the same height as the center of the painting. Make sure the camera is level and centered between the two flashes. Now, focus and take a picture. Both flashes will go off, but amazingly, there's no light reflection in the picture! Magically, each flash cancels out the reflection from the other (see Figure 4-12). You get an evenly illuminated image with no hot spots. Figure 4-12. Two flashes at 45 angle for no reflection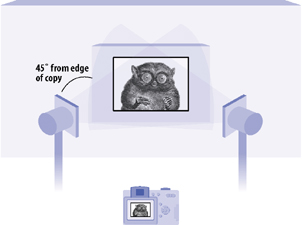 You can also apply this technique to tabletop photography for items such as flower vases and glassware. The main thing to remember is to keep your light sources at strict 45 angles from the subject, and keep the camera centered between them. |
| < Day Day Up > |
EAN: 2147483647
Pages: 161
- Getting a Precompiled Version of BIND
- Configuring a Name Server to Listen Only on Certain Network Interfaces
- Configuring DNS So a Mail Server and the Email It Sends Pass Anti-Spam Tests
- Limiting Concurrent TCP Clients
- Configuring a BIND Name Server to Accommodate a Slave Running the Microsoft DNS Server