Hack 38 Colorful Star Trails
| < Day Day Up > |
Hack 38 Colorful Star Trails For most people, stars are decorative points of light that decorate the night sky. But for you, they can also be fascinating streaks of light that add dazzle to your compositions . Stars might appear as twinkling points of light to the naked eye, but when you point a camera at them and leave the shutter open for a while, they transform into colorful streaks across the sky. Photographing star trails is not only an artistic endeavor; it can also provide insight into the nature of stars themselves . Stars are basically composed of hydrogen and helium, and they burn intensely. The hotter the star is, the more bluish its color , and cooler stars tend to be reddish orange. Based on this information, scientists have formed theories about the age of the stars we observe. A bright blue star, for example, is considered at the peak of its life. A duller red star, on the other hand, is much older. Thinking about the age of a particular star on a chilly night probably demands more commitment than the average person cares to allocate to such matters. But if you point your digital camera upward and let it record trails of those stars, their colors are much easier to distinguish in the comfort of your home, gazing at your computer screen, than they are when you gaze upward into the frigid night. Take a look at the picture of Orion's belt and sword in Figure 3-18 (the constellation Orion the Hunter dominates the winter sky in the Northern Hemisphere). This image is a four-second exposure (f-1.8 at ISO 800, taken with a Canon 10D) and is an enlargement of what you'd observe with your eyes in the sky. You can see some differences in star colors, but they are subtle. Figure 3-18. Stars without trailing effect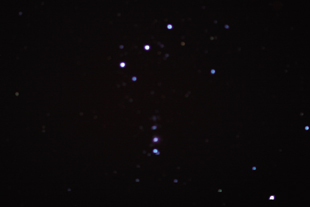 Figure 3-19. Stars with trails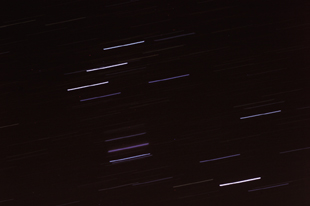 In the eight-minute exposure (f-1.8 at ISO 100, taken with the same Canon 10D) shown in Figure 3-19, the colors of the stars are easier to determine. The purplish "star" in the middle of Orion's sword is actually a nebula . Clearly, the three stars in his belt are burning hotter than the three in his sword. You can draw your own conclusions about the meaning of all of this, such as the age and distance from Earth of each of these entities. But the point is that it's much easier to analyze stars if you have more visual information. And photographing star trails is a great method for amateur stargazers.
The three stars that form a diagonal line (Orion's belt) at the top of Figure 3-19 are (from top to bottom) Mintaka, Alnilam, and Alnitak. They're about 1,800 light-years away and are much bigger than our own Sun. We can tell from their intensity that they burn hotly, changing hydrogen into helium at a furious pace. But the brightest star in the constellation is Rigel, in the lower right corner of the frame. It's part of Orion's left foot (in case you couldn't tell that was a foot !). Rigel is 1,000 light-years away, but its luminosity is actually 50,000 times brighter than our Sun. If you study a little star history to learn more about this beacon of the night sky, you'll find out that Rigel is actually a triple star (three stars close together, giving the illusion of being just one). Last, but not least, the Orion nebula emanates its fuzzy glow in the lower part of the sword. This area is know as a stellar nursery , because new stars are formed here within the masses of gas and dust that are the building blocks of these entities. Some of these young whipper-snappers are only a million years old. That might not sound so youthful to you, until you learn that our Sun is about 4.6 billion years old. Now, when you look at these images of Orion, those colors begin to take on new meaning. And this is a satisfying exploration that you can enjoy until, well, the end of time. 3.11.1 There's More to Stars Than ScienceCapturing stars in motion has its artistic side, too, especially when combined with other elements, such as a desert landscape or dimly illuminated camp tent. If you put the North Star in the center of your viewing frame, the star trails will form concentric circles around it, as shown in Figure 3-20, a picture of the Canada-France-Hawaii Telescope in Mauna Kea. Figure 3-20. The Canada-France-Hawaii Telescope (photo by Jean-Charles Cuillandre)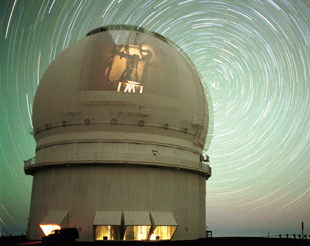 Pointing your camera at other parts of the sky produces different streaming effects. This is truly trial-and-error fun at its best. The thing to keep in mind is that you want to find an interesting landscape element that isn't too brightly lit and that complements the streaking stars above. 3.11.2 Get Your Equipment TogetherUnlike some of the other hacks, where you could employ workarounds for your point-and-shoot digicam, this technique requires a camera that enables you to control the shutter. Manual mode (where you control shutter and aperture independently) is the absolute best for star trails. Your exposures will be anywhere from 30 seconds to hours in duration. I also prefer a real cable release that allows me to lock the shutter open. I've been using the Canon Remote Switch RS-80N3 with the Canon 10D for my long exposures. The Remote Switch has a locking button, so I can trip the shutter and keep it open until I unlock the button on the switch. Battery power becomes a real issue for this type of shooting. Prior to digital imaging, many photographers would use older mechanical bodies that didn't require any type of power at all. They would lock the shutter open with a cable release, time the shot with their watch, then close the shutter when time was up. But digital cameras need juice for any type of shooting. And when you're making long exposures on a cold night, those batteries seem to drain pretty fast. To help deal with this situation, I recommend you have two or three extra batteries with you. Even better, consider an auto-adapter kit that allows your camera to tap power through the cigarette lighter. For the Canon 10D, I also use the Battery Grip BG-ED3 that holds two lithium-ion power cells . Once you have your power under control, turn your attention to dew and condensation management. I suggest you keep a multicoated protection filter, such as a skylight or UV, and a lens hood on your camera at all times. The lens hood helps block out stray light and reduces the amount of moisture that accumulates on the glass part of the lens. The protection filter keeps dew and debris off the actual front lens element. And it's much easier to clean the filter than the lens itself. Make sure you have a sturdy Ziploc bag in your camera case. When you're done shooting outside, put your camera in the bag and zip it up. Once you bring your rig indoors, the condensation will form on the bag, not in the camera. Leave it in the bag until the camera reaches room temperature. Be sure to remove your memory card before putting the camera in the plastic bag, so you don't have to wait until it warms up to room temperature before you can start viewing the images you captured. To begin your shoot, attach your camera to a sturdy tripod, point it upward to an interesting group of stars, and set it to Manual Exposure mode. If you have a 50mm lens, start with that and open the aperture all the way to its widest settingusually, f-1.7 or so. If you have only a zoom lens, set it to a mid focal length, such as 50mm, and open the aperture all the way. Set the shutter speed to Bulb setting; this is often denoted by the letter B. That setting means that for as long as you hold down the shutter release, the shutter will stay open. You can already see the advantage of having a locking release: you don't have to stand next to your camera, holding the button down for 30 minutes. Make your first exposure for five minutes and review the result in your LCD monitor. This will give you a point of reference for experimentation. You don't have to take notes about your exposure times, because your camera is recording that information and attaching it to the image. 3.11.3 A Few More TipsWhen scouting for a location for your star shooting, try to find somewhere that has little or no light pollutionthe darker , the better. A little light pollution makes a big impact on long exposures. Be sure to bring at least one flashlightpreferably, one with a red lens that enables you to keep your night vision while working. A piece of red tissue paper and a rubber band over the flashlight lens will do in a pinch . Another accessory that makes shooting more comfortable is a right-angle finder that slips over your eyepiece. This enables you to view the sky more comfortably by looking down into the finder, as you would with a quality telescope. Gloves, hat, hot cocoa, and all the cold weather comforts will make this assignment more enjoyable. If you have a photo buddy, star shooting is a great opportunity to catch up with each otheryou'll have quite a bit of time on your hands during those two- hour exposures. |

| < Day Day Up > |
EAN: 2147483647
Pages: 161