Hack 37 Night Landscapes and the Moon
| < Day Day Up > |
Hack 37 Night Landscapes and the Moon The moon is a beautiful but often elusive element for nighttime landscapes. If your previous attempts have resulted in sheer lunacy, take a look at these helpful tips . Nothing perks up an evening landscape like a rising moon hanging above the horizon. You walk out of the office to go home. It's dusk and there's still color in the sky. Then, like magic, the moon appears from behind the clouds. You feel like you can reach out and touch it, just like that. These are the small moments that often stay with us. Trying to photograph that is another matter. The moon hanging just above the horizon looked so big. But it seems to shrink in size the minute you point a camera lens at it. What was once a compelling evening moonscape photographs as a bunch of clouds with an overexposed dot of light among them. Don't despair. By making a few adjustments to how you take the shots and applying a little photographic wizardry, you can bring the moon back to its rightful splendor. But to do so you have to overcome a few common obstacles. 3.10.1 Obstacle 1: The Moon Is Brighter Than Everything ElseIf you wait until the sky is completely dark and the moon is high above the horizon, chances are the moon is brighter than everything else in the scene. The trick here is to catch the moon when it's low and to include other bright things in the composition, as shown in Figure 3-15. When the moon is lower, it shines through more atmosphere than when it is high in the sky. The atmosphere serves as a neutral density filter of sorts and reduces the moon's luminosity. Figure 3-15. Moon with Christmas lights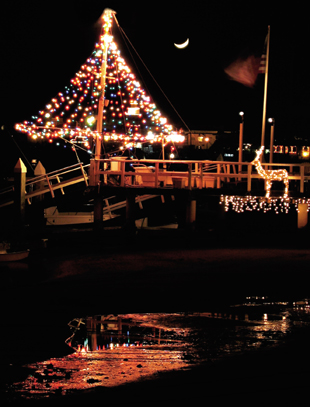 However, if everything else in the frame is dark, then your camera will expose for the dominating dark elements and thereby overexpose the moon, rendering it as a fuzzy dot of light. Look for adjacent elements to lighten up the scene, such as brightly lit buildings (their lights often go on at dusk, before darkness sets in), illuminated clouds from the setting sun, or any other radiant element. You could battle the exposure problem by using your camera's built-in spot meter to determine the exposure (using a healthy dose of exposure compensation, such as -2), but then you just have a properly exposed dot in the sky. Try to find a visually appealing supporting cast and catch the moon when it's close to the horizon. 3.10.2 Obstacle 2: The Shrinking MoonHow could something appear so big to your eyes and so small in the camera lens? When I took Figure 3-16, the moon looked a lot bigger than it turned out in the photo. Most camera lenses at landscape focal lengths (normal to wide angle) exaggerate distances and work against you for this type of shot. So, you have to compensate optically to make things look more natural. Figure 3-16. Minuscule moon If you have a digital SLR, pull out a 200mm or 300mm telephoto lens and compose the scene. You'll see that the moon looks a little more in proportion with the landscape. Telephoto lenses compress visual elements and are helpful for this type of shooting. But don't despair (too much) if you only have a point-and-shoot camera on hand. Just extend the lens to the telephoto position and use your camera's highest resolution (e.g., if it's a 4 megapixel camera, shoot at 4 megapixels). You can crop the photo later on the computer. If you're tempted to use the Digital Zoom function on your camera, resist! It will severely compromise image quality. You're much better off shooting at a high resolution and cropping the picture on the computer. 3.10.3 The CheatIf the previous techniques still don't provide the results you want, consider using the cheat . You'll need a digital SLR with at least a 200mm telephoto lens to cheat properly. First, compose your landscape with the appropriate normal lens and take the shot. Don't worry about the size or the brightness of the moon at this point; just focus on the landscape itself. Now, attach your telephoto lens and expose only for the moon. For a full moon, start with a setting of 1/125 of a second at f-16 and ISO 100, and see how it looks. For a quarter moon, try f-5.6 as your starting point. When you return home to your digital darkroom, combine the images into one shot, as shown in Figure 3-17. I usually use the Magic Wand tool in Photoshop to select the big moon only (leaving the other parts of the image behind), copy it to the clipboard, and then paste it into the landscape shot over the tiny dot of the moon. Carefully clean up the edges of moon so your viewers won't detect any obvious clues from your digital wizardry. Figure 3-17. Moon added to evening landscape using Photoshop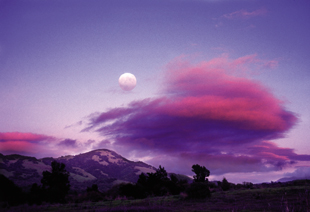 Some photographers rail against this technique, while others love it. It's your picture and your call. My recommendation is that if you use it, don't get too carried away with the size of the moon in the final composition. If you make it too big, your viewers will probably spend more time trying to figure out what's wrong with the shot than appreciating the overall composition. 3.10.4 A Few Camera TipsIf your tripod is available, use it. Otherwise, find a sturdy surface to rest the camera on while making the exposures. Remote releases work great for these shots. In a pinch , self-timers are a good backup for tripping the shutter. Don't bump up your ISO setting. Keep it at 100 so that you don't compromise image quality. You don't need your camera's autofocus system for these shots; in fact, the autofocus system can be fooled. Instead, use the infinity lock to ensure good sharp shots. Also watch out for condensation, especially when you bring the camera back indoors. Keep a Ziploc plastic bag with you. When you're done shooting, put the camera in the bag before bringing it indoors. As the camera warms up to room temperature, the condensation will collect on the bag, not in the camera. To find out when the moon rises and sets in your area, go to the U.S. Naval Observatory web site (http://aa.usno.navy.mil/data/docs/RS_OneDay.html) and enter your location. You'll get the precise rise and set times to help you plan your outing. Manual Exposure mode works best for shots of the moon by itself. At ISO 100, with the aperture set at f-16, use a starting exposure of 1/125 for full moon, 1/30 for first quarter, and 1/15 for thin crescent, and adjust from there. 3.10.5 Final ThoughtsA beautiful twilight landscape with a full moon hanging above the horizon is an attainable shot for anyone . You just have to do a little planning, have the right equipment with you, and employ these techniques. The results can be fantastic! |
| < Day Day Up > |
EAN: 2147483647
Pages: 161