Hack 24 Go Low-Rez
| < Day Day Up > |
Hack 24 Go Low-Rez There's much more to digital photography than megapixel brute force. And if you're artistically minded, you might try your hand at going low-rez, Jam Cam style . As digital photographers, we're often obsessed with getting every last pixel we canthe more megapixels, the better the shot, right? This hack allows you to let go of your pixel-counting tendencies and helps to remind you that photography, analog or digital, is all about capturing compelling images, regardless of the technology used. Traditional photographers have long used cheap or low-tech cameras to capture interesting, artistic images. Perhaps the best example is the US$20 Holga camera that uses 120 film, tape, and a plastic lens and gives images a beautiful, halolike look. Fear not, digital photographers, there are many inexpensive digital equivalents to the Holga that will stretch your creativity. For this hack you need to get the cheapest, lowest -resolution digicam you can find! I highly recommend the Jam Cam. This little plastic beast captures images at an astounding 640 480 or 320 240 pixels and has a focus-free lens. The built-in memory stores eight images and, believe it or not, it can connect to your Mac or PC via USB. The battery is the old standby: the 9-volt that powers up smoke detectors all across the land. Does the Jam Cam create artistic images? Take a look at the picture in Figure 2-15, and you be the judge. Figure 2-15. An artistic Jam Cam image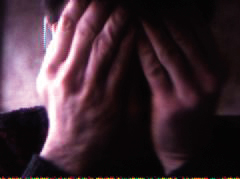 The great thing about the Jam Cam is that it is wholly unpredictable. One fun way to use it is to bring it along with you when you are shooting with your regular digital camera, take pictures with each camera, and compare the results. Expect strange color shifts, horrible color balance, random pixelation, and some interesting results. I used the Jam Cam to take portraits. Embracing the low resolution, I took the images at 320 240 pixels and printed the 150 KB JPEGs at 11 14. You can also experiment with other ultra -low-rez cameras, the cheaper the better, and see the results you get. Toy digital cameras are a great place to start, as are camera phones or anything with a resolution no higher than 640 480. But resolution is not everything! In low-rez mode, your current digital camera might shoot images at only 640 480. However, because of your camera's quality lens, the images won't come out looking quite as funky or interesting as an image from a toy camera. A focus-free plastic lens in combination with low resolution is going to give you the most interesting results. But what if you don't want to plunk down the 20 bucks or so to get a super- low-resolution camera? You can always use Photoshop as a tool to add distortion and noise to your current shots. One way to start is to greatly reduce the resolution of a current image you have and print it to see the results. Convert your image to 20 ppi at 8" 10" (by selecting Image Figure 2-16. An 8"x10" print at 10 ppi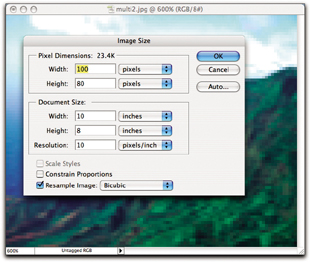 One thing that the low-rez camera does so well is perform tasks in random ways. To duplicate this randomness in Photoshop, you need to select only certain areas of an image. To imitate the effect of the Holga camera I mentioned previously, for example, use the circular select tool and begin a selection from the center of your image, ending about halfway out. Now, go to Select/Feather to feather the selection by 50 pixels and blur the image. To recreate some of the randomness of a low-rez digital camera, you can make some duplicates of the layer, offset them, apply a multiply effect or a screen effect, and see what happens. You can also use layer adjustments to adjust the hue and saturation, change the brightness and contrast, and add some noise. Layer adjustments are a great way to experiment. To use layer adjustments, select a layer, go to Layer Using either low-rez digital cameras or Photoshop as a low-rez randomizing tool can provide you with some incredible results. Keep an open shutter and mind, and let the beauty of the images be your guide. Hadley Stern |
 Image Size) and have a look. Or even try 10 ppi, as shown in Figure 2-16. Suddenly, your pristine image becomes like a Chuck Close painting, which, depending on the image, can be interesting.
 | < Day Day Up > |
EAN: 2147483647
Pages: 161