Hack 23 Multiple Exposures, Digital Style
| < Day Day Up > |
| If you're looking for the multiple-exposures setting on your digicam, forget about it. It probably isn't there, unless you own a Fuji pro SLR camera or one of a handful of other models with this capability. So, what's the creative digital photographer to do? In the film world, multiple exposures are a great way to create interesting, unexpected visual effects. Traditionally, this was done either in-camera by exposing one frame of film many times, or in the darkroom by sandwiching negatives together. Unfortunately, most digital cameras don't support multiple exposures. But that doesn't mean it can't be done. Photoshop, the digital darkroom of choice for many, comes to the rescue. There are a couple ways to approach gathering your source material for Photoshop. You can previsualize the final image you're after, shoot its parts (layers) with your digital camera, and then assemble these layers on the computer. Or, if you just want to experiment, grab a few pictures out of your existing library, mush them together, and see what happens. Suddenly, every digital image in your photo library becomes potential fodder for an interesting photo montage. 2.9.1 Assembling Multiple Images into a MontageFor the first option, we're going to shoot three images, as illustrated in Figure 2-13. Figure 2-13. A photo montage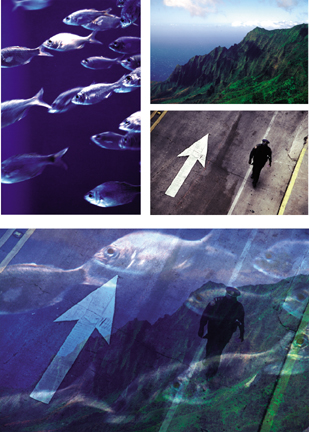 As you shoot, try to imagine each shot layered on top of the next one, resulting in an interesting image. For each shot, we're going to underexpose by a factor of 2. Set your exposure compensation to -2 and take three different shots. You've now captured three underexposed images that, when added together, will create one well-exposed image. Bring these pictures into your computer, start up Photoshop, and open each one in turn . Copy two of the images and paste them into the first. You should now have a single image file with three layers. If you open the Layers palette (Window Figure 2-14. Three images in the Layers palette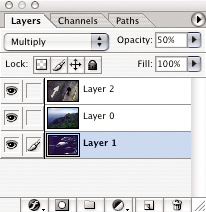
You'll now adjust the blending mode to Multiply. Click on the layer in the Layers palette to indicate that you want to work on it. Then, select Multiply from the drop-down menu (in the Layers palette). In Figure 2-14, Layer 1 is highlighted, with Multiply selected in the upper left. Photoshop's Multiply feature takes each layer and adjusts its density and highlight colors relative to the layer beneath it. This accurately creates the same effect as traditional film-based multiple exposures. Because you compensated for exposure when you recorded the pictures, these three light images should now look like one well-exposed shot, with the random and interesting effects you get from multiple exposures. You can also make minor density adjustments by using the Opacity setting in the upper-right corner of the Layers palette. 2.9.2 Creating Multiple-Exposure-Like EffectsBut what if you don't want to go through the bother of shooting images with exposure compensation? The second option is to use your current pictures to experiment with multiple-exposure-like effects. Open up any number of images and bring them into one Photoshop document. As in the previous example, adjust the layers to Multiply. Now, adjust the opacity of the individual layers until you get an even exposure. Of course, one of the benefits (and frustrations too, because when do you stop fiddling?) of Photoshop is that you can adjust to your heart's delight. If a particular image (layer) is too dominant, adjust its opacity or delete it altogether. 2.9.3 Working in a Truly Digital DarkroomBack in the darkroom days, technicians often employed techniques called burning and dodging . And guess what, Photoshop does too! This means that if you don't like the density of a certain area of your image, you can tweak it with these adjustments. Select the part of the layer you want to emphasize or deemphasize, and use the burn tool to darken it or the dodge tool to lighten it. Even though creating multiple images has its roots in film photography, it's a terrific digital-imaging technique too. Let your visual imagination run wild. Hadley Stern |
 Layers), you'll see your three images in the palette, as shown in Figure 2-14.
| < Day Day Up > |
EAN: 2147483647
Pages: 161